
Chapter 2: Setting Up Your Python Quant Dev Environment
While all roads lead to Rome, some are smoother and faster, and some people even live there. For programmers, the better your development environment, the closer you are to Rome. Therefore, our journey begins here.
1. Choosing an Operating System
At first glance, the operating system (OS) seems unrelated to programming languages, especially for Python, whose programs can run on almost any OS. However, subtle differences warrant consideration. Python is better suited for data analysis, artificial intelligence, and backend development rather than desktop or mobile applications. Since big data analysis, AI, and backend development are often deployed on Linux servers, the associated ecosystems are typically built on Linux (e.g., big data platforms and distributed computing systems). Important libraries, while eventually compatible with multiple OSs, often have different release schedules due to OS-specific differences. Open-source projects and libraries frequently prioritize Linux, with more thorough testing on that platform.
Consider quantitative trading, one of Python’s most critical applications. The talib library is commonly used for technical analysis in this domain. It relies on a C module that must be compiled during installation. Compiling on Windows requires downloading and configuring a suite of Visual C++ build tools, which can be challenging for Python programmers unfamiliar with these concepts. In contrast, on Linux, while compilation is still required, installation and building can be done with a single script.
This applies not only to Python libraries but also to various services we depend on. For instance, while you can install the desktop version of Docker on Windows and run Linux containers, Docker’s resource utilization on Windows is far inferior to that on Linux. Resources are statically allocated when the Docker service starts, regardless of whether containers are running, making them unavailable to other Windows programs. Fundamentally, this difference stems from Windows’ inability to provide container-level resource isolation.
Later in this book, we will cover CI/CD, which relies heavily on container technology. At that point, you will appreciate the convenience of using Linux. For example, we will use containers provided by GitHub Actions for testing, but due to licensing restrictions, the free tier of GitHub CI does not include Windows containers.
If these reasons do not persuade you, consider how experienced developers choose their OS. The following figure is from a 2022 StackOverflow[^stackoverflow] survey:
The numbers to the right of each item indicate the percentage of respondents using that OS. Combining the usage of Linux itself with WSL (Windows Subsystem for Linux, a Linux variant), professional users’ share reaches 54.23%, exceeding those using Windows as their development platform (48.82%). Linux is now the top-ranked OS.
For these reasons, we recommend Linux as the OS for your Python development projects. Unless otherwise specified, the tools, examples, and libraries mentioned in this book default to Linux as the runtime environment and have been tested on Linux.
However, you may not appreciate this advice, as your computer likely runs MacOS or Windows.
The good news is that MacOS and Linux are both "Unix-like" operating systems with high similarity. If you use MacOS, you do not need to install Linux separately. If you use Windows, we provide three solutions below to run a virtual Linux environment for development.
2. Linux Environment on Windows
There are three ways to build a Linux virtual environment on Windows. One is the native Windows solution: Windows Subsystem for Linux (WSL). The other two are Docker and virtual machine solutions.
2.1. WSL Solution
WSL is a new feature in Windows 10. It runs a GNU/Linux environment on top of Windows. In this environment, most Linux command-line tools and services can run without setting up a dual-boot system or incurring the overhead of a virtual machine.
Two versions are currently available: v1 and v2. The author recommends v1. WSL v2 behaves more like a true virtual machine, resulting in poorer integration with Windows.
2.1.1. Installing WSL
If your Windows 10 is version 2004 or higher, or if you use Windows 11, installation requires only one command:
wsl --install --set-defalut-version=1This installs WSL v1 on your machine. For slightly older systems, follow these steps:
- First, enable the "Windows Subsystem for Linux" feature:

- After configuration, restart your computer.
- Search for and install a Linux distribution from the Microsoft Store. In this example, we use Ubuntu:

Now, typing "Ubuntu" in the search bar opens the Ubuntu shell. Since it is the first run, you will be prompted to enter a username and password. WSL is now installed. You can subsequently launch it by typing wsl in the search box.
2.1.2. Customizing WSL
Using WSL v1 offers a unique experience. It resembles a virtual machine but lacks certain features, such as the concept of background services[^wsl]. You can install services like Redis cache or databases, but these background services do not start automatically with WSL; you must start them manually. However, you can customize WSL to make its experience closer to that of a virtual machine.
Our customization will achieve two functions: first, allowing the WSL virtual machine to start automatically with Windows; second, enabling an SSH service to run automatically when WSL starts, allowing you to connect to it at any time. After mastering this customization, readers can also configure WSL to start additional background services automatically.
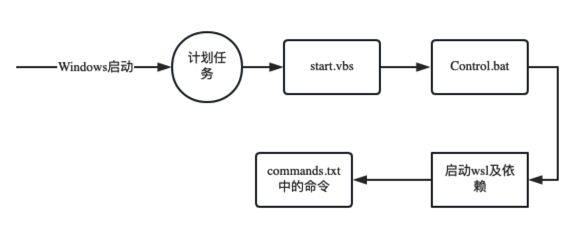
We need to write three scripts: start.vbs, control.bat, and commands.txt, and add a scheduled task for automatic startup. When Windows starts, this task executes start.vbs, which calls control.bat. control.bat then starts WSL (and its dependent Windows services) and executes commands defined in commands.txt within the WSL environment—such as starting the SSH server. The entire process is illustrated below:
First, define the background services to run in WSL in the commands.txt file:
/etc/init.d/cron
/etc/init.d/sshNext, write a batch script to start WSL and execute the above commands:
REM control.bat
REM 脚本来源于 https://github.com/troytse/wsl-autostart/
@echo off
REM Goto the detect section.
goto lxssDetect
:lxssRestart
REM ReStart the LxssManager service
net stop LxssManager
:lxssStart
REM Start the LxssManager service
net start LxssManager
:lxssDetect
REM Detect the LxssManager service status
for /f "skip=3 tokens=4" %%i in ('sc query LxssManager') do set "state=%%i" &goto lxssStatus
:lxssStatus
REM If the LxssManager service is stopped, start it.
if /i "%state%"=="STOPPED" (goto lxssStart)
REM If the LxssManager service is starting, wait for it to finish start.
if /i "%state%"=="STARTING" (goto lxssDetect)
REM If the LxssManager service is running, start the linux service.
if /i "%state%"=="RUNNING" (goto next)
REM If the LxssManager service is stopping, nothing to do.
if /i "%state%"=="STOPPING" (goto end)
:next
REM Check the LxssManager service is started correctly.
wsl echo OK >nul 2>nul
if not %errorlevel% == 0 (goto lxssRestart)
REM Start services in the WSL
REM Define the service commands in commands.txt.
for /f %%i in (%~dp0commands.txt) do (wsl sudo %%i %*)
:endThen, write a start.vbs script to execute control.bat:
' start.vbs
' 脚本来源于 https://github.com/troytse/wsl-autostart/
' Start services
Set UAC = CreateObject("Shell.Application")
command = "/c """ + CreateObject("Scripting.FileSystemObject").
GetParentFolderName(WScript.ScriptFullName) + "\control.bat"" start"
UAC.ShellExecute "C:\Windows\System32\cmd.exe", command, "", "runas", 0
Set UAC = NothingFinally, add a new startup task to the Task Scheduler:


Note that Ubuntu installed via the Microsoft Store should already have ssh-server installed. The steps above merely configure it to start with WSL. If you find that ssh-server is not installed in your WSL, you can install it manually. After all, it is a Linux server, and you can install most Linux software on it.
By applying this solution, you will have two operating systems running simultaneously on Windows. Notably, when not in use, WSL consumes minimal CPU and memory resources (limited to WSL 1.0), a benefit unmatched by other virtualization solutions.
At the time of writing, WSL 2.0 has a preview version supporting graphical interfaces, called wslg. This version will eventually merge into WSL and be released with Windows. The following image shows a rendering of the wslg graphical interface:

Although this is unrelated to the main theme of this book, it provides another reason to use Linux. Even Microsoft is taking Linux seriously[^Linux]; are you still using Windows for development?
2.2. Docker Solution
WSL appeared later than Docker. If you purchased your machine earlier, your Windows may not support WSL but can install Docker. In this case, you can try installing the desktop version of Docker and run a Linux virtual machine via Docker.
Download Docker from its official website[^docker]. After installation, you must manually start it for the first run. Search for "Docker" in the search box and select "Docker Desktop" to start it, as shown below:

When Docker starts, a notification icon appears in the system tray:

The third icon, a whale, indicates that Docker is running. Clicking it opens the management interface. Initial setup requires configuration; refer to the official documentation.
Running Docker on Windows involves enabling the Hyper-V virtual machine due to OS heterogeneity, then installing Docker within that VM. This is why system resources are statically allocated when Docker runs on Windows, regardless of whether containers are active. However, since approximately March 2020, Docker has supported desktop versions based on WSL2. Docker Desktop based on WSL2 starts faster and allocates resources only when needed, making resource scheduling more flexible and efficient.
2.3. Virtual Machine Solution
Your machine may not support WSL or Docker. In this case, you can run Linux by installing a virtual machine like VirtualBox[^virtualbox]. This technology is well-known, so we will not elaborate further.
2.4. Summary
We have introduced three solutions for building a Linux development environment on Windows. Whenever possible, you should install WSL first. WSL runs on almost all Windows 10 and later distributions, including Windows 10 Home.
If your machine does not support WSL, consider installing Docker. Even if your machine supports WSL, installing Docker is advisable for practicing CI/CD to experience containerized building and deployment. This requires a more powerful CPU and memory.
For older machines that cannot be upgraded to newer Windows versions, consider using a virtual machine, such as the free version of VirtualBox.
3. Integrated Development Environment (IDE)
As a scripting language, Python runs without compilation, so almost any text editor can serve as a Python development tool. However, for serious development, achieving the best balance between development progress and quality requires a more professional tool.
An Integrated Development Environment (IDE) improves development efficiency by providing code hints, detecting syntax errors early, and allowing debugging directly within the editor.
PyCharm and VS Code are the two preferred tools for Python application development. For developers in data analysis and AI, Jupyter Lab (an upgraded Notebook) and Anaconda’s Spyder are also options.
3.1. VS Code vs PyCharm: Which IDE to Use?
PyCharm is an established IDE for Python development, while Visual Studio Code (VS Code) is a rising star in recent years. VS Code is completely free, whereas PyCharm offers Community and Professional editions. The Professional edition has more powerful features but requires payment. The following table summarizes the key differences:
| Feature | PyCharm | VS Code | Description |
|---|---|---|---|
| Remote Development | Professional Edition Only | Supported | In Professional PyCharm, files are edited locally and synced to the remote machine for debugging before execution; VS Code edits and debugs directly on the remote machine via file sharing protocols |
| Three-Way Merge | Supported | Supported | VS Code has provided a three-way merge editor since July 2022. This is a convenient way to resolve conflicts in code |
| Data View | Supported | Not Supported | PyCharm allows viewing database and DataFrame data in a GUI; VS Code requires plugins, which are weaker, but data can be viewed and managed via third-party tools |
| Startup Speed | Slow | Very Fast | VS Code’s startup speed is excellent, making it suitable not only for development but also for document writing, journaling, and other scenarios requiring quick opening. |
| Multi-Language Support | Python-centric | Supports Multiple Languages | VS Code supports development in many languages, making it particularly suitable for professional developers |
There are minor differences, such as VS Code implementing many features via plugins, each with its own log output window. If a feature does not work in VS Code, it may be caused by a plugin. This error might silently output in the plugin’s log window rather than in familiar interface windows, which can confuse beginners. In PyCharm, the arrangement of these windows and hint interfaces seems more intuitive.
In summary, PyCharm is an out-of-the-box IDE, while VS Code requires installing a series of plugins before formal development, which may take time to compare, configure, and learn. However, if you plan to engage in development long-term, investing time in VS Code is worthwhile. VS Code is a free product, and its license allows you to use it for any commercial development. Thus, whether you are an individual developer or employed by an organization, you can use it.
Since we prefer VS Code and PyCharm is easy to use with little need for instruction, we will skip the introduction of PyCharm and focus on configuring the VS Code development environment.
3.2. VS Code and Extensions
VS Code is a multi-language editing and development platform that provides basic functions such as a text editor, code management (Git), and extension management. Development for specific languages is achieved by loading the corresponding language extensions. Therefore, after installing VS Code, you must configure a series of extensions.
After installing VS Code, a toolbar appears on the sidebar as shown below:

The icon circled corresponds to extension management. The upper rectangular box can be used to search for an extension. After finding the corresponding extension and clicking it, you can see its detailed information in the right window, as shown below:

This detailed information page provides an installation button.
VS Code’s extension management offers filtering, sorting, and other functions beyond search, which readers can explore. If you use VS Code in multiple development environments, you may want these extensions to work across different environments. To address this, VS Code provides an extension synchronization mechanism. On the extension detail page, to the right of the "Uninstall" button, there is a synchronization icon. Clicking it automatically synchronizes the extension to other environments.
Below, we discuss some of the most common and important VS Code extensions. Armed with these extensions, your development efficiency will significantly improve.
3.2.1. Python Extension
To develop Python applications in VS Code, you must install the Python extension, as shown in the previous figure.
The Python extension is developed by Microsoft and has over 100 million downloads. It provides IntelliSense, code syntax checking, debugging, navigation, formatting, refactoring, and unit testing features. Additionally, it offers a Jupyter Notebook integrated environment.
Along with the Python extension, extensions such as Pylance, Python Test Explorer for Visual Studio Code, and Jupyter are installed.
Pylance is a Language Server developed by Microsoft based on its acquisition of the Pyright static analysis tool. It provides syntax highlighting, code auto-completion, syntax checking, and parameter suggestions.
Although Pylance provides these features, we often treat Pylance as a Language Server. Functions such as syntax checking, code hints, and auto-completion should be handled by more specialized extensions (or third-party services). In this context, Pylance serves as an extension platform for these functions.
Test Explorer’s main role is to discover and collect unit test cases defined in the project, build a TestSuite, provide a test execution entry, and report test results after completion.
Jupyter is an extension that allows you to read and develop notebooks in VS Code. Compared to a separately installed Jupyter notebook, it provides more powerful code hints, variable viewing, and data viewing. Additionally, debugging notebooks has traditionally been cumbersome. However, in VS Code, you can run and debug notebooks line by line, just like debugging Python code.
After installing the Python extension, you can begin Python development. Before development, you need to select a Python interpreter for the project. This can be done by entering Python: Select Interpreter in the command palette or clicking the selection icon in the status bar, as shown below:

3.2.2. Remote - SSH
This is a highly useful extension, one of Microsoft’s official offerings. It allows you to directly open folders on a remote machine in VS Code, edit, and debug them. If you have used IDEs like PyCharm, you know that although they support remote development, they create files locally and sync them to the remote machine before debugging. Frequent syncing reduces efficiency and often leads to inconsistencies due to failed syncs, wasting time troubleshooting. This is a key advantage of VS Code over PyCharm.

After installing this extension, a remote connection icon appears on the sidebar. If currently connected to a remote machine, the status bar’s leftmost side displays summary information about that connection.
Next, we need to install version control-related extensions.
Although VS Code provides Git integration, many features are not available via GUI, requiring us to memorize Git commands. Additionally, some features are missing from Git, such as:
- Editing commit messages in a GUI according to specified format standards during code submission.
- Managing
.gitignorefiles. - Managing local history.
To implement these features, we need to install further extensions, starting with GitLens.
3.2.3. GitLens
GitLens is powerful and commonly used in team development. Its features include:
- Quick navigation through file modification history.
- Displaying blame information on code lines, as shown below:

- Gutter changes, as shown below:

Gutter changes refer to the lines on the right side of the line numbers in the editor area, indicating changes in the current region. Clicking this line pops up a window showing the change history of the current region, allowing you to rollback or commit changes. This function is essentially Git’s interactive staging feature, which is less user-friendly in the command line.
If you did not plan well before editing a file and introduced modifications belonging to multiple commits, gutter change is the best remedy. It allows you to submit changes block by block, rather than by file. Thus, you can submit different blocks in a file in several commits.- GitLens provides a rich toolbar in the sidebar, as shown below:
With these toolbars, you no longer need to memorize many Git commands, and the results of these commands are displayed visually, which is more efficient than the console interface. These toolbars provide views for commits, repositories, branches, file history, and tags.
In short, GitLens graphically displays and reconstructs almost all Git functions, providing a rich operation interface that makes it easier to operate Git and understand code changes.
3.2.4. Extensions for Editing Commit Messages
Programmers who frequently use PyCharm will not forget its Git commit dialog. Regrettably, VS Code and its extensions have not yet addressed this shortcoming. However, there are some niche but useful extensions that can help us edit commit messages in a GUI and manage them in a standardized manner.
Here we recommend an extension named git-commit-plugin:
This extension categorizes commit messages and adds emoji icons to each category, allowing us to identify categories more quickly:
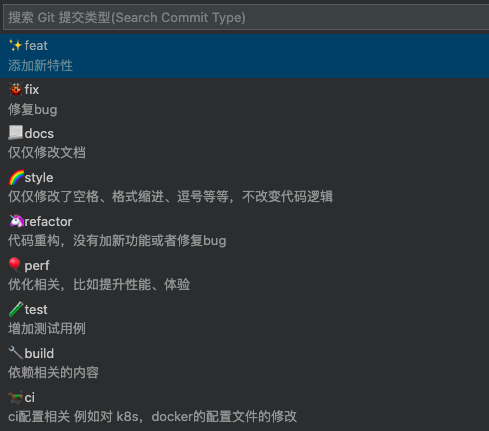
Correctly categorizing code is a crucial task. If we correctly categorize every code submission, we can automatically generate release notes for new versions based on these historical submission messages. The generated release notes may require slight modification but will absolutely avoid omitting important changes.
Obviously, not all submission messages should appear in release notes. Especially submissions related to code style, documentation revisions, adding test cases, and build processes are often not of interest to end users and should not be included in release notes. If we correctly categorize every submission, tools for automatically generating release notes can extract only valid information according to our specified categories.
Later, we will mention tools for automatically generating Release Notes. We use tools to ensure the standardization of Commit Message formats, and Release Notes tools extract and analyze this information. The entire software development process works precisely like an assembly line.
This is the main theme of this book: Software development processes should not be abstract concepts but software production assembly lines enforced through a series of tools. Once the assembly line is calibrated, the produced products can pass 6 Sigma quality certification[^6-sigma].
3.2.5. Gitignore Extension
Code repositories should only retain useful files. However, during development, the workspace inevitably generates temporary files, junk files, and file types unsuitable for code repository storage, such as logs generated during debugging or binary files produced after compilation. If these temporary files are repeatedly uploaded, they waste repository storage space and reduce performance. To prevent these files from being committed to the code repository, we can create a .gitignore file in the code repository, containing the relative paths or matching pattern strings of these files. Consequently, Git automatically filters out these files when committing code.
The format of the .gitignore file is very simple, with each line representing a file’s relative path. Therefore, we can manually edit this file. However, the Gitignore extension provides more features:
- Generating
.gitignorefiles from templates. A.gitignorefile may have dozens of lines, with many parts common across different projects that do not need to be memorized. - Conveniently selecting files from the workspace and automatically adding them to the
.gitignorefile. This avoids path errors and is faster than manual editing.
3.2.6. Local File History
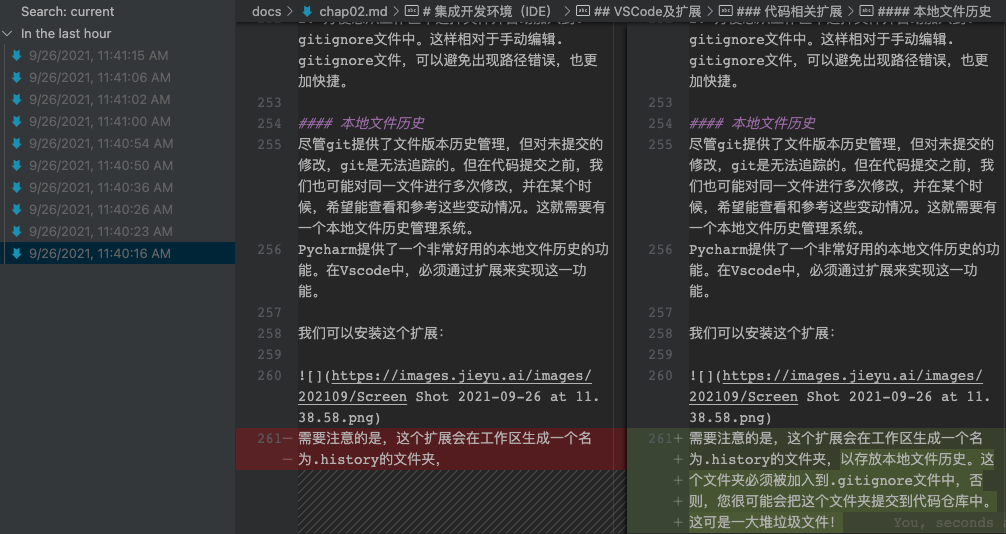
Although Git provides file version history management, it cannot track uncommitted modifications. However, before committing code, we may modify the same file multiple times and wish to view and reference these changes at some point. This requires a local file history management system.
PyCharm provides a very useful local file history feature. In VS Code, this function must be implemented through extensions.
Readers can install this extension:
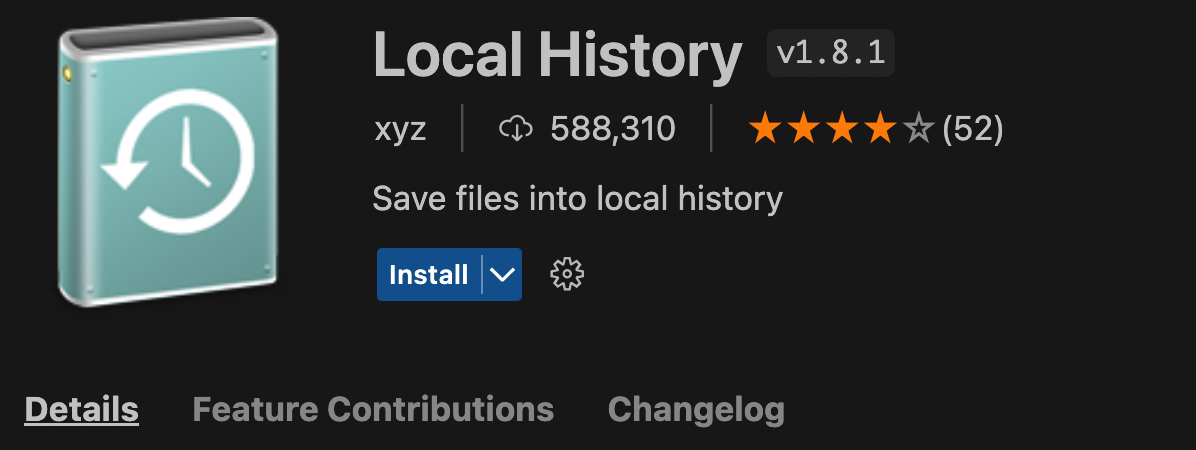
Note that this extension generates a folder named .history in the workspace to store local file history. This folder must be added to the .gitignore file; otherwise, you may commit this folder to the code repository, which is a lot of junk!
The following figure shows how this extension tracks code changes:
3.2.7. Code Assistance and Auto-Completion
Code assistance and auto-completion are the most important reasons for using an IDE instead of a text editor. According to statistics from Kite[^kite], using Kite for assisted programming can save up to 47% of code typing, making code writing easier and faster.
Of course, you may not agree that typing speed dictates programming efficiency. After all, we spend a lot of time thinking about how to implement algorithms and functions, recalling how to call certain library functions, and naming our own variables and constants. Surprisingly, with the enhancement of AI capabilities, a large part of this work can now be done by code assistance and auto-completion tools.
Info
A female programmer once worked at my company. She wore exquisite makeup, and her long nails were engraved with beautiful, shimmering patterns. When typing, the patterns on her nails danced like butterflies. I knew how unpleasant the sound of nails scraping against keyboard caps was, so I always kept my nails trimmed to avoid interference during typing, which made me worry about the impact of long nails on typing speed. However, after interacting with her for a while, I found that her work efficiency was not low at all—even if her typing speed might still be affected by her long nails.Although Kite’s data suggests they saved programmers 47% of typing time, the example above shows that the resulting efficiency improvement may not be as significant as Kite imagined. We will have the opportunity to review Kite’s story later: if the direction of effort is wrong, diligence is futile.
The lowest level might be what ordinary text editors achieve: suggestions at the word level. If you have ever typed a word or a sentence, the next time you type the beginning of that word or sentence, the IDE will automatically suggest it. If you frequently use Excel, you will easily understand what kind of assistance this is. However, such suggestions are far from precise; often, they cannot provide the input we truly want.
For program development, since syntax rules can be leveraged, these suggestions can be more precise. For example, if you define a class, the next time you type the name of that class (or an instance variable of the class) and enter a prompt symbol (possibly ".", or "->", depending on the programming language), the IDE can suggest all methods or attributes of the class for selection. Additionally, if you import a namespace, the IDE can suggest all variables, functions, and classes in that space based on the same logic. These are strictly dependent on syntax, so IDE code hints can be excellent for static languages. For dynamic languages like Python, accurately hinting member variables without type annotations is somewhat difficult.
Now, with the加持 of artificial intelligence, code assistance has evolved to an astonishing degree. In fact, this book was completed with the help of Github Copilot[^Github Copilot]. Let’s look at this example:

Based on previous inputs, Copilot automatically generates a grammatically correct sentence (displayed in gray in the figure above), which is quite harmonious with the context. I do not intend to use the words it suggests here (mainly because I worry readers may not want to read a machine-written book), but I must admit that unless writing poetry, we do not need to agonize over every word as ancients did. Articles do not need to be meticulously crafted in every sentence; sometimes, it is perfectly fine to use Copilot’s suggested phrases for transitions. More often, when writing articles, Copilot can help open up ideas, which is undoubtedly beneficial.
The above is just one example of AI in general text-assisted writing. When we restrict the domain to programming, the results are even more astonishing. Often, if you write a comment, Copilot can help you complete the code to implement the function described in that comment. Especially when the function we want to implement is already realized in a certain library function or exists as a famous algorithm, you will find this feature very useful.
There are many other extensions for VS Code. For example, if our project uses files like JSON or YAML, or uses Markdown/RST to write documents, there are good tools for assistance and feature enhancement when editing these files. For instance, Markdown’s support for tables is poor, and manually editing Markdown tables is tedious. We can use some extensions to convert CSV block content within documents into Markdown tables.
Besides extensions, VS Code has other customization options, such as themes. If you work in front of a computer for long periods, we recommend installing so-called "night mode" themes. Among these themes, Dracula PyCharm Theme is quite interesting. The theme’s name comes from Count Dracula, a character from Bram Stoker’s同名 novel—a bloodthirsty vampire who targets young women. The novel was adapted into movies multiple times. Considering that vampires only come out at night, using this name for a dark mode theme is apt.

Due to space limitations, we cannot introduce all these extensions. Besides those with extremely high download counts, this chapter also introduces some niche extensions. These niche extensions may disappear in the future (e.g., if VS Code directly implements their functions) or be replaced. What is important is that the functions they implement significantly improve production efficiency. These methods and functions are what we should be familiar with.
4. Other Development Environments
4.1. Jupyter Notebook
PyCharm and VS Code are large development tools suitable for developing large, complex applications. However, in the Python domain, there is a class of problems better suited for exploratory programming, such as data analysis tasks. We obtain some data, view their characteristics through statistical methods, perform some visual analysis, preprocess the data, and then write some machine learning algorithms. If the results are unsatisfactory, we start over and explore new algorithms.
This method is called exploratory programming: exploratory work重于 following design patterns, with code interspersed with extensive explanatory documents and output results (including charts and images), which are part of the final result, unlike traditional programming where code, documents, and output results are separate.
Jupyter Notebook is a powerful tool for exploratory programming. It provides a web-based editor and runtime environment where user inputs are organized into cells; each cell can be a code cell or a text cell. Code cells also allow for output results, which can be text, charts, or images, as shown below:
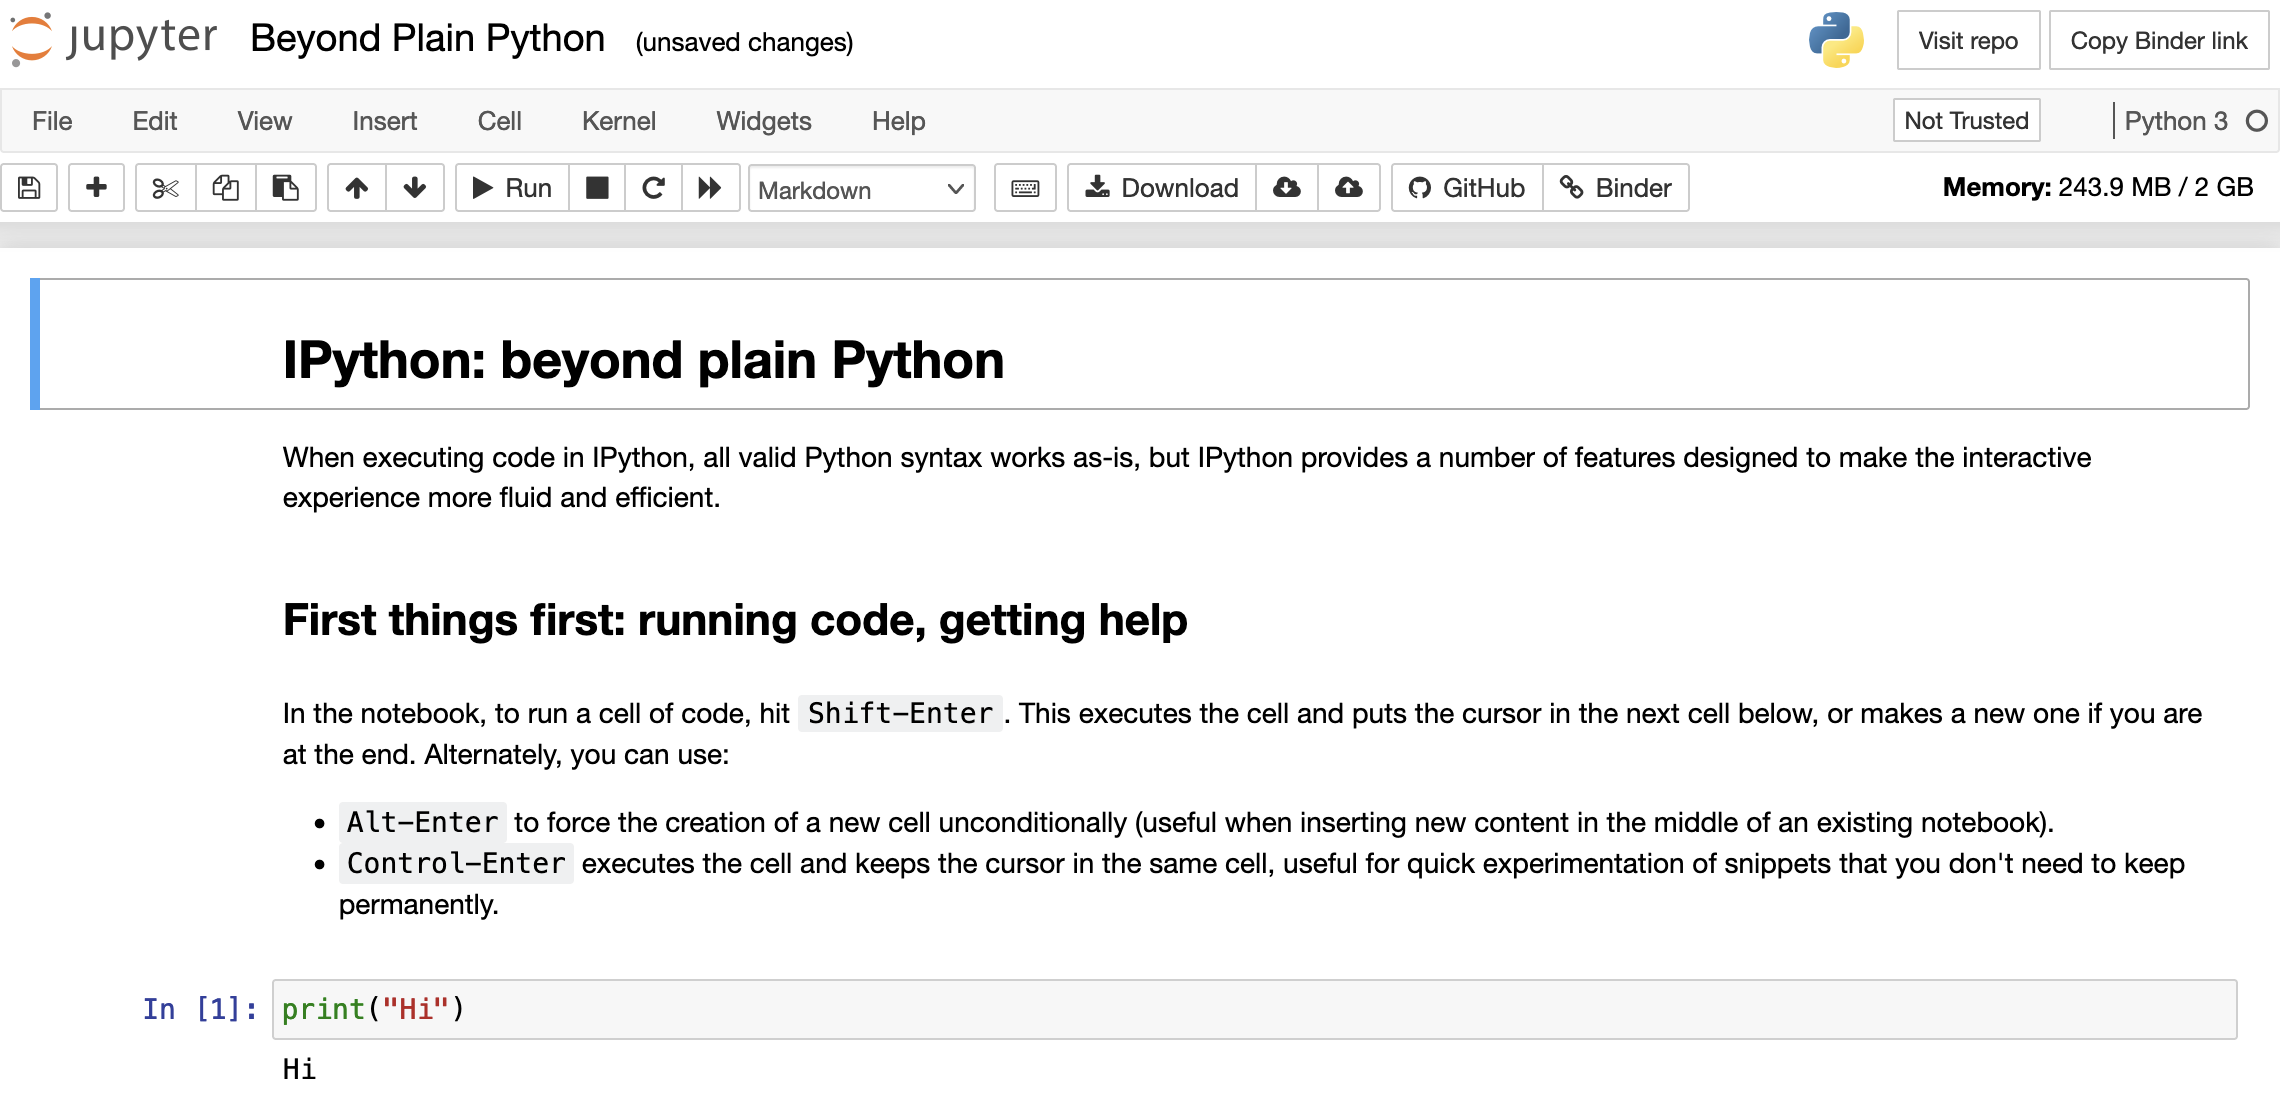
A running Notebook can be seen as a process, where variables and functions defined in the code cells of this Notebook have global scope, and each code cell can be executed individually. This mode has its extremely convenient aspects; you can run code in the Notebook at any time and switch between different code cells—whether exploring data characteristics or exploring the functionality of a new library becomes very easy.
Currently, the developers of Jupyter Notebook are promoting Jupyter Lab to replace Jupyter Notebook. However, due to the integration of Jupyter Notebook in VS Code and PyCharm, Notebook will exist for a considerable time.
4.2. Spyder
Spyder[^spyder] is an open-source programming environment designed specifically for scientists, data analysts, and engineers. It combines the advanced editing, analysis, debugging, and profiling functions of an IDE with the unique combination of data exploration, interactive execution, deep inspection, and beautiful visualization functions of scientific libraries. We can easily see this from its interface:
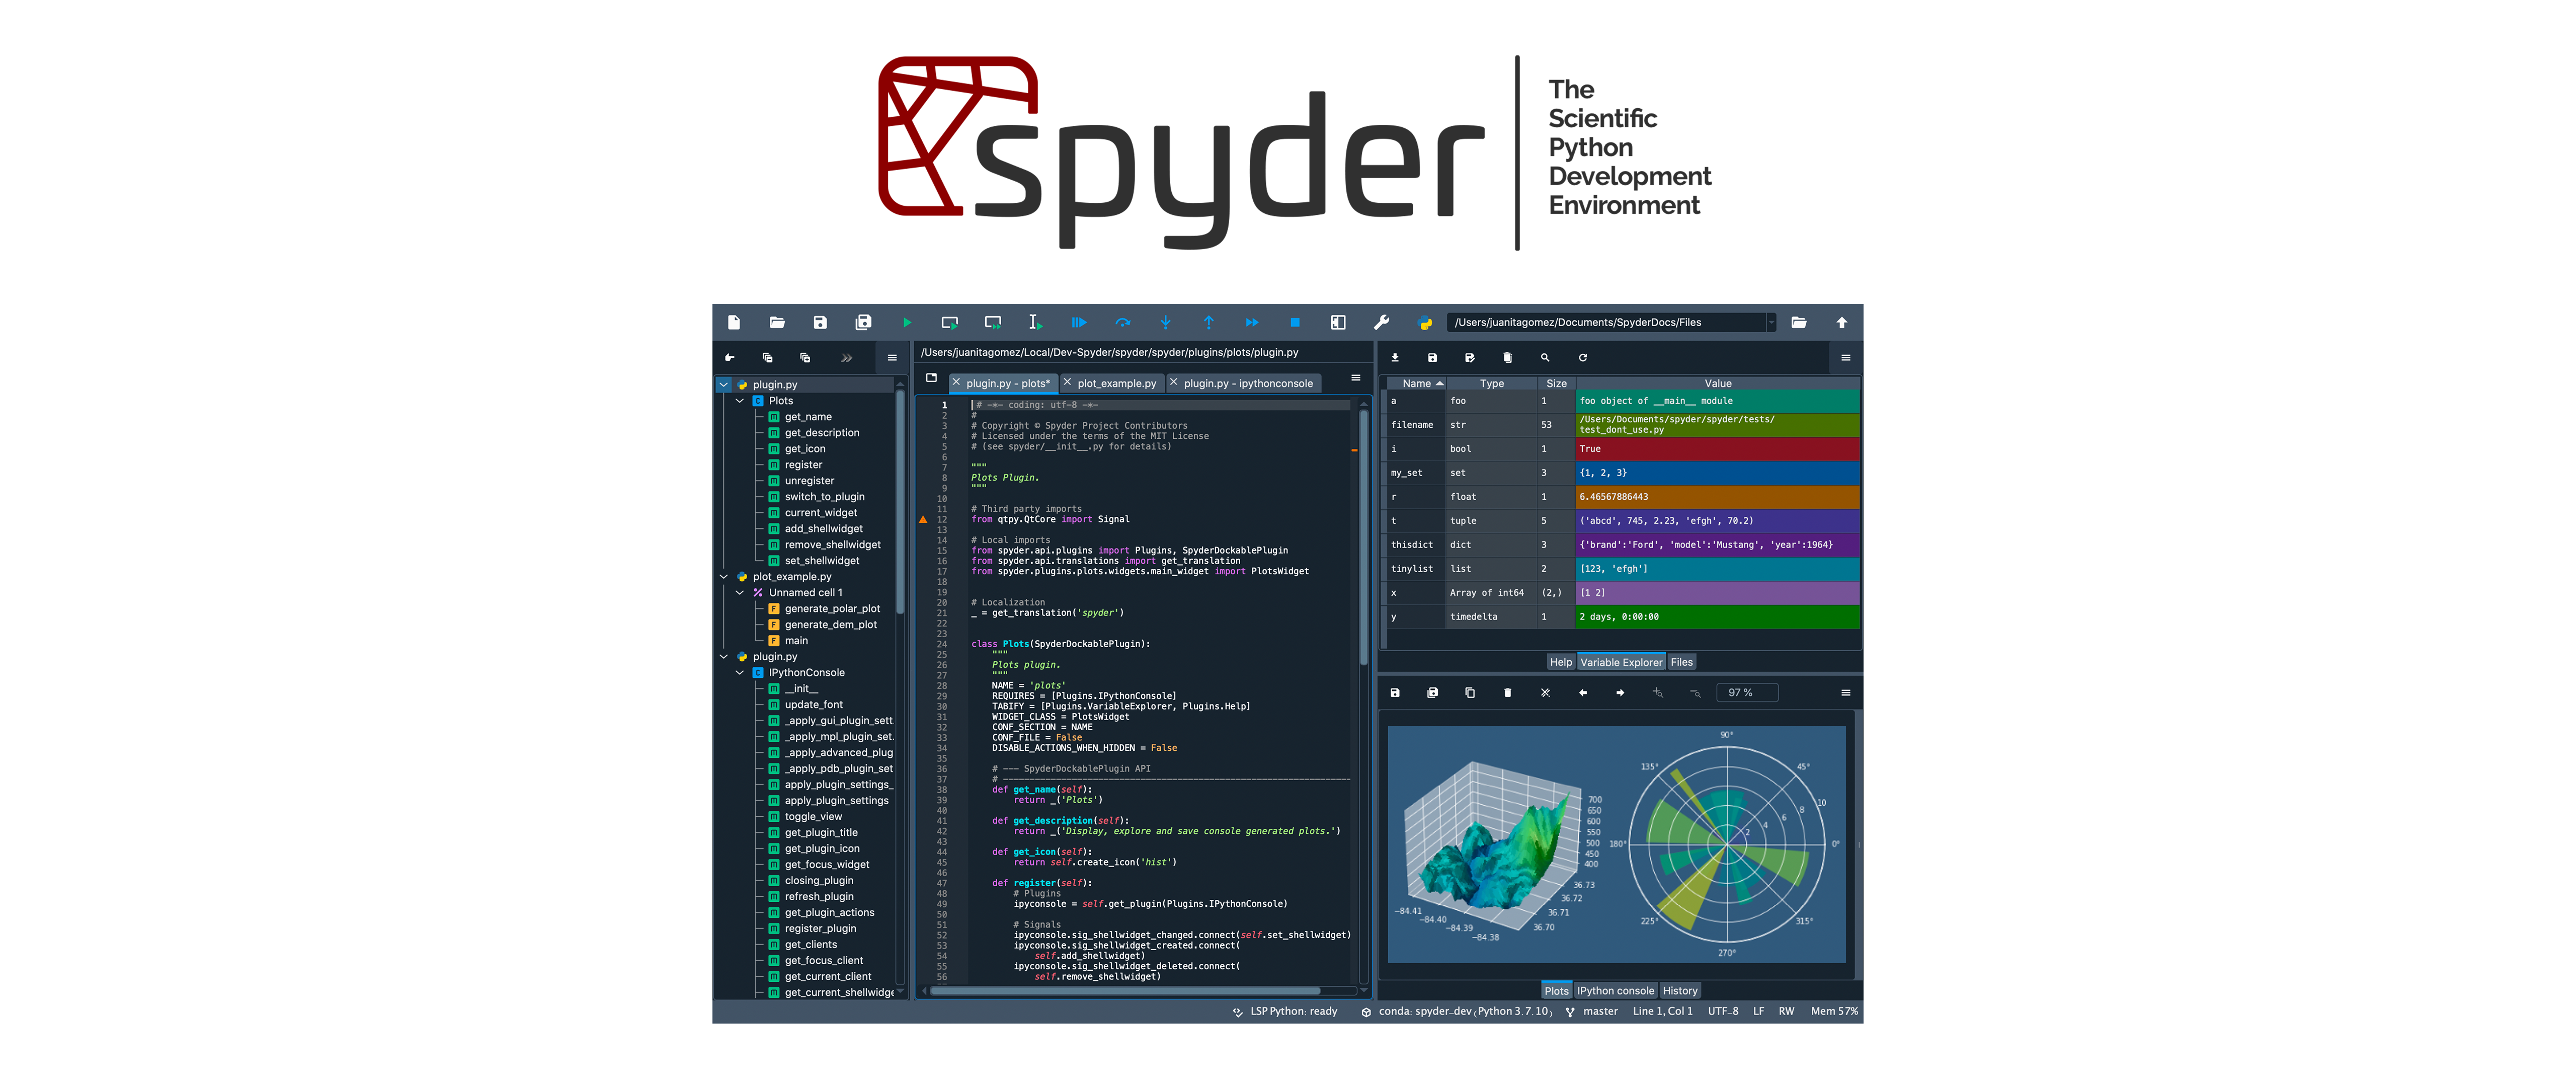
Spyder is included in the Anaconda distribution, so once Anaconda is installed, you can directly use Spyder to write Python code. Its official website also provides standalone installation packages for download.
We have mainly introduced three types of Python development environments: PyCharm/VS Code for large-scale engineering development, Jupyter Notebook for exploratory programming, and Spyder, which integrates features of both. Of course, in PyCharm/VS Code, we can also open and run Jupyter Notebook; this feature has been integrated into these two IDEs for some time.
If our frequent development work involves building highly reusable component libraries or complex applications, PyCharm/VS Code is undoubtedly the best choice. These two tools integrate almost perfectly with tools responsible for testing, continuous integration, code management, and document building. Conversely, if your work is more exploratory, it seems that using only Jupyter Notebook is sufficient. Spyder provides an option for users who need to balance both needs.
[^stackoverflow]: stackoverflow.com is the world’s most well-known technical sharing community. Programmers often use this community to ask others about technical problems they encounter. [^Linux]: There is a saying that MacOS is the best Linux, Windows is also the best Linux, and only Linux does a bad job of Linux. [^wsl]: As of the time of this book’s drafting, this concept may have changed. Ubuntu 20 and later versions installed under WSL may already have the concept of services; please verify this yourself. [^docker]: Docker’s official website is: https://desktop.docker.com/ [^virtualbox]: VirtualBox is currently the most popular desktop-level virtual machine. Its use is completely free. Website address: https://www.virtualbox.org/ [^6-sigma]: In statistics, 6 sigma means a confidence level of 99.99966%. In quality inspection scenarios, it indicates that products have reached a very high quality standard. Starting from the 1970s, Motorola discovered a positive correlation between improving quality and reducing production costs, thus developing a complete set of methods to improve industrial processes and eliminate defects. In 1986, Motorola officially named it 6-sigma. It emphasizes continuous improvement, stable and predictable improvement of process results; production and business processes can be improved through measurement, analysis, improvement, and control, etc. With the decline of Motorola’s influence, the influence of 6-sigma has also gradually declined, but its core viewpoints and methods, such as continuous improvement, are still widely recognized and disseminated. [^kite]: https://www.kite.com/ [^Github Copilot]: https://www.copilot.ai/ [^spyder]: https://www.spyder-ide.org/