
Chapter 7: Python Unit Testing with Pytest and Mock
quote
Testing leads to failure. Failure leads to understanding.Here, we primarily compare pytest and unittest. In most cases, choosing one of these two is sufficient. Unittest organizes test cases based on classes, while pytest is functional, organizing test cases based on modules, and also provides the concept of groups to organize test cases. Pytest's mocking is based on the third-party pytest-mock, which is essentially a simple wrapper around the standard library's mock. Both frameworks have concepts of setup and teardown; unittest directly uses setUp and tearDown as the entry and exit APIs for tests. In pytest, this is implemented via fixtures, which may have a slightly steeper learning curve. Regarding assertions, pytest uses Python's assert keyword, which is more concise than unittest, although it offers fewer assertion types.
Another notable difference is that unittest has inherently supported asyncio since Python 3.8, whereas pytest requires the pytest-asyncio plugin. However, there is no significant difference in testing compatibility between the two.
The main advantages of pytest are:
- Pytest test cases are more concise. Since test cases are not production code, developers naturally want to spend less time on them, making code conciseness important.
- It provides a command-line tool. If we only use unittest, we must execute unit tests using
python -m unittest; with pytest, we simply callpytest .. - Pytest provides markers, allowing us to more easily decide which cases to execute or skip.
- Pytest provides parameterized testing.
Here, we briefly illustrate what parameterized testing is, to help readers understand why it is a noteworthy advantage.
# 示例 7 - 1
import pytest
from datetime import datetime
from src.example import get_time_of_day
@pytest.mark.parametrize(
"datetime_obj, expect",
[
(datetime(2016, 5, 20, 0, 0, 0), "Night"),
(datetime(2016, 5, 20, 1, 10, 0), "Night"),
(datetime(2016, 5, 20, 6, 10, 0), "Morning"),
(datetime(2016, 5, 20, 12, 0, 0), "Afternoon"),
(datetime(2016, 5, 20, 14, 10, 0), "Afternoon"),
(datetime(2016, 5, 20, 18, 0, 0), "Evening"),
(datetime(2016, 5, 20, 19, 10, 0), "Evening"),
],
)
def test_get_time_of_day(datetime_obj, expect, mocker):
mock_now = mocker.patch("src.example.datetime")
mock_now.now.return_value = datetime_obj
assert get_time_of_day() == expectIn this example, we want to test the get_time_of_day method with different time parameters. If using unittest, we would need to write a loop to call get_time_of_day() sequentially and compare results. With pytest, we only need to use the parametrize decorator to pass an array of parameters (including expected results) for multiple tests. This not only reduces the amount of code but, more importantly, makes the code clearer.
For the above reasons, the subsequent content will primarily use pytest as an example.
1. Organizing Test Code
We generally categorize all test code in a tests folder at the project root. Each test file name should either use test_*.py or *_test.py. This is a requirement of the testing framework. Only in this way can the testing framework discover test cases from these files when we execute commands like pytest tests and combine them into suites to be executed.
In test_*.py, function names must also follow a certain pattern, such as test_xxx. Test functions that do not follow the rules will not be executed.
Generally, test files should correspond one-to-one with functional module files. If the code under test has multiple folders, the corresponding test code should also be organized in the same directory structure. The purpose is to align business logic with its test code, facilitating the addition of new test cases and refactoring of existing ones.
For example, in the sample project generated by ppw, we have:
sample
├── sample
│ ├── __init__.py
│ ├── app.py
│ └── cli.py
├── tests
│ ├── __init__.py
│ ├── test_app.py
│ └── test_cli.py
Although there is only one level of directory here, the file names in the directory correspond one-to-one. Note the __init__.py file in this directory. If this file is missing, tests will not become a valid package, causing pytest to fail to correctly import test cases.
2. PYTEST
Writing test cases with pytest is simple. Suppose sample\app.py is as follows:
# 示例 7 - 2
def inc(x:int)->int:
return x + 1Then our test_app.py only needs the following code to complete the test:
# 示例 7 - 3
import pytest
from sample.app import inc
def test_inc():
assert inc(3) == 4This is much more concise than code under unittest.
2.1. Assembling Test Cases
In pytest, pytest searches for test cases in the passed files (or folders) and assembles them into test suites. Additionally, it can use pytest.mark to mark which test cases need to be executed and which need to be skipped.
# 示例 7 - 4
import pytest
@pytest.mark.webtest
def test_send_http():
pass # perform some webtest test for your app
def test_something_quick():
pass
def test_another():
pass
class TestClass:
def test_method(self):
passWe can then choose to execute only the test cases marked as webtest:
$ pytest -v -m webtest
=========================== test session starts ============================
platform linux -- Python 3.x.y, pytest-7.x.y, pluggy-1.x.y -- $PYTHON_PREFIX/bin/python
cachedir: .pytest_cache
rootdir: /home/sweet/project
collecting ... collected 4 items / 3 deselected / 1 selected
test_server.py::test_send_http PASSED [100%]
===================== 1 passed, 3 deselected in 0.12s ======================From the output, it is evident that only test_send_http was executed.
Here, webtest is a custom marker. We can also use pytest's built-in markers to filter cases:
pytest.mark.filterwarnings: Add afilterwarningsmarker to test cases to ignore warning messages.pytest.mark.skip: Add askipmarker to test cases to skip them.pytest.mark.skipif: Add askipifmarker to test cases to skip them based on conditions.pytest.mark.xfail: Use this marker when a case should fail under certain conditions (e.g., running on a specific OS), so it is marked in the test report.
These markers can be viewed using the pytest --markers command.
2.2. Pytest Assertions
During testing, after calling a method, we need to compare its return value with the expected result to determine if the test passes. This is called a test assertion.
Pytest's assertions cleverly intercept and reuse Python's built-in assert function. Since you have likely encountered assert before, the learning cost for this part is very low.
# 示例 7 - 5
def test_assertion():
# 判断基本变量相等
assert "loud noises".upper() == "LOUD NOISES"
# 判断列表相等
assert [1, 2, 3] == list((1, 2, 3))
# 判断集合相等
assert set([1, 2, 3]) == {1, 3, 2}
# 判断字典相等
assert dict({
"one": 1,
"two": 2
}) == {
"one": 1,
"two": 2
}
# 判断浮点数相等
# 缺省地, ORIGIN ± 1E-06
assert 2.2 == pytest.approx(2.2 + 1e-6)
assert 2.2 == pytest.approx(2.3, 0.1)
# 如果要判断两个浮点数组是否相等,我们需要借助 NUMPY.TESTING
import numpy
arr1 = numpy.array([1., 2., 3.])
arr2 = arr1 + 1e-6
numpy.testing.assert_array_almost_equal(arr1, arr2)
# 异常断言:有些用例要求能抛出异常
with pytest.raises(ValueError) as e:
raise ValueError("some error")
msg = e.value.args[0]
assert msg == "some error"The above code demonstrates how to check equality for built-in types, lists, sets, dictionaries, floats, and float arrays. This syntax is identical to standard Python syntax. Like unittest, pytest does not provide assertions for checking equality between two float arrays. If this is needed, we can turn to numpy.testing, as shown in lines 25–30 of the example.
Sometimes we need to test error handling to see if a function correctly raises an exception. Lines 32–37 demonstrate the use of exception assertions. Note that we should not write it this way:
# 示例 7 - 6
try:
# CALL SOME_FUNC WILL RAISE VALUEERROR
except ValueError as e:
assert str(e) == "some error":
else:
assert FalseThe above code appears logically correct, but it confuses exception handling with assertions, making it difficult for others to distinguish whether this code is handling exceptions in the test code or testing whether the called function correctly raises an exception. It is clearly less straightforward than using exception assertions.
2.3. Pytest Fixtures
Generally, our test cases may depend on external resources, such as databases, caches, or third-party microservices. We want the initialization and destruction of these external resources to be completed automatically before and after the execution of test cases, i.e., to automatically complete setup and teardown operations. At this point, we need to use pytest's fixtures.
Info
Whether to use external resources in unit testing is a matter of debate. Some argue that once external resources are introduced, the test cases are no longer unit tests but integration tests. Times are always changing, especially in the containerized era, where it is very fast and easy to quickly create a dedicated database server in tests, which may be easier than isolating external resources through extensive mocking. Therefore, we do not need to stick strictly to these past views.# 示例 7 - 7
import asyncpg
import datetime
async def add_user(conn: asyncpg.Connection, name: str, date_of_birth: datetime.date)->int:
# INSERT A RECORD INTO THE CREATED TABLE.
await conn.execute('''
INSERT INTO users(name, dob) VALUES($1, $2)
''', name, date_of_birth)
# SELECT A ROW FROM THE TABLE.
row: asyncpg.Record = await conn.fetchrow(
'SELECT * FROM users WHERE name = $1', 'Bob')
# *ROW* NOW CONTAINS
# ASYNCPG.RECORD(ID=1, NAME='BOB', DOB=DATETIME.DATE(1984, 3, 1))
return row["id"]We first show the test code (see code/chap07/sample/test_app.py) and then explain the use of fixtures with the code:
# 示例 7 - 8
import pytest
from sample.app import add_user
import pytest_asyncio
import asyncio
# PYTEST-ASYNCIO 已经提供了一个 EVENT_LOOP 的 FIXTURE, 但它是 FUNCTION 级别的
# 这里我们需要一个 SESSION 级别的 FIXTURE,所以我们需要重新实现
@pytest.fixture(scope="session")
def event_loop():
policy = asyncio.get_event_loop_policy()
loop = policy.new_event_loop()
yield loop
loop.close()
@pytest_asyncio.fixture(scope='session')
async def db():
import asyncpg
conn = await asyncpg.connect('postgresql://zillionare:123456@localhost/bpp')
yield conn
await conn.close()
@pytest.mark.asyncio
async def test_add_user(db):
import datetime
user_id = await add_user(db, 'Bob', datetime.date(2022, 1, 1))
assert user_id == 1The functional code here is simple: it inserts a record into the users table and returns its ID in the table. The test code calls the add_user function and then checks if the return value is 1 (if a new database is created or the table is cleared before each test, the returned ID should be 1).
This test obviously requires connecting to a database, so we need to create a database connection before the test and close it after the test. Moreover, we will have multiple test cases that need to connect to the database, so we want the database connection to be a global resource that can be shared among multiple test cases. This is where fixtures come in.
Fixtures are functions that pytest loads and runs before (or after) executing test functions. Unlike setUp and tearDown in unittest, fixtures in pytest have explicit dependencies. For example, in the above test_add_user, it explicitly depends on the db fixture (by passing db as a parameter in the function declaration), and db in turn explicitly depends on the event_loop fixture. However, even if there are other fixtures in the file, executing test_add_user will not execute these other fixtures because dependencies must be explicitly declared.
The above code demonstrates testing an asynchronous function add_user. Obviously, asynchronous functions must be executed within an event loop, and related initialization (setup) and exit operations (teardown) must also be executed within the same loop. This is achieved here through pytest.mark.asyncio, pytest_asyncio, and other fixtures:
First, we need to mark the test case as asynchronous execution, i.e., line 23 of the above code. Second, test_add_user needs a database connection, which is provided by the fixture db. Obtaining this connection is also asynchronous, so we cannot use pytest.fixture to declare this function but must use @pytest_asyncio.fixture (see line 15 of the code) to declare it.
We also need to introduce scope='session' appearing in lines 8 and 15. This parameter indicates the scope of the fixture, with four optional values: function, class, module, and session. The default value is function, indicating that the fixture is only valid for the current test function. In the above example, we want this event loop to be valid throughout one [^pytest-session] test, so we set the scope to session.
The above example is about testing in asynchronous mode. Testing ordinary functions is simpler. We do not need the pytest.mark.asyncio decorator or the event_loop fixture. All pytest_asyncio.fixture should be replaced with pytest.fixture (obviously, it must and can only decorate ordinary functions, not functions defined by async).
Info
If we use unittest to test asynchronous code, note the following: first, the test class must inherit from `unittest.IsolatedAsyncioTestCase`, and the test functions must be defined with `async def`. Additionally, setup and teardown must be replaced with their asynchronous versions, `asyncSetUp` and `asyncTearDown`.Note that unittest only directly supports asynchronous testing starting from Python 3.8. In Python 3.7 and earlier versions, we need to use the third-party library aiounittest.
------------- fixtures defined from faker.contrib.pytest.plugin --------------
faker -- .../faker/contrib/pytest/plugin.py:24
Fixture that returns a seeded and suitable Faker instance.
------------- fixtures defined from pytest_asyncio.plugin ----------------- event_loop -- .../pytest_asyncio/plugin.py:511 Create an instance of the default event loop for each test case.
...
------------- fixtures defined from tests.test_app ---------------- event_loop [session scope] -- tests/test_app.py:45
db [session scope] -- tests/test_app.py:52
Here we see that `faker.contrib` provides a fixture named `faker`, the `pytest_asyncio` we installed earlier to support asynchronous testing also provides a fixture named `event_loop` (other few are omitted for brevity), and the two fixtures `event_loop` and `db` defined in our own test code.
Pytest also provides a special class of fixtures, namely pytest-mock. For the sake of explanation, we first install the pytest-mock plugin and see the fixtures it provides.
```shell
$ pip install pytest-mock
pytest --fixture
------- fixtures defined from pytest_mock.plugin --------
class_mocker [class scope] -- .../pytest_mock/plugin.py:419
Return an object that has the same interface to the `mock` module, but
takes care of automatically undoing all patches after each test method.
mocker -- .../pytest_mock/plugin.py:419
Return an object that has the same interface to the `mock` module, but
takes care of automatically undoing all patches after each test method.
module_mocker [module scope] -- .../pytest_mock/plugin.py:419
Return an object that has the same interface to the `mock` module, but
takes care of automatically undoing all patches after each test method.
package_mocker [package scope] -- .../pytest_mock/plugin.py:419
Return an object that has the same interface to the `mock` module, but
takes care of automatically undoing all patches after each test method.
session_mocker [session scope] -- .../pytest_mock/plugin.py:419
Return an object that has the same interface to the `mock` module, but
takes care of automatically undoing all patches after each test method.It can be seen that pytest-mock provides 5 fixtures at different levels. Regarding what mock is, this is the content of the next section.
3. Magical Mocking
During unit testing, we want the test environment to be as pure and controllable as possible. Therefore, we do not want to depend on user input, nor do we want to connect to non-exclusive databases or third-party microservices. At this point, we need to use mock to simulate these external interfaces. Mocking may be the most core technology in unit testing.
note
Thanks to container technology! In unit testing, more and more databases, caches, and third-party microservices are being connected. Because the cost of mocking some interfaces has exceeded launching a container, initializing a database, and then starting the test.info
Python only began to have relatively complete support for mocking in async mode from version 3.8. Since Python 3.7 has reached the end of its life, this book does not introduce how to implement mocking in async mode in Python 3.7.In addition, the mock module provides the patch method and the MagicMock subclass. The difference between MagicMock and Mock is that it automatically implements mocking of magic functions in Python class objects (hence its name!). Magic functions refer to functions with double underscores, such as __iter__, etc. patch is a context management tool that automatically restores our changes to the system.
Info
In fact, most of the time, we use `MagicMock` objects, not `Mock`.The most basic concept of mock can be demonstrated through the following code:
# 示例 7 - 9
from unittest.mock import MagicMock
thing = ProductionClass()
thing.method = MagicMock(return_value=3)
thing.method(3, 4, 5, key='value')
thing.method.assert_called_with(3, 4, 5, key='value')This code assumes we have a class under test, ProductionClass. When we call its method method, there are some inconvenient situations to run under unit testing (e.g., needing to connect to a database), so we want to skip calling it and directly return some specified values.
Here we can get a reference to the ProductionClass instance object, so we can directly modify its method attribute to point to a MagicMock object. The MagicMock object has some important attributes and methods.
The return_value appearing in line 3 is the first important attribute. It means that when the replaced object (here method) is called, the return value should be 3. Another similar attribute is side_effect. It also returns the set value when the mock is called. However, there is an important difference between return_value and side_effect: the return values of both can be set to arrays (or other iterable objects), but when setting the return value through side_effect, each call to the mock returns the next iterative value in side_effect; whereas return_value only returns the set value all at once. Additionally, if both are set, side_effect takes precedence in returning the value. Please see the following example:
# 示例 7 - 10
import unittest.mock
side_effect = [1, 2, unittest.mock.DEFAULT, 4, 5]
m = unittest.mock.Mock(return_value="foo", side_effect=side_effect)
for _ in side_effect:
print(m())
print(f"m is called by {m.call_count} times")
m.assert_called_with()The output result will be:
1
2
foo
4
5We set 5 values for side_effect, and during 5 repeated tests, it sequentially returns the next iterative value. Note that here we use unittest.mock.DEFAULT to make one of the iterations return the set value of return_value. Of course, essentially, this is still an iterative result of side_effect.
Here also appears an important method, assert_called_with, which checks whether the replaced method was called with the expected parameters. In addition, we can also assert the number of times it was called, etc.
note
If you have previously encountered other mock frameworks, you may need to note that Python's mock is an `action -> assertion` pattern, not the common `record -> replay` pattern in other languages.Often, we use mock through patch. The following are examples of using patch in different scenarios.
3.1.1. Using as a Decorator
Suppose we have a file system-related operation. To test this operation, if we do not use mock, we must build directories and add certain files in the test environment. Unless absolutely necessary, we generally do not want tests to change our file system, which is where we should use mock.
# 示例 7 - 11
import os
# 被测试代码
class Foo:
def get_files(self, dir_: str):
return os.list_dir(dir_)
# 测试代码
from unittest.mock import patch
from unittest import TestCase
class FooTest(TestCase):
@patch('__main__.Foo.get_files')
def test_get_files(self, mocked):
mocked.return_value = ["readme.md"]
foo = Foo()
self.assertListEqual(foo.get_files(), ["readme.md"])
test = FooTest()
test.test_get_files()
Let us explain some of the key code. First, when using mock via decorator syntax, our test function will have an additional parameter (here mocked, but the name can be specified by us). It is also possible to use multiple patch decorators; for each additional decorator, the test function will have one more parameter.
Second, we want to mock Foo.get_files, but we add a __main__ prefix before Foo.get_files. This is because the class Foo is defined in the top-level module. In Python, any symbol (class, method, or variable) exists under a certain module. If this code is saved as a disk file foo.py, the module name is foo; when we import Foo.get_files in other modules, we should use foo.Foo.get_files. But here, since we are referencing within the same module, its prefix is __main__.
info
The key to using mock is to find the correct reference method for the object being mocked. In Python, everything is an object. These objects are addressed through hierarchical namespaces. Taking the `patch` method as an example, it is in the mock module, and the mock module is a subordinate module of the package unittest, so we use `unittest.mock.patch` to reference it, which is consistent with the import path.However, for scripts like this, if an object is not a system built-in object and does not exist in any package, its namespace is __main__, just like the example __main__.Foo here. Regarding addressing, there are other situations, which we will introduce later in the sections on builtin objects and incorrect references.
3.1.2. Using in Block-Level Code
When we use patch via decorators, its context is function-level. After the function exits, the mock's changes to the system are restored. However, sometimes we prefer to use block-level patch, on the one hand, to more precisely limit the scope of mock usage, and on the other hand, because its syntax is more concise, as we can complete the mock behavior setting in one line of code.
# 示例 7 - 12
import os
# FUNCTION UNDER TEST
class Foo:
def get_files(self, dir_: str):
return os.list_dir(dir_)
# TESTING CODE
from unittest.mock import patch
from unittest import TestCase
class FooTest(TestCase):
def test_get_files(self):
with patch('__main__.Foo.get_files', return_value=["readme.md"]):
foo = Foo()
self.assertListEqual(foo.get_files(), ["readme.md"])
test = FooTest()
test.test_get_files()Here, replacement and setting are completed in just one line of code.
In practice, using mock may not be as easy as it looks. Some scenarios are relatively difficult for beginners to understand. But once you are familiar with them, you will find that you have a deeper understanding of Python's underlying mechanisms. Below, we introduce how to use mock in these scenarios.
3.2. Mocking in Special Situations
3.2.1. Modifying Instance Attributes
In the previous examples, the target we passed to patch was a string, obviously, all newly generated objects within the patch scope would be patched. If the object was generated before patch, we need to use patch.object to complete the patch. Another benefit of this is that we can selectively patch only some objects.
# 示例 7 - 19
def bar():
logger = logging.getLogger(__name__)
logger.info("please check if I was called")
root_logger = logging.getLogger()
root_logger.info("this is not intercepted")
# TEST_FOO.PY
from sample.core.foo import bar
logger = logging.getLogger('sample.core.foo')
with mock.patch.object(logger, 'info') as m:
bar()
m.assert_called_once_with("please check if I was called")In the bar method, two loggers (root_logger and the logger corresponding to 'sample.core.foo') are both called, but in the test, we only intercepted the info method of the first logger (line 2), verifying that it was called and called only once.
Here, we need to mention a subtle difference between mocker.patch in pytest and unittest.mock.patch. The latter can return a mock object when patching, through which we can perform more checks (see line 11 in the example code above); but the return value of mocker.patch is None.
Here, we need to mention a subtle difference between mocker.patch in pytest and unittest.mock.patch. The latter can return a mock object when patching, through which we can perform more checks (see line 15 in the example code above); but the return value of mocker.patch is None.

3.2.2. Asynchronous Objects
From version 3.8, unittest.mock generally no longer distinguishes between synchronous and asynchronous objects, for example:
# FUNCTION UNDER TEST
class Foo:
async def bar():
pass
# TESTING CODE
class FooTest(TestCase):
async def test_bar(self):
foo = Foo()
with patch("__main__.Foo.bar", return_value="hello from async mock!"):
res = await foo.bar()
print(res)
test = FooTest()
await test.test_bar()The return value of the original function bar is empty. But the output result is "hello from async mock," indicating that the function was mocked.
The mocked method bar is an asynchronous function. If we only need to mock its return value, we still use the same method, directly assigning a value to return_value. If we want to replace it with another function, we only need to declare that function as asynchronous.
However, if we are mocking an asynchronous generator, the method will be different:
# FUNCTION UNDER TEST
from unittest import mock
class Foo:
async def bar():
for i in range(5):
yield f"called {i}th"
# TESTING CODE
class FooTest(TestCase):
async def test_bar(self):
foo = Foo()
with mock.patch(
"__main__.Foo.bar"
) as mocked:
mocked.return_value.__aiter__.return_value = [0, 2, 4, 6, 8]
print([i async for i in foo.bar()])
test = FooTest()
await test.test_bar()The key to understanding this code is that bar is the object we want to mock, and its return value (i.e., mocked.return_value) is a coroutine. We need to set the return value of the __aiter__ method of this coroutine to get the correct result. Additionally, since __aiter__ itself means an iterator, even if we set its return_value to a list, it will return iterative results sequentially, not the entire list. This is different from what we discussed earlier regarding the differences between return_value and side_effect.
Also of special note is the async with method. You need to mock its __aexit__ and replace it with the method you want to implement.
3.2.3. Builtin Objects
If we have a program that needs to read user input from the console and perform some calculations based on that input. Now, we need to test this part of the functionality. Obviously, we need to mock user input, otherwise, unit testing cannot be automated.
In Python, the function that accepts user console input is input. To mock this method, based on the experience gained from previous learning, we need to know which namespace it belongs to. But we have never imported them; which namespace do they belong to?
In Python, there are about 80 functions like input, open, eval, etc., known as builtin (built-in functions). When mocking them, we use the builtins namespace for reference:
with patch('builtins.input', return_value="input is mocked"):
user_input = input("please say something:")
print(user_input)When executing the above code, we no longer depend on user input, because the input method is mocked and replaced, and always returns "input is mocked," ensuring that our test results are reproducible.
3.2.4. Let Time Stay at This Moment
quote
Verweile doch, du bist so schön! You are so beautiful, please stay a moment!-- Faust
Implementing this mock may be more difficult than we initially thought. Our recommendation is to use the freezegun library and avoid implementing this mock ourselves.
# 请使用 PYTEST 来运行,或者自行改写为 UNITTEST
from freezegun import freeze_time
import datetime
import unittest
# FREEZE TIME FOR A PYTEST STYLE TEST:
@freeze_time("2012-01-14")
def test():
assert datetime.datetime.now() == datetime.datetime(2012, 1, 14)
def test_case2():
assert datetime.datetime.now() != datetime.datetime(2012, 1, 14)
with freeze_time("2012-01-14"):
assert datetime.datetime.now() == datetime.datetime(2012, 1, 14)
assert datetime.datetime.now() != datetime.datetime(2012, 1, 14)Note that Python has many time libraries. If you are using other libraries to get the current time, freezegun may not work. However, mocking third-party time libraries is generally easy to implement.
3.2.5. How to Create "Chaos"?
Assume we have a crawler fetching Baidu's hot search terms. Its functionality is mainly implemented by crawl_baidu. We have another function calling it to save the return result of crawl_baidu. We want to know if the calling function can correctly handle the situation if an exception is thrown in crawl_baidu.
The key here is that we need to make crawl_baidu throw an exception. Of course, we cannot achieve this by unplugging the network cable.
import httpx
from httpx import get, ConnectError
from unittest.mock import patch
from unittest import TestCase
def crawl_baidu():
return httpx.get("https://www.baidu.com")
class ConnectivityTest(TestCase):
def test_connectivity(self):
with patch('httpx.get', side_effect=["ok", ConnectError("disconnected")]):
print(crawl_baidu())
with self.assertRaises(ConnectError):
crawl_baidu()
case = ConnectivityTest()
case.test_connectivity()crawl_baidu relies on httpx.get to crawl data. We can mock the httpx.get method to sometimes return normal results and sometimes return exceptions. This is achieved through side_effect.
Reiterate! Note line 12, where we use self.assertRaises instead of try-except to catch exceptions. Both can achieve the function of checking whether an exception is thrown. But through self.assertRaises, we emphasize that an exception should be thrown here, which is part of our test logic. Whereas try-except should be used to handle real exceptions.
3.2.6. Disappearing Magic
Reiterate again, "The key to using mock is to find the correct reference method for the object being mocked." And the key to correct reference is this "spell":
Warning
Mock an item where it is used, not where it came from.Mock an item where it is used, not where it came from.
from os import system
from unittest import mock
import pytest
def echo():
system('echo "Hello"')
with mock.patch('os.system', side_effect=[Exception("patched")]) as mocked:
with pytest.raises(Exception) as e:
echo()We call the system's echo command in the echo method. In the test, we try to mock the os.system method to return an exception as soon as it is called. Then we use pytest to check; if an exception is thrown, it proves the mock was successful; otherwise, the mock failed.
But if we run this example, we will only get a friendly greeting: "No errors, No warnings!" Why?
Because when we call the system function in the echo() function, at this time, system exists in the __main__ namespace, not the os namespace. The os namespace is where system was born, and the __main__ namespace is where it is used. Therefore, the object we should patch is '__main__.system', not 'os.system'.
Now, let us change os.system to __main__.system and rerun it, and you will find that the magic works again!
In the companion code, there is another example named where_to_patch. Let us also take a look.
# FOO.PY
def get_name():
return "Alice"
# BAR.PY
from .foo import get_name
class Bar:
def name(self):
return get_name()
# TEST.PY
from unittest.mock import patch
from where_to_patch.bar import Bar
tmp = Bar()
with patch('where_to_patch.foo.get_name', return_value="Bob"):
name = tmp.name()
assert name == "Bob"
The test code will throw AssertionError: assert "Alice" == "Bob". If we change where_to_patch.foo to where_to_patch.bar, the test passes. This slightly extended example further clearly demonstrates how to correctly reference the object being mocked.
4. Coverage - Measuring Test Coverage
We have mastered how to conduct unit testing. Next, a natural question arises: how do we know the quality of unit tests? This raises the concept of test coverage. Coverage measurement is usually used to measure the effectiveness of tests. It can show which parts of your code have been tested and which have not.
coverage.py is the most common tool for measuring Python program code coverage. It monitors your program, records which parts of the code have been executed, and then analyzes the source code to identify executed and unexecuted code.
We can install coverage.py through the following method:
$ pip install coverageTo collect test coverage data, we only need to add coverage run before the original test command. For example, if we previously used pytest arg1 arg2 arg3 for testing, now we use:
$ coverage run -m pytest arg1 arg2 arg3After the test runs, we can view the test coverage report through coverage report -m:
Name Stmts Miss Cover Missing
-------------------------------------------------------
my_program.py 20 4 80% 33-35, 39
my_other_module.py 56 6 89% 17-23
-------------------------------------------------------
TOTAL 76 10 87%If you want better visual effects, you can also use the coverage html command to generate an annotated HTML report, and then open htmlcov/index.html in a browser.
However, more people choose to use the pytest-cov plugin to collect test coverage. This is also ppw's choice. In projects generated by ppw, pytest-cov has been added to the test dependencies, so it is naturally installed into the environment.
Therefore, for projects configured through ppw, we generally do not need to directly call the coverage command but use the pytest command for testing. The pytest-cov plugin will automatically collect test coverage data and, after the test is completed, print the test coverage report to the console. If you want to generate an annotated HTML report, you can use the pytest --cov-report=html command.
By default, coverage.py measures test line (statement) coverage, but through configuration, branch coverage can also be measured. We illustrate what these two types of coverage mean through the following example code.
def my_partial_fn(x):
if x:
y = 10
return y
my_partial_fn(1)In the above code, line 2 is an if statement. Depending on the value of x, execution may proceed to line 3 or line 4. When coverage is configured to calculate coverage by statement (which is the default), as long as the function is executed, coverage will count that all statements of the function have been executed; but if coverage is configured to calculate coverage by branch, if the result of evaluating x is False, code execution will jump directly from line 2 to line 4. Coverage will mark the code from line 2 to line 4 as partially branch-covered.
In addition to configuring branch coverage, there are other situations that require configuration. Next, we introduce how to configure them.
The default name of the Coverage.py configuration file is .coveragerc. In projects generated by ppw, this file is located at the project root (readers can return to the end of Chapter 4 to view the file list generated by ppw). If the default configuration file is not used, Coverage.py will read settings from other common configuration files, such as setup.cfg or tox.ini.
In these configuration files, if there is a section with the prefix "coverage:", it will be treated as coverage configuration. For example, in .coveragerc, there is a section named run. When it appears in tox.ini, the section name should be [coverage:run].
We can also configure coverage in pyproject.toml. To use this method, we need to add a section named tool.coverage in pyproject.toml, and then add configuration items in this section.
Coverage configuration items follow ini syntax, with an example as follows:
[run]
branch = True
[report]
# REGEXES FOR LINES TO EXCLUDE FROM CONSIDERATION
exclude_lines =
# HAVE TO RE-ENABLE THE STANDARD PRAGMA
pragma: no cover
# DON'T COMPLAIN ABOUT MISSING DEBUG-ONLY CODE:
def __repr__
if self\.debug
# DON'T COMPLAIN IF TESTS DON'T HIT DEFENSIVE ASSERTION CODE:
raise AssertionError
raise NotImplementedError
# DON'T COMPLAIN IF NON-RUNNABLE CODE ISN'T RUN:
if 0:
if __name__ == .__main__.:
# DON'T COMPLAIN ABOUT ABSTRACT METHODS, THEY AREN'T RUN:
@(abc\.)?abstractmethod
ignore_errors = True
[html]
directory = coverage_html_reportWe mentioned earlier that we can let coverage.py calculate coverage by branch, which can be configured as in line 2 above. Configuration items in the [report] section allow coverage.py to ignore some code that does not need to be counted, such as debug code. The [html] section configures where the generated HTML files should be stored. If not specified, they will be stored in the htmlcov directory by default.
Although not mentioned in the example, the [run] section also has commonly used configuration items include and omit, used to specifically add a file or directory to test coverage or exclude it. There are also identical configuration items in the [report] section, with some differences. Specifying omit or include in [report] only applies to report generation and does not affect actual test coverage statistics.
5. Publishing Coverage Reports
If our project is an open-source project, you may wish to publish the coverage report online so that others can see the coverage of your project. This is very helpful for promoting your open-source project. Here we use codecov.io to publish the coverage report.
Codecov is an online code coverage report service. It can obtain code coverage reports from code hosting platforms such as GitHub, Bitbucket, and GitLab, and then generate an online report. This report allows others to see the coverage situation of your project.
Setting up codecov integration in GitHub is simple. Open the https://github.com/apps/codecov page in your browser, click to complete the installation, and then add an upload action in the CI process. In projects created through ppw, we have already integrated this step. If you want to manually execute this in your own project, you can complete the upload by executing the following commands (commands are given separately for different platforms):
# LINUX
$ curl -Os https://uploader.codecov.io/latest/linux/codecov
$ chmod +x codecov
$ ./codecov
# WINDOWS
$ ProgressPreference = 'SilentlyContinue'
$ Invoke-WebRequest -Uri https://uploader.codecov.io/latest/windows/codecov.exe -Outfile codecov.exe
$ .\codecov.exe
# MACOS
$ curl -Os https://uploader.codecov.io/latest/macos/codecov
$ chmod +x codecov
$ ./codecovWe strongly recommend uploading coverage reports only through CI, not executing them locally. Because coverage reports executed locally may vary due to differences in developers' local environments. On the other hand, after executing in CI, we can also get such status reports after a pull request:

And we can also see changes in coverage in the comments of the pull request:
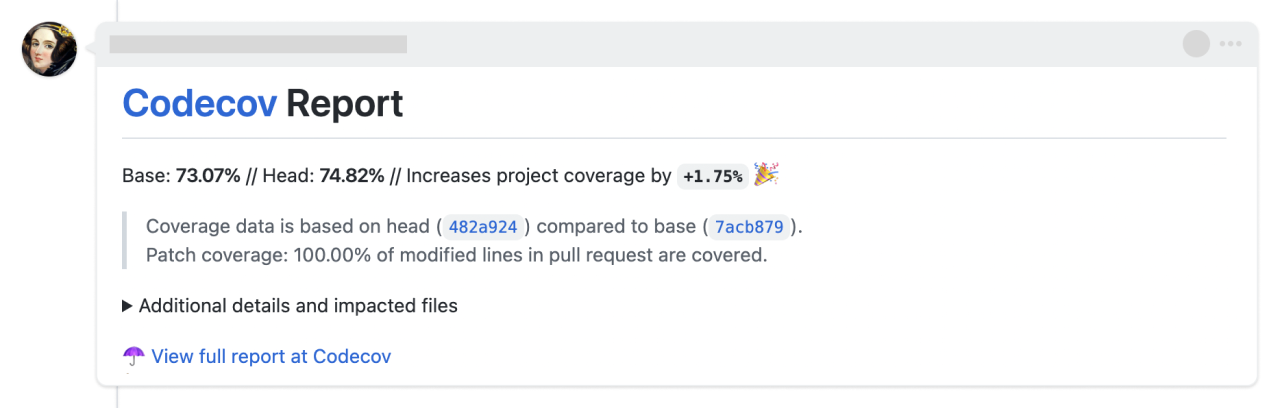
This makes your open-source project look very professional, doesn't it? More importantly, it makes your potential users more confident that this is a high-quality project.
6. Matrix Testing with Tox
If our software supports 3 operating systems and 4 Python versions, we must create 4 virtual environments on each of the 3 operating systems, install our software and dependencies, and then execute tests and upload test reports. This action is not only quite tedious but also prone to introducing errors.
Combining tox with CI can help us automate the creation of these environments and the execution of tests.
6.1. What is Tox?
Tox is a general-purpose Python virtual environment management and testing command-line tool, designed to automate and standardize Python testing. It is part of a larger vision to simplify the packaging, testing, and publishing processes of Python software. Most projects use it to ensure software compatibility across multiple Python interpreter versions.
In fact, tox mainly accomplishes the following tasks:
- Create virtual environments based on multiple versions of Python according to configuration, and ensure the reproducibility of these virtual environments (requires collaboration with poetry or other dependency management tools).
- Run tests and code checking tools in multiple environments, such as pytest, flake8, black, mypy, etc.
- Isolate environment variables. Tox does not pass any system environment variables to the virtual environment, ensuring the reproducibility of tests.
tip
Beginners may not be accustomed to this feature. This means that if your tests or code need to read certain environment variables, they cannot be set on the host machine running the tests but must be set in tox's configuration file. The purpose of this is to ensure the reproducibility of test results.The following figure is the working principle diagram shown in the tox documentation:
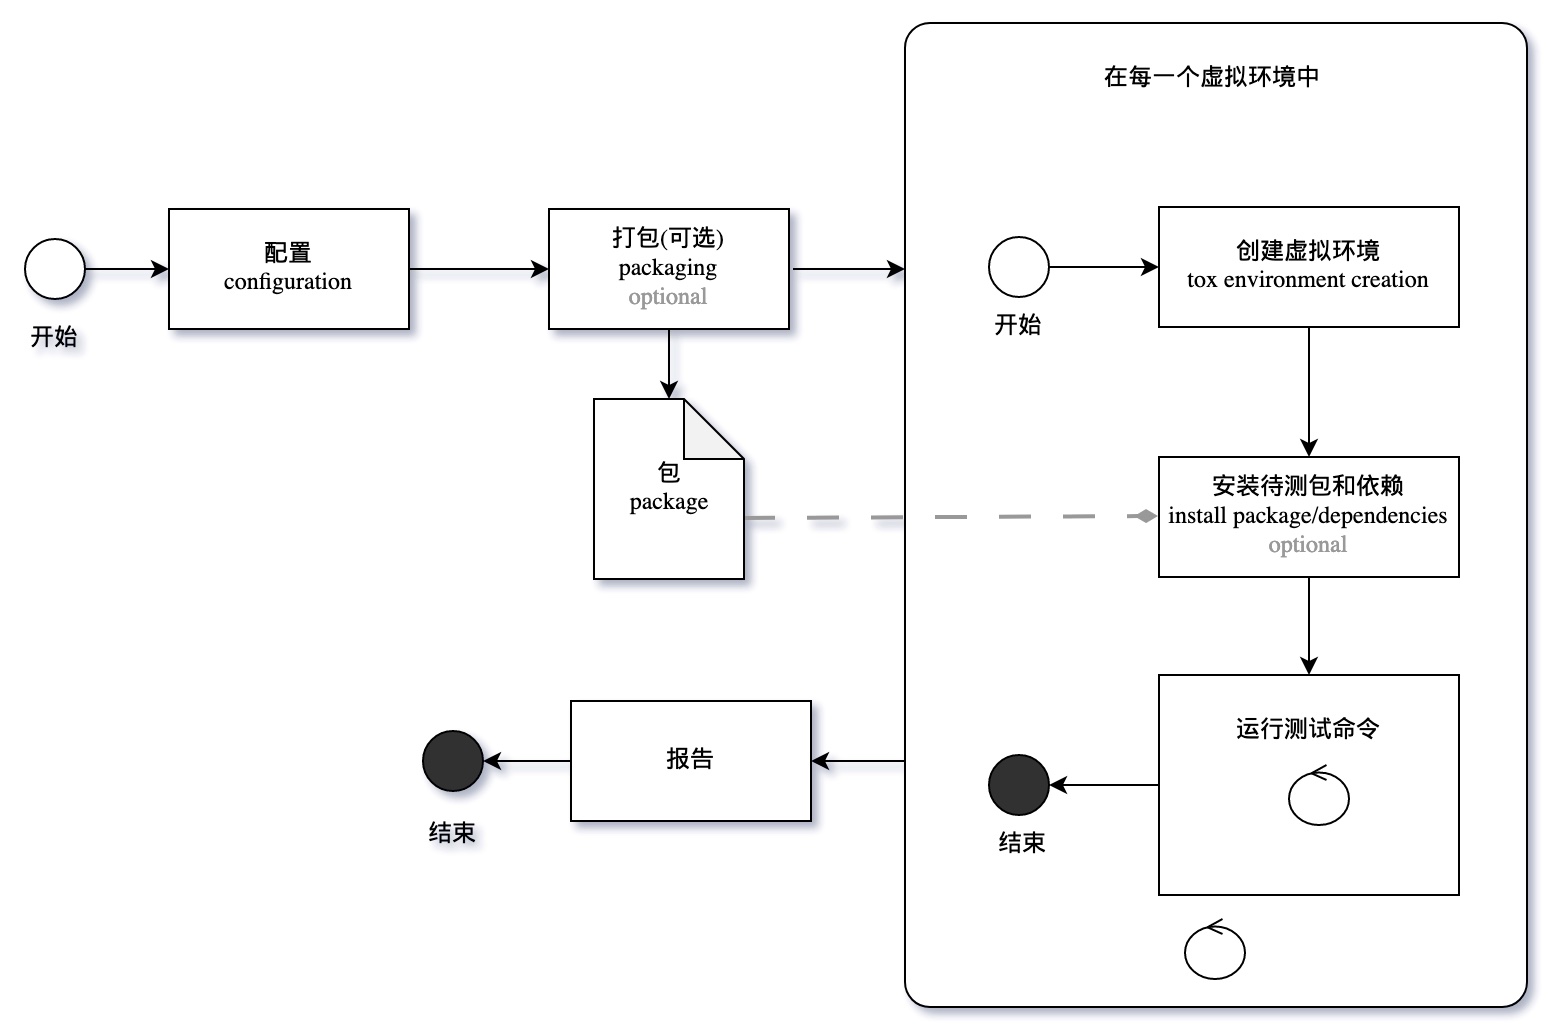
According to this diagram, tox reads the configuration file, packages the software to be tested, creates virtual environments according to the configuration file, and installs the software to be tested and dependencies, and then executes test commands in sequence. Finally, when all tests in the virtual environments pass, tox generates a test report.
Below, we mainly introduce how tox is configured and works through a typical configuration file.
6.3. How to Configure Tox
In projects generated by ppw, the following tox.ini file exists:
[tox]
isolated_build = true
envlist = py38, py39, py310, lint
skipsdist = false
[gh-actions]
python =
3.10: py310
3.9: py39
3.8: py38
[testenv:lint]
extras =
dev
doc
deps =
poetry
commands =
poetry run isort {{ cookiecutter.project_slug }}
poetry run black {{ cookiecutter.project_slug }} tests
poetry run flake8 {{ cookiecutter.project_slug }}
poetry build
poetry run mkdocs build
poetry run twine check dist/*
[testenv]
passenv = *
setenv =
PYTHONPATH = {toxinidir}
PYTHONWARNINGS = ignore
deps =
poetry
extras =
test
commands =
poetry run pytest -s --cov={{ cookiecutter.project_slug }} --cov-append --cov-report=xml --cov-report term-missing testsThe configuration file is still in standard ini file format (tox also supports configuration through pyproject.toml). We mainly focus on the following parts:
6.3.1. [tox] Section
Before testing a package, tox first needs to build an sdist distribution package. In terms of packaging, Python has gone through a long process, and packaging tools and standards have undergone many changes, which we will introduce in a dedicated chapter. Now we need to know that the latest standards are PEP517 and PEP518, and tox already supports these two standards. However, if the project itself does not support these two PEPs, tox must return to previous packaging methods.
Therefore, tox introduces the isolated_build option. If set to true, tox will use PEP517 and PEP518 to package the project. If set to false, tox will use traditional methods (setup.py) to package the project. If a project is created through poetry and requires and build-backend items are set in pyproject.toml, then we need to set isolated_build to true.
In all projects created by ppw, we set isolated_build to true, so that it is consistent with the settings in pyproject.toml.
The envlist option, as its name suggests, indicates in how many environments we need to run tests separately. Here we specify 4 virtual environments: py38, py39, p310, and lint. Tox will automatically decide the Python version to be installed in each environment based on the environment name. For example, it can analyze from the name py38 that Python 3.8 should be used. Here we also specify a lint environment, which is used to execute code checks. We do not specify a Python version for it specifically, and tox cannot analyze the Python version from the name, so it will use the current Python version.
By default, tox creates a .tox directory in the project root, and the above virtual environments are created in this directory:
$ll .tox
total 36
drwxrwxr-x 9 aaron aaron 4096 Jan 20 23:48 ./
drwxrwxr-x 12 aaron aaron 4096 Jan 20 23:48 ../
drwxrwxr-x 5 aaron aaron 4096 Jan 20 23:47 .package/
-rwxrwxr-x 1 aaron aaron 0 Jan 20 23:47 .package.lock*
drwxrwxr-x 3 aaron aaron 4096 Jan 20 23:47 .tmp/
drwxrwxr-x 2 aaron aaron 4096 Jan 20 23:47 dist/
drwxrwxr-x 6 aaron aaron 4096 Jan 20 23:48 lint/
drwxrwxr-x 2 aaron aaron 4096 Jan 20 23:47 log/
drwxrwxr-x 7 aaron aaron 4096 Jan 20 23:47 py38/
drwxrwxr-x 7 aaron aaron 4096 Jan 20 23:48 py39/Listing the directory shows that lint, py38, and py39 exist. We can further check the Python versions in these virtual environments. However, we do not see py310 here because, during my testing, the system did not yet have Python 3.10 installed, so tox will temporarily skip this version until we install Python 3.10, at which point tox will create the py310 environment during test initialization.
The skipsdist option is used to indicate whether tox should skip the step of building the sdist distribution package. This setting is mainly for compatibility with Python applications, because tox's test objects are not only libraries but may also be services or simple script sets. These services or script sets do not have setup.py files and cannot build sdist distribution packages. Without a flag to let tox skip the step of building the sdist distribution package, tox will report an error:
ERROR: No pyproject.toml or setup.py file found. The expected locations are:
/Users/christophersamiullah/repos/tox_examples/basic/pyproject.toml or
/Users/christophersamiullah/repos/tox_examples/basic/setup.py
You can
1. Create one:
https://tox.readthedocs.io/en/latest/example/package.html
2. Configure tox to avoid running sdist:
https://tox.readthedocs.io/en/latest/example/general.html
3. Configure tox to use an isolated_buildThis option is false by default in tox and usually does not need to be configured. We introduce it here for the purpose of helping everyone understand the working principle of tox.
6.3.2. [testenv] Section
The configuration items in this section apply to all virtual environments. If there are special options and actions in a certain virtual environment, they need to be defined in their own section, such as [testenv:lint].
Here we also set some additional environment variable fields. For example, we set PYTHONPATH and also ignore some warning messages (line 27). If some libraries we use have not been updated, a large number of deprecation warnings will be printed during the test process, interfering with our check of error messages during the test. Of course, we should also open this warning at least once in the test to know which usages need to be updated.
Generally, tox will not pass environment variables from the host machine to the test environment. But in some cases, such as account names and passwords for important services, it is not suitable to write them in configuration files and can only be configured in the host machine's environment variables. In this case, we need to specify the environment variables to be passed through the passenv option. The value of this option is a comma-separated string, which can be a single environment variable or, as in the example, a wildcard.
Info
In team development, not all developers have access to account names and passwords for important services. If these secret information are configured in code files or related configuration files, it will lead to these secrets being exposed to all developers. Additionally, if the code repository uses GitLab, it may also lead to this information leaking to the internet. The correct approach is to configure these important information only in the host machine's environment variables. In this way, only those with access to that machine can access these secrets.This is a standard practice and is also supported by GitHub CI. In GitHub CI, environment variables can be read using the env option in the workflow file, and then passed to the test environment via tox.
Tox generally does not install dependencies declared as extra types when installing the package under test. However, to run tests and perform linting, we must install third-party libraries such as pytest, Flake8, etc. In projects generated by ppw, these extra type dependencies are further subdivided into dev, test, and doc. Among them, test dependencies are those that need to be installed in all test environments (i.e., py38, py310, etc.), while dev and doc are generally only needed when linting. Therefore, we depend on test in [testenv], while [testenv:lint] depends on dev and doc.
Next is the commands field. This is where tests or linting are actually executed. The command here is:
commands =
poetry run pytest -s --cov=%package_under_test% --cov-append --cov-report=xml
--cov-report term-missing tests"-s" tells pytest not to capture console input and output.
In projects generated by ppw, we have integrated the pytest-coverage plugin. Therefore, through appropriate configuration, we can complete test coverage statistics simultaneously during testing. --cov indicates the scope of code coverage, here %package_under_test% needs to be replaced with the name of our program library under test. --cov-append indicates that the results of this test will be appended to previous statistics, rather than completely replacing previous data. --cov-report outputs test data in XML format. --cov-report indicates how the report should be generated.
Finally, tests is the folder where our test code is located.
6.3.3. [testenv.lint]
The syntax of this section is no different from [testenv]. Only the commands to be run are different. There is no need to explain them one by one here.
[^pytest-session]: According to the pytest documentation, a pytest session refers to a test process started by the pytest command.