
Chapter 3: Setting Up Python Virtual Environments
In the previous chapter, we discussed the basic steps for building a development environment, such as selecting an operating system and an integrated development environment (IDE). Now that we are ready to start coding, we must specify the Python runtime (or interpreter) to run and debug programs. This step is particularly critical if you are using VS Code, as it is not designed exclusively for Python development and supports multiple programming languages. Therefore, you must explicitly configure the Python runtime for VS Code to recognize your project.
Python has two major runtime versions: Python 2.x and Python 3.x. Python 3.x represents a breaking upgrade from 2.x. Currently, more applications and components require Python 3.x, yet older versions of operating systems like macOS or Ubuntu still rely on Python 2.x for core functions such as package management. Consequently, Python 2.x remains the default installed runtime on these systems.
info
Python 2.7 was the final version of the Python 2.x series, with maintenance ending on January 1, 2020. Python 3.7 ended maintenance on June 27, 2023. Therefore, when starting a new project, you should avoid these legacy Python versions as much as possible.Even if the target machine and your application use the same Python version, similar conflicts can arise with other components. For example, Django is one of the most prestigious web development frameworks in the Python community. It relies on SQLAlchemy, another renowned open-source ORM framework in the Python community. If your program also depends on SQLAlchemy, and you use SQLAlchemy version 1.4 or higher, while Django uses an earlier version, these two applications cannot share the same Python environment: SQLAlchemy 1.4 is a completely incompatible breaking update compared to previous versions.
This issue is known as "dependency hell." Dependency hell is not unique to Python; it is a problem faced by all software systems.
1. Dependency Hell
When building software systems, functional reuse is typically involved. After all, "reinventing the wheel" is an unnecessary waste. Functional reuse can occur at the source code level, binary level, or service level. Source code-level reuse involves directly using other people's source code in our projects; binary-level reuse refers to using third-party libraries in our applications; service-level reuse involves running program functions independently as services, which other applications access via network requests.
When using binary-level reuse, we often encounter dependency hell. For instance, in the Django example above, if there is no way to provide different versions of SQLAlchemy to Django and your application separately, these two applications cannot run simultaneously on the same machine.
Dependency hell is not unique to Python. All programming languages face similar issues. One way to solve this problem is to isolate the runtime environments of programs. For example, instead of installing third-party libraries required by an application into system directories, install them into a separate directory: for instance, install them together with the application in the directory occupied by that application, and load third-party libraries only from that directory.
The Python interpreter itself can be viewed as a regular application. Therefore, when installing a Python application, we can install the Python runtime and related third-party libraries required by the program into a separate directory. In this way, when we run the application, we start Python from that directory. If Python loads third-party libraries only from (or prioritizes) that directory, we achieve a certain degree of isolation. This concept is the idea of a virtual runtime environment, which is a primary method for solving Python's dependency hell problem.
Since we mentioned "isolation," let us briefly extend this. In Chapter 2, we discussed virtual machines and Docker containers, which are methods for isolating resources to resolve resource conflicts. Now, deploying Python applications as (micro) services via containers is becoming increasingly common, involving considerations such as simplifying installation environments and avoiding dependency hell.
In this chapter, we focus on how to build virtual runtime environments, which can completely resolve dependency hell issues between runtimes and other applications. However, dependency hell has various other manifestations, which we will explore later in the chapter on Poetry.
2. Dependency Hell and Virtual Environments
Python's virtual environment solutions have a long history and are diverse. If you have been in contact with Python for some time, you have likely heard of similar concepts such as Anaconda, virtualenv, venv, pip, pipenv, poetry, pyenv, pyvenv, pyenv-virtualenv, virtualenvwrapper, and pyenv-virtualenv wrapper.
Info
An important principle mentioned in the Zen of Python is: There should be one -- and preferably only one -- obvious way to do it. There should always be only one obvious solution.Judging by the multitude of Python's virtual environment solutions, reaching this境界 seems difficult. People try to build the Tower of Babel, but God destroys it. However, similar dilemmas are not unique to Python. For example, as JavaScript surged forward, its syntax underwent drastic changes, leading some to develop a module to translate JavaScript syntax across different versions. This module is called Babel, which is quite fitting.
Pipenv and Poetry, although often mentioned in discussions about virtual environments and indeed related to them, do much more than just virtual environments—their main function is providing dependency management, with Poetry also offering build and packaging features (which we will detail in Chapter 5 on Poetry).
Venv is not an independent tool; it is just a module. Venv is a module provided in the standard library starting from Python 3.8, which you can run using python -m venv. Its goal is similar to virtualenv, but it only provides a subset of virtualenv's commands. Since it is provided by the standard library, many tools, such as poetry and pyenv, are now built upon it. Therefore, if you are a developer of some tool, I think you need to master it; otherwise, you will naturally come into contact with and use it when using tools like poetry, but you might not know that the unsung hero behind the scenes is venv.
Both conda and Virtualenv are tools for creating and managing Python virtual environments, with similar command-line interfaces. The differences are:
- Conda is a multi-language, cross-platform virtual environment manager, while Virtualenv is used only for Python.
- Conda can manage (install, upgrade) Python versions, whereas virtualenv lacks this capability.
- By default, conda occupies about 100MB of disk space, while virtualenv requires less space (about 10MB). This can be both an advantage and a disadvantage. Virtualenv reduces disk space usage by using symbolic links to native libraries, which means isolation of native libraries is not truly achieved—if your application depends not only on Python libraries but also on native libraries, dependency conflicts may still occur, causing hard-to-trace errors in your program. In conda virtual environments, all dependencies are completely isolated.
- By default, conda manages virtual environments centrally, with all virtual environments in one directory, while virtualenv tends to place virtual environments in the current directory. In the long run, non-centralized management may lead to these virtual environments becoming fragmented and difficult to track.
Point 3 above is likely the most significant difference. It is difficult to guarantee that Python applications will always depend only on pure Python libraries. In fact, some performance-related modules are often developed in C++ or other languages. Lapack (a common linear algebra library, upon which the most famous scientific computing libraries in Python, Numpy and scipy, depend) or OpenSSL are common examples.
In this book, we only recommend Anaconda. However, readers should know that if you are developing a tool (or module) that generates and builds virtual environments—for example, building a virtual environment for a container or dynamically building a remote virtual environment for a distributed program—then venv or virtualenv will be the best choice, as conda is not a lightweight tool.
For the technologies not mentioned above, we will not introduce them in detail in this book. Here is only a general description:
- pyenv is a script that cannot be used in the Windows environment. Its role is to intercept your calls to the Python toolchain and select the correct Python version for you. Additionally, you can use it to install multiple versions of Python. Its functionality can be fully replaced by tools like Anaconda. But if you use virtualenv, you will likely still need pyenv to install and select Python versions. It currently has over 28k stars on GitHub.
- pyenv-virtualenv is a plugin for pyenv that combines pyenv and virtualenv, allowing us to conveniently use commands from both. If you do not care about this convenience, you can use pyenv and virtualenv separately.
- Virtualenv wrapper is an extension set for virtualenv, providing commands such as mkvirtualenv, lssitepackages, and workon. workon is a command used to switch between different virtualenv directories.
- pyenv-virutalenvwrapper is another plugin for pyenv, developed by the author of pyenv, which integrates the functions of pyenv and virtualenvwrapper. Based on these extensions, virtualenv gains all the functionalities similar to conda.
- pyvenv (please do not confuse it with pyenv) is an official script available only from Python 3.3 to Python 3.7, but from Python 3.8 onwards, it has been replaced by the standard library module venv.
After reading the text above, you can completely ignore these strange dialects in the future. Almost any function you need to manage virtual environments can be obtained from the solution recommended in this book -- Anaconda. Now, let us introduce Anaconda to you.
Anaconda covers all functions from installing Python versions to creating and switching virtual environments. Its official website is Anaconda.org. It is the natural choice for everyone engaged in data science or deep learning. Its built-in package management system provides pre-compiled versions of many popular machine learning libraries, so you do not need to familiarize yourself with the compilation process of gcc and C/C++ code.
2.1. Installing Anaconda
Please download the installation package from the page here ^anaconda. Unless you use Anaconda for scientific computing, we recommend downloading the latest Miniconda^miniconda installation package.
Taking Ubuntu as an example, whether it is Anaconda or Miniconda, its installation file is a shell script containing installation data files. You can download it using wget or curl, and then execute this script to install.
During the installation process, you are first asked to read and accept Anaconda's service terms, and then select the directory to be installed. After completing the file copy, it will ask if you want to run conda init to initialize the conda environment. It is recommended to choose yes, so that conda will modify your shell initialization script. This step is mandatory to use conda.
After conda is installed, it will generate the first virtual environment on your system, called base. You can now list the directory where conda was just installed. The most important directory here is envs, where newly created Python virtual environments will be stored in the future. But now it is empty, although there is already a virtual environment named base, this virtual environment points to the Python in the /bin directory under the installation directory.
2.2. Configuring the Conda Environment
After conda is installed, it can generally be used without configuration. However, if we need to use a proxy server or change the conda source to accelerate download speeds, we need to configure conda.
The conda configuration file is .condarc in the user directory, which is a YAML format file. This file is generated until you first call conda config, for example, to add a conda source:
conda config --add channels conda-forgeWe can also edit the condarc file directly:
channels:
- https://mirrors.aliyun.com/anaconda/pkgs/free/
- https://mirrors.aliyun.com/anaconda/pkgs/main/
- file:///some/local/directory
- defaults
proxy_servers:
http: http://user:pass@corp.com:8080
https: https://user:pass@corp.com:8080
ssl_verify: FalseIn the example above, we first configured the conda source. We added the commonly used Alibaba mirror in China and added a local directory. If we have some internal installation packages, we can place them in this directory. When conda cannot find these packages from the Alibaba mirror server (obviously it won't find them), it will search this directory. When all the paths above fail, conda will finally use the system's default source to search. This situation is common when a package has a new version, but the mirror server has not yet synchronized it.
Sometimes, when accessing conda's official source, we need to use a proxy server to accelerate. The example above shows how to configure these. Some proxy servers do not support SSL verification well; in this case, you need to set ssl_verify to False, as shown in the example above.
Conda allows some other configurations. If necessary, we recommend readers further read about configuring conda^config.
2.3. Creating and Managing Virtual Environments
Now, let us create a virtual environment and use some conda commands to see how to manage it.
$ conda create -n test python=3.8The above command creates a virtual environment named test and installs python=3.8. Now let us check what virtual environments exist in the current system:
$ conda env list
# 输出应该类似于:
# CONDA ENVIRONMENTS:
#
base /root/miniconda3
test /root/miniconda3/envs/testThe output above indicates that we installed Miniconda under /root and also created a virtual environment named test. The folder for this virtual environment is /root/miniconda3/envs/test.
Now let us switch to this newly created virtual environment:
$ conda activate testNow, your shell prompt should change to something like:
(test) root@ubuntu:~# Our test was conducted on an Ubuntu virtual machine, directly using the root account for testing. Therefore, in the prompt above, root is the current username. The (test) before the current username indicates that we are currently in the test virtual environment.
To install a package in this virtual environment, you can use the conda install command:
$ conda install PACKAGENAMENow, suppose we want to remove this virtual environment:
# 退出当前的虚拟环境 TEST,以便可以删除它
$ conda deactivate
$ conda env remove --name testThe above command does not give you a chance to confirm, so you must be careful when using this command. Of course, conda's design is not problematic; virtual environments should be creatable and destroyable at any time. If you accidentally delete the wrong one, just rebuild it. There is always a way back.
Before ending this section, we would like to introduce some advanced usage methods. Mastering these methods will make it easier to solve problems when difficult issues arise.
First, we can check some key information about the conda installation using the conda info command:
$ conda info
active environment : base
active env location : /root/miniconda3
user config file : /root/.condarc
conda version : 4.13.0
python version : 3.8.12.final.0
base environment : /root/miniconda3 (writable)
conda av data dir : /root/miniconda3/etc/conda
channel URLs : https://mirrors.aliyun.com/anaconda/pkgs/main/linux-64
https://mirrors.aliyun.com/anaconda/pkgs/main/noarch
https://repo.anaconda.com/pkgs/main/linux-64
https://repo.anaconda.com/pkgs/main/noarch
https://repo.anaconda.com/pkgs/r/linux-64
https://repo.anaconda.com/pkgs/r/noarch
package cache : /root/miniconda3/pkgs
/root/.conda/pkgs
envs directories : /root/miniconda3/envs
/root/.conda/envsThe content above is the output of the conda info command (some unimportant content has been deleted for brevity), revealing some key information:
- We are currently in the
basevirtual environment. This is a virtual environment that exists by default when you install conda. Its file directory is/root/miniconda3. If you are in thetestvirtual environment, theactive env locationshould point to/root/miniconda3/envs/test. - The configuration file is located at
/root/.condarc. We have already used this file when introducing how to configure conda earlier, but for brevity, we did not tell readers the location of this file there. Now you know that if you are unsure of the location of the conda configuration file, you can use theconda infocommand to view it. - The output above also shows the configuration of conda sources.
- When conda downloads installation packages, it caches them.
package cachetells us the location where conda caches installation packages. When we find that the behavior of installation packages is abnormal, we may need to clear this cache. - Finally,
envs directoriestells us where the file directories of all virtual environments are located. We can list the/root/miniconda3/envsdirectory:
ls /root/miniconda3/envs
# 以下假设上述输出中包含 TEST 虚拟环境
ls /root/miniconda3/envs/test
# 输出中将包含以下重要目录:
bin # 在 bin 目录下,存放有 python, pip 等重要命令
lib # 在 lib 下,存放有 python3.x 目录,site-packages 等安装包将最终安装到这里。Another important command useful for troubleshooting is conda list. It will list the libraries (packages) installed in the current conda environment.
2.4. Common Issues
- Can a virtual environment be renamed? Starting from conda 4.14, conda supports renaming virtual environments:
$ conda rename -n old_name -d new_nameHowever, the above command is actually a simple combination of conda create and conda remove, so in older versions of conda, you can rename a virtual environment like this:
$ conda create --name new_name --clone old_name
$ conda env remove --name old_name- How to track changes in a virtual environment? This is one of the useful features provided by conda, i.e., tracking the change history of a virtual environment:
# 切换到关注的虚拟环境,并运行以下命令:
$ conda list --revisions
# 恢复变更到某个镜像点
$ conda install --revision 2Note the distinction between conda list and conda env list. The latter lists virtual environments, while the former lists the packages and versions installed in the current virtual environment.
For a comprehensive and quick understanding of conda commands, you can refer to the conda cheat sheet ^cheatsheet.
3. Lightweight Python Package Installation Tool Pip
In the previous section, we introduced how to install program libraries into a virtual environment:
$ conda install PACKAGENAMEYou can also use pip to install program libraries:
$ pip install PACKAGENAMEIn fact, taking the test environment you created earlier as an example, conda has already installed pip into the /root/miniconda3/test/bin directory:
$ ls /root/miniconda3/envs/test/binPip has multiple ways to install third-party libraries. Here is a brief introduction:
- Install from wheel files or GitHub.
- Install from local file directories. This is very useful during the development and debugging phase. Its command is
pip install -e path/to/your/source. Here,-eis the key. In this way, every modification we make to the source code takes effect automatically without reinstalling. - Download only wheel files without installing them.
- Install non-officially released files, such as an alpha version. You need to use the option
--pre.
If we execute the pip install command and it prompts that a package cannot be found, after ruling out typos, it is very likely that the package does not exist under the currently used Python version.
4. Configuring the Interpreter in VS Code
We have created a virtual environment and installed Python. But to develop Python applications in VS Code, we must complete the relevant configuration in VS Code.
In VS Code, open the command palette (on Mac it is cmd+shift+p, on other operating systems it is ctrl + shift + p), and enter Python: select Interpreter, as shown in the following figure:
A list will appear as shown in the following figure (the display on your computer may vary):
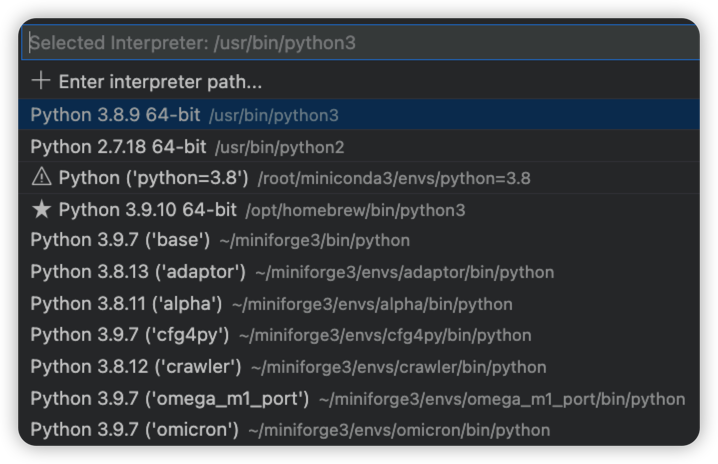
To select the test environment created earlier, you can also directly enter it here:
/root/miniconda3/envs/test/bin/pythonAdditionally, you can look for prompts similar to the following in the status bar of VS Code:

And click it to enter the "Python: Select Interpreter" menu.
Great job!
At this point, you have completed the most basic development environment setup: the IDE is installed, and the Python version to be used has been specified! Now, you can write the simplest Python program:
print("Hello World")Save this program as helloworld.py, and then you can run it via the command line using python helloworld.py!