
Standard Python Project Layout & Automated Generation
Having completed the first three chapters, we now understand how to set up a development environment and have written our first Python program—the classic "Hello World."
You may have already noticed that, aside from its limited functionality, there are significant shortcomings in other areas:
- Generally, users of a program require help documentation and need to understand copyright, authorship, and other metadata. How should this information be provided?
- No program is immune to bugs. You may have heard that to reduce bugs, programs must undergo systematic and thorough testing. How should test code be written and organized?
- Programs should be distributed as installable packages, not merely as source code. The "Hello World" example clearly does not address this aspect.
Info
There is a GitHub project with over 50k stars called [nocode](https://github.com/kelseyhightower/nocode). It truly achieves zero bugs:No code is the best way to write secure and reliable applications. Write nothing; deploy nowhere.
Not writing code means no bugs, which is indeed a profound Zen-like wisdom: "The Bodhi tree is not a tree, the mirror is not a stand; originally there is not a single thing, where can dust alight?" However, even such a project has received over 3k issues (issues are raised when we believe a bug exists or a new feature is needed), far exceeding the average. This seems to be a bit of humor among programmers.
This chapter introduces the directory structure a standardized project layout should have and concludes by introducing a wizard tool that generates a Python project framework adhering to the latest community standards.
Project file layouts must follow certain specifications. This is driven by two considerations. First, the project layout is the first impression a project gives; a messy layout scares away potential users and contributors, whereas a standardized layout makes it easier for others to get started. Second, build tools and testing tools rely on specific file structures. If file structures are not standardized, each tool requires specific configuration to function. Too many configuration options often lead to errors and increase the learning curve.
Readmore
Take the dependency management and build tool Poetry as an example. It defaults to placing built packages in the `dist` directory, and `tox` looks for installation packages in this directory when building test environments. This is a convention.1. Standard Project Layout
First, we introduce a classic Python project layout recommended by Kenneth Reitz[^kenneth], the famous author of the Python HTTP library requests and pipenv.
The layout is as shown below:
├── sample
│ ├── AUTHORS.rst
│ ├── docs
| | ├── conf.py
│ │ └── index.rst
│ ├── HISTORY.rst
│ ├── LICENSE
│ ├── makefile
│ ├── MANIFEST.in
│ ├── README.rst
│ ├── requirements.txt
│ ├── sample
| | ├── app.py
│ │ └── helper.py
| ├── setup.cfg
| ├── setup.py
│ └── testsLet us explain this step by step.
1.1. General Documentation
1.1.1. Project Description Document
The file is generally named README in uppercase. It is used to provide a general overview of the project to its users, such as main features, advantages, and version plans. The file extension here is .rst, a reStructuredText format. Through documentation build tools, rich text format files can be generated. The more popular format now might be Markdown, with the .md extension. We will detail the differences between the two in the documentation building chapter.
1.1.2. License Document
The file is generally named LICENSE in uppercase. Open-source projects must configure this document. This file is generally in plain text format and does not support markup extensions.
1.1.3. Version History Document
The file is generally named HISTORY in uppercase.
Each version release may introduce new features, fix some bugs and security issues, or introduce behavioral changes that require users to make corresponding modifications to use it.
Without a clear version description, library users would not know which version to choose or whether they should upgrade to the latest version. When using libraries developed by others, we do not necessarily have to choose the latest one; sometimes upgrading to the latest version can cause the program to malfunction. For example, SQLAlchemy is a widely used Python ORM framework. Its 1.4 version has many incompatibilities with previous versions. If you upgrade directly to 1.4 without modification, there is a high probability that the program will crash. Therefore, while using a new version may be beneficial, it might also break existing applications due to compatibility issues. Thus, extensive testing is required before upgrading to a new version.
Like README, you can use the .rst or .md file format. We will no longer specifically prompt this later.
1.1.4. Developer Introduction Document
The file is generally named AUTHORS in uppercase. Its purpose is to introduce the project's development team to others.
1.2. Help Documentation
An excellent project often has detailed help documentation to tell users how to install, configure, and use it, and may even include tutorials. The naming of these documents is less strict. Ultimately, they will be converted into beautifully formatted online documentation by documentation generation tools for users to read. Generally, these documents are placed in the docs directory, linked by a master document. Of course, the specific approach depends on the documentation build tool.
1.2.1. API Documentation
There is another category of special documents that do not appear directly in the above directories but are scattered throughout the source code. They are generated by specialized tools and used alongside help documentation. We will introduce help and API documentation in detail in Chapter 10, "Writing Technical Documentation."
1.3. Engineering Build Configuration Files
Different build tools require different configuration files. In Python projects, there are two main mainstream build tools: Python setup tools and newer build tools compliant with PEP517 and PEP518 standards, such as Poetry.
In the directory example above, a build tool based on Python setup tools is used. It requires configuration files such as setup.py, MANIFEST.IN, and possibly requirements.txt and Makefile; this is why you see files like setup.py. If you use Poetry, the configuration files are much simpler, requiring only a pyproject.toml.
When starting a new project, you should use Poetry exclusively, not Python setup tools. Poetry’s dependency management can lock the program’s runtime, avoiding many issues. However, you may still need to understand the old-style engineering configurations based on setup tools, which will likely continue to exist in the next one or two years.
1.4. Code Directory
In other development languages, especially compiled languages, the code directory is often called the source file directory. Since Python is an uncompiled language, code source files are themselves executable, so we generally do not call code files "source files." We usually refer to the distributed target as a "package." Therefore, in the following discussion, we will refer to the code directory as the package directory or package directory.
Therefore, if you are developing a package named sample, your code should be placed in a directory named sample, as shown in the directory view above.
One small point needs clarification: the top-level sample is the project name, and the inner sample is the package name. Two levels of directories sharing the same name may confuse beginners somewhat. However, in Python, we cannot simply change the package directory to src as in other languages, because this would cause the generated package name to be src, which is not only meaningless but also means all libraries developed by everyone would use the same name.
Info
Even worse, some projects (or project generation tools) name the main entry file of the program with the same name as the project. That is, if the project name is `sample`, the main entry program file is also named `sample.py`. In the example above, we recommend naming the main entry program file `app.py`. This file should be your program entry, managing the application's lifecycle, such as initialization, entering the event loop, and responding to exit signals.# 注意, `IMPORT *`一般来说是一种不好的语法,这里这样使用,是为了方便示例。
from sample.helper import *readmore
Pypa provides another file structure in [sampleproject](https://github.com/pypa/sampleproject), where `sample` is placed under the `src` directory.We mentioned in the previous chapter that Pypa is the developer of PyPI, the de facto standard for Python distribution packages. Therefore, their preferences also influence other developers.
It is certain that, regardless of the approach, the code directory name must be the package name and cannot be anything else. Whether to add a src/ layer on top is still a subject of some debate. However, once your project determines its directory structure, do not modify it thereafter, as this involves modifying a large number of files due to its close relation to imports.
1.6. Makefile
Python programmers may not particularly like Makefile. In other languages, makefile and the tool make are primarily used to define dependencies and compile to generate build artifacts. Python programs generally do not require compilation; they only need packaging. Therefore, the latest project templates based on Poetry do not include a Makefile. However, some tools, such as Sphinx documentation building, still require a Makefile; additionally, the multi-target command mode of Makefile still has its uses. Therefore, whether to use Makefile depends on your project's needs.
The project layout recommended by Kenneth Reitz is missing some important files (or directories). These are indispensable for ensuring project quality. They mainly include configuration files for lint tools, tox configuration files, code coverage configuration files, and CI configuration files.
1.7. Lint Tool Configuration Files
Projects may use lint tools like flake8 for syntax checking and black for formatting. These tools introduce configuration files. Additionally, to ensure the style and quality of code committed to the server, pre-commit hooks may be configured.
1.8. Tox
If a project supports multiple Python versions, unit tests often need to be run in various Python environments before release. Automating the construction of virtual runtime environments for unit tests and executing them is what tox does. This is also a practical use case for the virtual runtime environments discussed in the previous chapter.
Projects configured with tox introduce a tox.ini file in the root directory.
1.9. CI (Continuous Integration)
Using CI in a project is an effective method to expose problems early and avoid greater losses. By using CI, we can ensure that code committed by programmers can pass unit tests before being merged into the main branch.
There are some online CI services, such as AppVeyor, Travis, and the rising star GitHub Actions. The author has not used AppVeyor. If you use Travis, you need to place a travis.yml file in the root directory. If you use GitHub Actions, you need to place configuration files in .github/workflows/ in the root directory. GitHub does not require specific names for configuration files.
1.10. Code Coverage
We need to measure the intensity of unit tests through code coverage. Some excellent open-source projects can even achieve 100% code coverage (of course, reasonably excluding some code is allowed). In Python projects, we generally use Coverage[^coverage] for code coverage testing. Testing frameworks like pytest integrate it, so there is no need to call it separately, but generally, you need to configure .coveragerc in the root directory.
As an open-source project, we hope to publish unit test coverage reports to give users stronger confidence. Codecov[^codecov] is such a platform. We generally configure it in CI. Therefore, this part of the configuration will be reflected in the CI configuration document.
An experienced developer will find that a mature project often includes many more configuration files, far beyond what Kenneth Reitz recommends. For example, configuration files for lint tools, tox, code coverage, CI, etc. In fact, manually generating a standardized project framework is not easy. Understanding the role of each tool and configuring them to work together requires experience. Therefore, in many development teams, the task of setting up the framework is generally handled by the dev lead, which is justified. Therefore, we recommend using a project generation wizard to generate the project layout and complete the configuration.
Readmore
The default configurations of some tools may conflict with each other, which is a common phenomenon. Because everyone has their own understanding of what the optimal technical route is. For example, between flake8 and black, there are some disagreements on what constitutes correct code formatting, leading to situations where code formatted by black always fails flake8 checks. Therefore, how to make tools coordinate with each other is also a time-consuming and laborious task when creating a new project.
2. Project Generation Wizard - Python Project Wizard
If you have development experience in other languages, you will find that development tools like Visual Studio or IntelliJ have good wizards. You only need to click some buttons and fill in some information to immediately generate a compilable project. In the Python world, unfortunately, no development tool (whether VS Code or PyCharm) provides such functionality yet.
2.1. Cookiecutter
Fortunately, there is an open-source project, cookiecutter[^cookiecutter], that can help us generate various project frameworks.
Readmore
The current trend is that, besides IDEs, some frameworks and tools themselves are providing generation wizards. For example, Vue in JavaScript. The `Poetry` mentioned multiple times in this article also has the function of generating framework programs, but it cannot provide templates for all the files introduced above, let alone customize them.cookiecutter-pypackage[^pypackage] is a template for generating Python projects developed following the cookiecutter specification, with nearly 4k stars on GitHub.
During the project generation process of cookiecutter-pypackage, it will ask for the developer's name, email, project name, license type (allowing you to choose among several well-known license models like MIT, BSD, etc., and providing standard LICENSE text), whether to integrate the click command-line interface, whether to generate console scripts, etc. After answering these questions, you will get a framework program that you can immediately compile and publish, including documentation.
info
Click is an open-source command-line tool by the Pallets[^Pallets] project team. Pallets is also the developer of the famous Flask and Jinja. By using Click, the Python libraries we create can be easily transformed into command-line applications. Click will handle tedious work such as command-line parsing for us. Click has over 14k stars on GitHub and is one of the essential Python libraries that Python developers must know.cookiecutter-pypackage has been around for a while. It iterates slowly, and the technologies it uses do not fully comply with current community standards. Therefore, the author of this book developed a new template based on cookiecutter-pypackage, which has these features:
- Provides modules for files like README, AUTHORS, LICENSE, HISTORY, etc., and customizes them based on the information you provide.
- Manages project versions and dependencies, performs builds and releases via Poetry. This is also the current mainstream solution.
- Integrates Mkdocs and Mkdocstrings, allowing you to use simple Markdown syntax to write help documentation and automatically extract comments from code to generate API documentation. Another solution is using Sphinx, whose syntax is much more cumbersome.
- Implements matrix-style coverage of multiple Python versions for local unit tests via Tox and Pytest. At this stage, code formatting, syntax checking, and build artifact format testing are also performed to ensure code style fully complies with project conventions and code quality meets requirements.
- In terms of code style enhancement, formats code via Black, reorganizes import code segments via isort, and checks syntax and documentation format via Flake8 and Flake8-docstrings.
- Forces syntax checking and formatting during code commit via Pre-commit hooks[^precommit].
- Generates command-line interfaces (console scripts) using Python Fire[^Python_fire]. Python Fire is simpler and easier to use than Click. You can basically start using it without any learning.
- Uses GitHub Actions for Continuous Integration (CI), implementing matrix-style test coverage across multiple operating systems and Python versions, automatically publishing documentation and build artifacts (i.e., Python libraries), generating code coverage reports, and automatically uploading them to Codecov.
- Uses GitHub Pages to host your documentation.
Readmore
Many concepts are mentioned here, and you may have encountered some for the first time. Let us introduce a small part first.What is artifact testing? When you publish built libraries to PyPI, they may be rejected due to formatting issues, causing the continuous integration process to fail. A tool named Twine can check artifacts to discover such errors in advance.
Python installation tools support adding command-line tools (console scripts) to published packages. In this way, after installing our developed Python library, we can call it directly from the command line, just like native shell commands.
Why publish versions via CI? Publishing from a development machine is quite arbitrary and difficult to ensure the quality of the published package. When your code is committed to the main/master branch and passes tests, you tag the branch, which triggers automatic publishing. Packages published in this way can ensure quality, and each publication ensures that the source code, version number, and published build artifacts are completely consistent and traceable.
The documentation for this wizard tool is here.
3. How to Use the Project Generation Wizard
3.1. Install Python Project Wizard (ppw)
First, create a virtual environment for our new project, let's call it sample:
conda create -n sample python=3.10Then, under the sample virtual environment, run the following command:
pip install ppw3.2. Generate Project Framework
Now, we can use ppw to create a project.
ppwHere, it will prompt you to enter some information.
Note that project_slug is the name of the GitHub repo and is also the name of your library by default. This name cannot contain spaces or "-".
Finally, ppw prompts you whether to create the development environment, with the default being 'yes'. It will install pre-commit hooks, install Poetry, and project dependencies for you. If you are not clear what this means, don't worry; we will explain it in subsequent chapters.
3.3. Install Pre-commit Hooks
If you selected init_dev_env when running the ppw generation command, this step has already run automatically. However, we can take this opportunity to introduce what init_dev_env specifically does.
Pre-commit hooks are a feature of Git that allows you to configure some check hooks so that your code can undergo basic syntax and style checks before being uploaded to the repository, avoiding mixing unqualified code into the repository.
Generally, we install hooks by running the command pre-commit install. When ppw is installed, this command is also installed in your virtual environment. However, if you did not select init_dev_env when generating with ppw, you can manually run this command now.
3.4. Install Development Dependencies
If you selected init_dev_env when running the ppw generation command, this step has also run automatically, just like pre-commit hooks.
We introduced dependency conflicts earlier. One solution is to create a separate runtime environment for each project. Nevertheless, for some large projects, even if you control everything, conflicts may still occur. Some conflicts are caused by various toolkits introduced during our development process, which do not need to be published to end users. Therefore, we can adopt dependency grouping, installing only these potentially conflicting toolkits in the development or testing environments.
The template created by Python Project Wizard does exactly this. It uses Poetry for project management and divides the project's development dependencies into three groups: dev, test, and doc, making the granularity of dependencies smaller. As a developer, you should install all three groups of dependencies.
pip install poetry
poetry install -E doc -E test -E dev
toxAfter installing the development dependencies, we immediately run the tox command to test the newly generated framework program. The command will finally give a test report and lint report. Assuming no unexpected issues, there should be no errors here (but there may be warnings about reformatting).
3.5. Create GitHub Repo
Now, we have a well-structured framework program, and you can immediately start functional development based on it. However, a complete development process includes at least code management, CI, and publishing. Let us next look at how to handle this part.
We use GitHub as the code repository. You can also use GitLab or other code repositories. However, GitHub is a free service that everyone can use without installation or setup. Therefore, in this book, we try to use these free services as much as possible.
Log in to GitHub and create a repo named sample (sample is the project_slug). Then, enter the sample directory on your local machine and execute the following operations:
cd sample
# GIT INIT
git add .
git commit -m "Initial skeleton."
git branch -M main
git remote add origin git@github.com:myusername/sample.git
git push -u origin main3.6. Perform Release Testing
Now, you can test the build process by publishing to testpypi. Of course, you can also temporarily ignore this step.
For this step, please refer to the documentation.
3.7. Set Up GitHub CI
You can also temporarily ignore this step, but we strongly recommend completing it.
The project generated by the wizard already includes necessary CI steps, such as calling tox for testing, publishing documentation, and distributing packages. However, you need to configure some accounts. You need to generate a GitHub personal token and add an environment variable named PERSONAL_TOKEN in repo > settings > secrets, setting its value to your token.
You need to apply for deployment tokens on test pypi and pypi, and add two variables, TEST_PYPI_API_TOKEN and PYPI_API_TOKEN, just like setting the GitHub token.
After you complete the above settings, every time you push code to any branch on GitHub, it will trigger CI, and after passing the tests, it will automatically publish to testpypi; when the main branch commits code and tags it, it will automatically publish to pypi after passing the tests.
Info
Why does pushing our code to GitHub trigger CI and publish to testpypi? The magic lies hidden in the `.github` directory. We will introduce these magics in detail in the CI chapter.CI is set to automatically publish code coverage reports, but you need to import your repo on Codecov[^codecov] and authorize it.
3.9. Set Up GitHub Pages
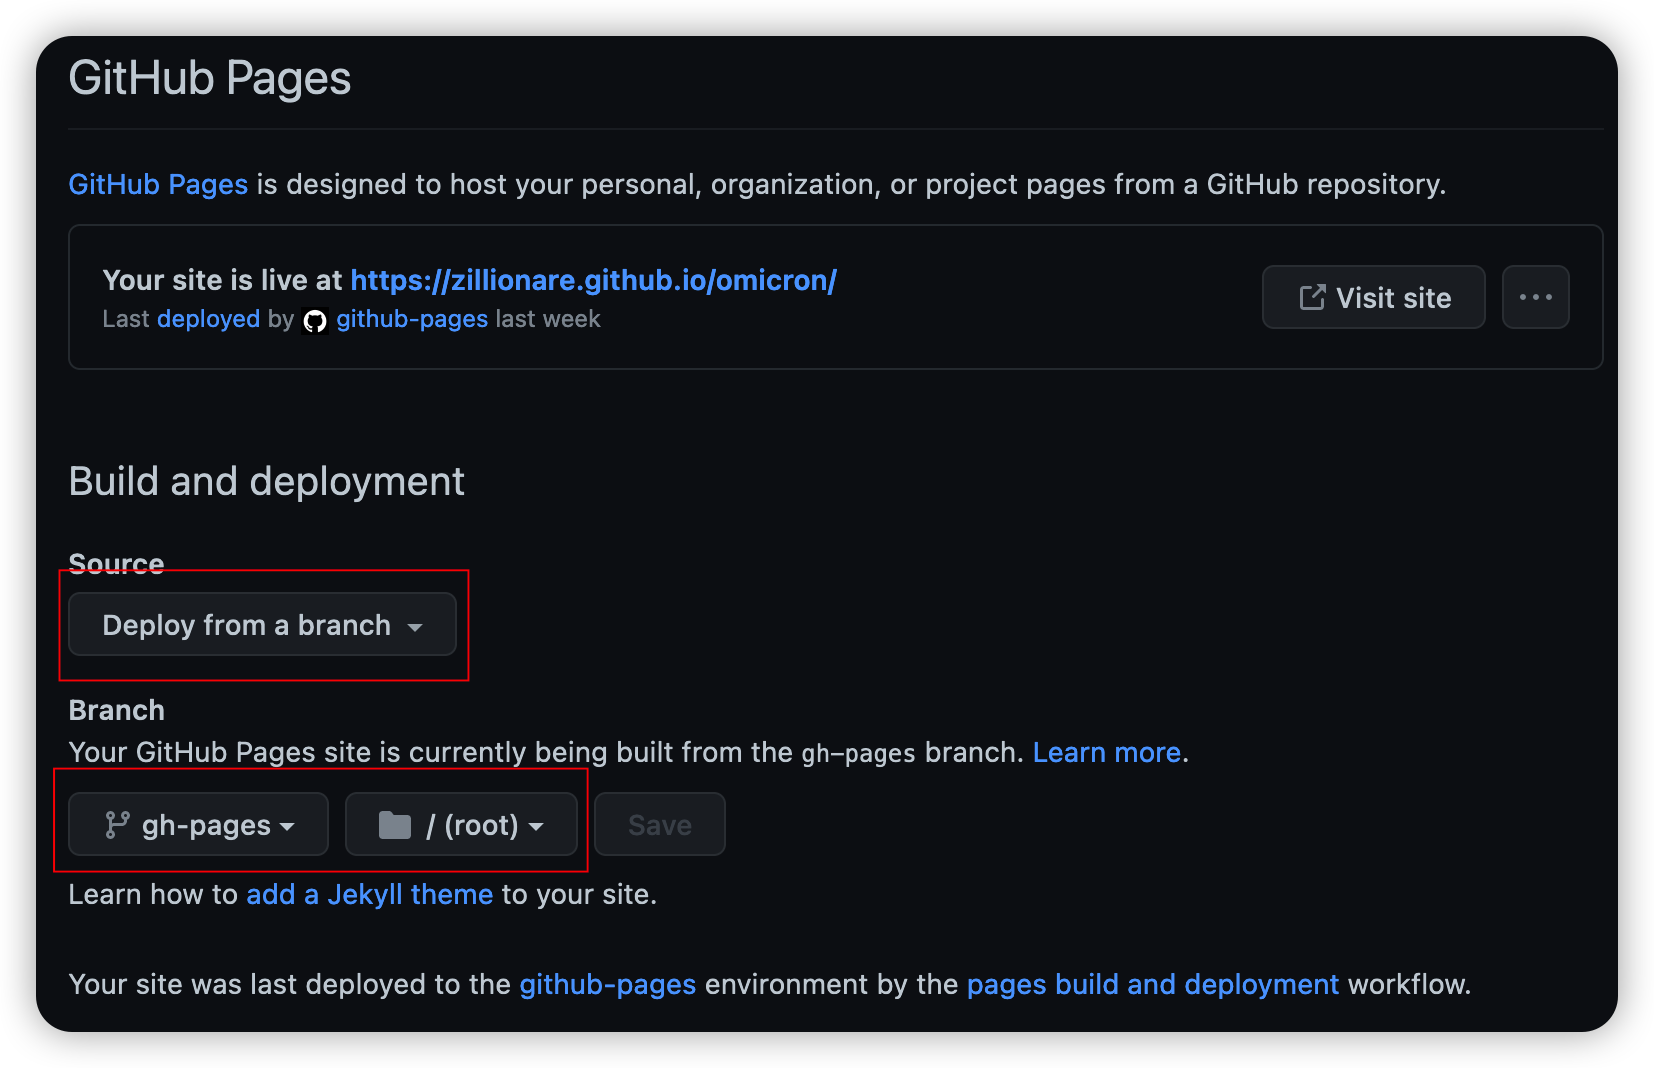
CI is set to automatically publish documentation to GitHub Pages. But you need to enable it in your project. The method to enable it is to select the following two items in repo > settings > pages:
3.10. GitHub Automation Script
For people using GitHub for the first time, some operations starting from creating a Git repository may be difficult; even for people proficient in using GitHub, these steps are tedious and error-prone. Therefore, in projects created by Python Project Wizard, there is a repo.sh script:
#!/bin/bash
# !!!NOTICE!!
# Personal token with full access rights is required to run this scripts
# Once you got persona token, set enviroment variable GH_TOKEN with it
# Create repo and push code to github
gh repo create {{cookiecutter.project_slug}} --public
git remote add origin git@github.com:{{cookiecutter.github_username}}/{{cookiecutter.project_slug}}.git
git add .
pre-commit run --all-files
git add .
git commit -m "Initial commit by ppw"
git branch -M main
# Config github secret used by github workflow.
gh secret set PERSONAL_TOKEN --body $GH_TOKEN
gh secret set PYPI_API_TOKEN --body $PYPI_API_TOKEN
gh secret set TEST_PYPI_API_TOKEN --body $TEST_PYPI_API_TOKEN
# uncomment the following if you need to setup email notification
# gh secret set BUILD_NOTIFY_MAIL_SERVER --body $BUILD_NOTIFY_MAIL_SERVER
# gh secret set BUILD_NOTIFY_MAIL_PORT --body $BUILD_NOTIFY_MAIL_PORT
# gh secret set BUILD_NOTIFY_MAIL_FROM --body $BUILD_NOTIFY_MAIL_FROM
# gh secret set BUILD_NOTIFY_MAIL_PASSWORD --body $BUILD_NOTIFY_MAIL_PASSWORD
# gh secret set BUILD_NOTIFY_MAIL_RCPT --body $BUILD_NOTIFY_MAIL_RCPT
git push -u origin mainThis script helps us complete these tasks:
- Create a GitHub repository and push code to GitHub.
- Add personal token (
PERSONAL_TOKEN) to the GitHub repository, API tokens for publishing to PyPI, and API tokens for publishing to testpypi. - Register email notifications. After GitHub CI execution is completed, whether successful or failed, a notification email will be sent to your registered email.
To run the above script, you need to complete two things:
- Install the GitHub CLI tool. Please refer to the Installation Guide.
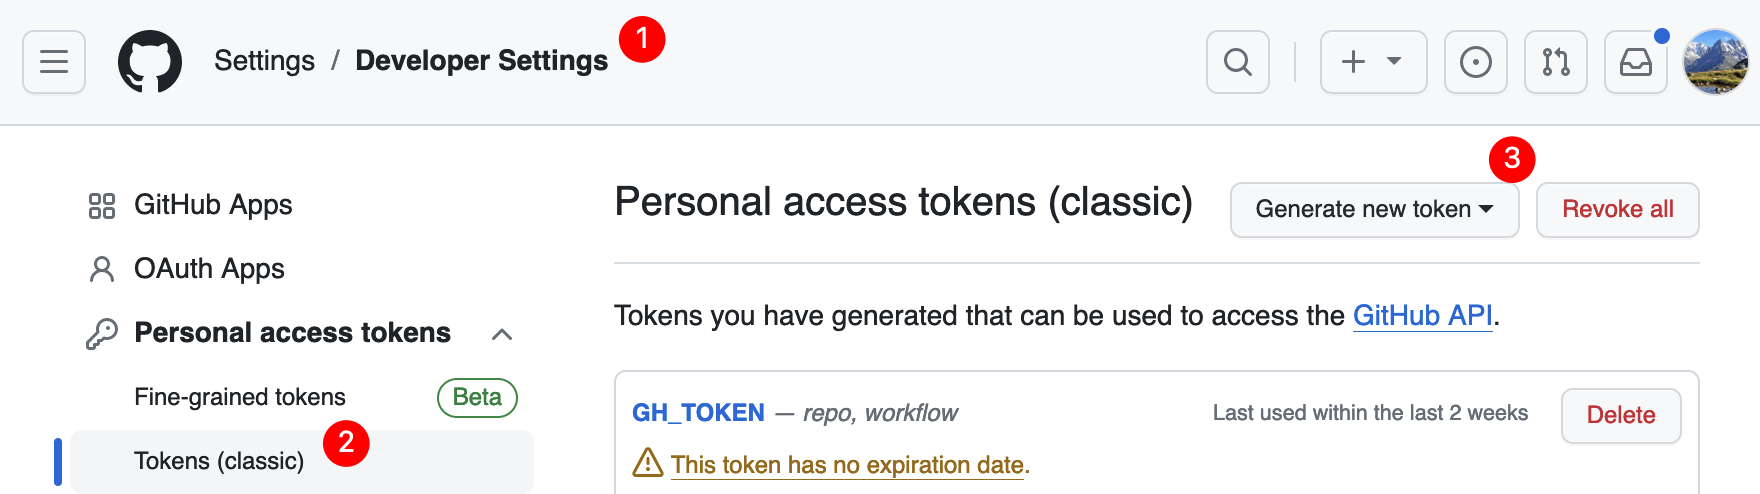
- Apply for a GitHub personal token (with all permissions) and expose this token to the script via the environment variable
GH_TOKEN. Only in this way can the script create a GitHub repository and set other tokens.
Personal tokens need to be set in the path Account > Settings > Developer Settings > Personal Access Tokens:
Once this token is set, you can add it to the environment variables on your development machine and reference it in the above script. Thereafter, when you create new projects, you no longer need to open the GitHub website but can directly complete the work of creating a new repo through the above script.
3.11. File List Generated by ppw
Now, a standardized new project has been created, and you have many cool features, such as CI, Codecov, GitHub Pages, Poetry, Markdown-based documentation, etc. The newly generated project should look like this:
.
├── .coveragerc
├── .docstring.tpl
├── .editorconfig
├── .flake8
├── .git
│ ├── hooks
│ │ ├── pre-commit
│ │ └── ...
├── .github
│ ├── ISSUE_TEMPLATE.md
│ └── workflows
│ ├── dev.yml
│ └── release.yml
├── .gitignore
├── .isort.cfg
├── .pre-commit-config.yaml
├── AUTHORS.md
├── CONTRIBUTING.md
├── HISTORY.md
├── LICENSE
├── README.md
├── docs
│ ├── api.md
│ ├── authors.md
│ ├── contributing.md
│ ├── history.md
│ ├── index.md
│ ├── installation.md
│ └── usage.md
├── mkdocs.yml
├── poetry.lock
├── pyproject.toml
├── pyrightconfig.json
├── repo.sh
├── sample
│ ├── __init__.py
│ ├── app.py
│ ├── py.typed
│ └── cli.py
├── tests
│ ├── __init__.py
│ └── test_app.py
└── tox.iniNext, we will guide you to delve into these tools, understand why this particular tool was chosen among many, how they should be configured, how to use them, and so on.

[^kenneth]: Kenneth Reitz developed the requests library, which is very famous. On GitHub, searching with the keyword Python and ranking by stars, this library ranks in the top 10.
[^coverage]: The documentation for coverage.py is here: https://coverage.readthedocs.io
[^cookiecutter]: https://cookiecutter.readthedocs.io
[^pypackage]: https://github.com/audreyfeldroy/cookiecutter-pypackage
[^Pallets]: https://palletsprojects.com/
[^precommit]: https://pre-commit.com/
[^Python_fire]: https://github.com/google/python-fire
[^codecov]: https://about.codecov.io/