
Git Version Control Best Practices for Quant Devs
1. The Importance of Version Control
When I was a graduate student, I made a mistake that still haunts me. It was 2:00 AM, six hours before we were scheduled to deliver a system we had developed to nearly 20 users in a conference room. Those users would rely on our software to determine the futures of nearly 10,000 young people. At that moment, we discovered that the tested, packaged version had been deleted while cleaning up disk space. However, since that version, we had made some code changes. These changes included feature enhancements and minor bug fixes, representing about a day’s worth of work. They were untested and not ready for release.
Today, it is hard for programmers to understand why this was such a major issue. But at the time, lacking version control tools (CVS had only been released a few years prior and had just entered China; it was understandable that we, on campus, were unaware of it), we faced an awkward situation: we had no ready-to-release software, nor a way to easily roll back the code to the version that had passed testing to build an identical release.
It was a painful night. Some began preparing contingency plans, while we, filled with guilt, tried hard to roll the code back to the state it was in when it passed testing.
If we had CI/CD, this mistake would almost never have happened. Even if it did occur, having version control would have significantly reduced the cost of correction.
Version control is a system that records changes to one or more files over time so that specific revisions can be recalled later. When writing this book, I used version control for both the text content and the accompanying source code.
If you are a graphic or web designer, you might need to save all revision versions of a specific image or page layout file (a feature you likely desire). Using a Version Control System (VCS) is a wise choice. With it, you can restore selected files to previous states, or even roll back the entire project to a state at a past point in time. You can compare file change details, find out who modified what last, identify the cause of bizarre issues, determine who caused a feature defect and when, and so on. Using a version control system usually means that even if you mess up the entire project by modifying or deleting files, you can easily restore the original state with minimal additional effort.
Back to my graduate school days, many people were accustomed to saving different versions by copying the entire project directory, perhaps adding a backup timestamp to the directory name to distinguish them. The only benefit of this approach was simplicity, but it was particularly prone to errors. Sometimes, you would confuse your working directory, accidentally writing to the wrong file or overwriting an unexpected one.
To solve this problem, many local version control systems were developed long ago, most using some form of simple database to record the differences in file updates. The most popular version control system during this period was likely RCS. Its working principle was to save a patch set on the hard disk (a patch refers to the changes before and after a file revision); by applying all patches, the content of files for each version could be recalculated.
The disadvantage of RCS was that it did not support branching operations (we will detail branching operations later), and since it could only manage local files, it could not support multi-person collaboration. Therefore, Client/Server (C/S) architecture centralized version control systems (Centralized Version Control Systems, abbreviated as CVCS), such as CVS, Subversion, and Perforce, were developed. The basic principle of these systems is that there is a single server acting as a centralized file storage and repository. All files must be accessed through this server, which effectively controls who can do what. The disadvantage of CVCS is that it requires a network connection to work. If the server is set up in a local area network, it requires a 24/7 computer as the server, and all files must be accessed through this server, creating a bottleneck in access speed.
To solve these problems, Distributed Version Control Systems (DVCS), such as Git, Mercurial, and Bazaar, were developed. The basic principle of DVCS is that every developer’s computer is a complete version repository. When a developer clones a project, they possess the complete historical version of that project. If they make some local modifications and want to share them with others, they only need to push their local repository to the server. Afterward, others can pull the latest version from the server to their local machine, merge it with their own modifications, and push it back to the server. This forms a distributed collaborative development model.
In this book, we only introduce Git, one type of version control system.
2. The Version Management Tool Git
Git was born in 2005. Its developer, Linus Torvalds, is also the creator of the Linux operating system. It has superior performance, is suitable for managing large projects, has an incredible non-linear branch management system, and is currently one of the most popular code management systems in the world.
Git essentially continues the concepts and APIs of most version control systems in its interface, but its underlying design is radically different, creating its powerful engine. Its main features are:
Directly records snapshots, rather than differences: Other version control systems extract differences between different versions as increments for recording. When extracting the latest file, you need to start from the initial version and merge all differences up to the latest version. Early computers had precious storage resources, so previous generations of version control systems adopted this design to reduce storage resource usage. Git does the opposite; it treats files as snapshots of specific files at a specific moment. Every time you commit an update or save the current state of the project, Git creates a snapshot of all files at that time and saves the index of this snapshot. Git’s design makes it very suitable for handling large projects and is extremely fast.
Almost all operations are executed locally: One of Git’s design goals is to ensure speed. Git’s main operations only require accessing local files and resources. Almost all information can be found locally, so Git is very fast. Another design goal of Git is to reliably handle various non-linear development (branching) histories. Git’s branching and merging operations are very efficient.
Git’s integrity guarantee: All data in Git is checksummed before storage and then referenced by checksum. This means that Git will automatically detect data corruption during storage and transmission.
Append-only operations: Almost all Git operations you perform only add data to the Git database. That is, Git almost never performs any operations that could result in unrecoverable files. This makes using Git a reassuring and pleasant process, because we know we can freely try various things without the danger of messing things up.
Next, we will mainly introduce Git commands and techniques in order of usage scenarios, from shallow to deep.
2.1. Creating a Git Repository
A Git repository (also called a storage repository) is the virtual storage for a project. It allows you to save versions of your code, which you can access when needed.
Generally, there are two ways to create a Git repository, depending on how your development work starts. However, before formally introducing them, let’s first look at a basic setup command.
When you first use Git on a machine (or in a project), the first thing we need to do is set your username and email address. This information is used for every commit.
$ git config --global user.name "John Doe"
$ git config --global user.email johndoe@example.comHere we used the --global option, so that on the same machine, you only need to configure it once, and all projects will reuse this setting. But if you work on multiple projects simultaneously and want to use different usernames and email addresses for different projects, do not use this option. The result is that these configurations will be written to the .git/config file of the current project, without affecting other projects. Of course, this per-project configuration must be done after the project repository is set up.
Now, let’s create a local repository.
2.1.1. Creating a New Local Repository: git init
To create a new repository, you will use the git init command. git init is a one-time command used during the initial setup of a new repository. When you execute this command, Git will create a new subdirectory in your current working directory. This will also create a new main branch.
This example assumes you already have an existing project folder that you want to add to Git’s version control. We need to enter the root directory of the project first, then run the git init command.
$ cd /path/to/your/project/root
$ git initThis will create a subdirectory named .git. This subdirectory contains all the necessary files for the Git repository; these files are the backbone of the Git repository. However, at this point, we have only performed an initialization operation, and the changes to files in your project are not yet being tracked (if we created the repository by cloning from a remote repository, all file changes would already be tracked).
2.1.2. Cloning an Existing Repository: git clone
If a project has already been established in a central repository, the clone command is our most common way to obtain versions.
Assuming GitHub is our server, we need to clone the repository for this book from GitHub to our local machine:
$ git clone git@github.com:zillionare/best-practice-python.gitThis will create a folder named best-practice-python in the current directory, with all files and Git information saved in this folder.
In addition to the above methods, we can also use the HTTPS protocol to clone:
$ git clone https://github.com/zillionare/best-practice-python.gitOr use the GitHub CLI to clone:
$ gh repo clone zillionare/best-practice-pythonThe GitHub CLI has powerful features, allowing us to achieve many automation tasks, which we will introduce later.
2.2. Establishing Association with Remote Repository: git remote
If the local repository was created via git clone, it is already associated with the remote repository. If it was created via git init, we still need to establish this association via the git remote command, so that we can push local changes to the remote server later.
If you are the first person to create a repository for this project, you likely still need to log in to the server to create an empty central repository. If you are part of a team, you may already have a central repository, and you need to know its URL.
Code hosting platforms like GitHub, GitLab, or Bitbucket all provide web interfaces, allowing us to log in to the web interface to perform operations.
If the hosting platform we use is GitHub, we can also use its command-line tool, GitHub CLI, to perform operations. The following command will create a public repository named sample on GitHub. In many contexts, this name is also referred to as project_slug.
$ gh repo create sample --publicObviously, authentication is required before executing the above command.
Now, since we have a remote repository and obtained its URL, we can establish the association between local and remote:
# 请替换下面语句中的{{GITHUB_USER_NAME}}为你的 GITHUB 用户名,{{PROJECT_SLUG}}为你的项目名
# 比如, GIT REMOTE ADD ORIGIN GIT@GITHUB.COM:ZILLIONARE/SAMPLE.GIT
$ git remote add origin git@github.com:{{github_user_name}}/{{project_slug}}.gitThis command also defines an alias for the remote repository, namely origin. This alias can be arbitrary; for example, since our server uses GitHub, we could also call the alias github. However, origin is Git’s default alias, so most people generally use this alias. After defining the alias, we can use the alias to replace the remote repository’s address in other commands, thereby simplifying the commands.
2.3. Saving Changes: add, commit, stash, etc.
When we modify some files in the working area (including creating new files, modifying file content, and deleting files), we need to save these changes to the version control system or temporarily stash them. This requires commands like add, commit, and stash.
# 将根目录下的文件及文件夹递归地加入跟踪,暂存模式
$ git add .
# 进入提交状态
$ git commit -m 'initial project version'At this point, using the git branch -v command, we will find that we are already on the main branch and have already had one commit. If the branch name is master, it is recommended to run the following command to change it to main:
$ git branch -M mainInfo
Starting October 1, 2022, new code repositories created on GitHub have `main` as the default branch, not the previous `master`. The above renaming operation is precisely to maintain consistency with GitHub.GitHub changed the default branch name from master to main, mainly influenced by the US "Black Lives Matter" movement in June 2020. The purpose of this movement was to oppose racial discrimination, and the word master was named from the perspective of slave owners. Therefore, renaming it to main was to avoid this discrimination.
Influenced by "Black Lives Matter," besides GitHub, many tech giants and well-known software have also adjusted their businesses or products. For example, MySQL announced the removal of terms like master, blacklist, and whitelist; Linus Torvalds passed a proposal in Linux to avoid terms like master/slave; and Twitter, GitHub, Microsoft, LinkedIn, Ansible, Splunk, OpenZFS, OpenSSL, JP Morgan, Android mobile operating system, Go programming language, PHPUnit, and Curl announced the removal or change of such terms.
In fact, the political correctness of computer terminology has long been a familiar topic. In 2004, "master/slave" was rated as one of the ten least politically correct words of the year by global language testing agencies. In 2018, the IETF also pointed out in a draft that open-source software should change the expressions "master/slave" and "blacklist/whitelist." If our software is面向 global, we should try to avoid using these terms to prevent unnecessary misunderstandings.
HEAD
HEAD is the pointer to the current branch reference; it always points to the last commit on that branch. It is also the parent node of the next commit. In some scenarios, we can also regard HEAD as a synonym for the branch. It is where changes go after we execute the git commit command.
Index
When we call the git add command, we record the change records in the index area. Then, from here, we commit the changes to the branch. More often, people use the term "staging area," but index is the standard term used in Git.
Working Tree
Finally, we need to have our own working directory (usually also called the working area). The other two trees (i.e., HEAD and INDEX) store their content in the .git folder in an efficient but not intuitive way. The working directory unpacks them into actual files for editing. You can regard the working directory as a sandbox. Before you commit modifications to the staging area and record them in history, you can change them freely.
The following figure shows the relationship between these three concepts:
We explain the flow of changes by combining commands and diagrams.
$ git status
On branch main
Your branch is up to date with 'origin/main'.
Changes not staged for commit:
(use "git add <file>..." to update what will be committed)
(use "git restore <file>..." to discard changes in working directory)
modified: README.md
no changes added to commit (use "git add" and/or "git commit -a")The status command shows that the file is in the working directory (working directory) and has not yet entered the staging area.
At this point, in the VSCode sidebar, we can see the README.md file appearing under the changes category (note that VSCode uses different terminology than Git, which is understandable).
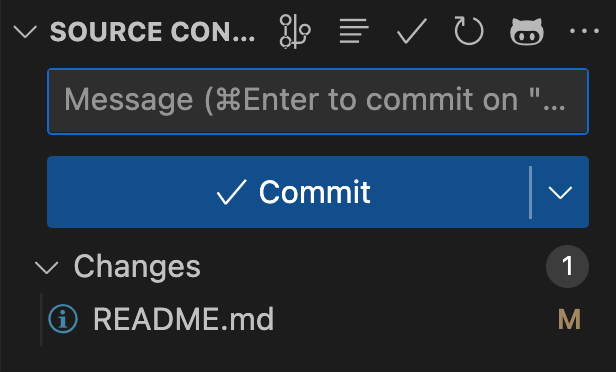
We can use the git add command to add the README.md file to the staging area, then check the status again:
$ git add README.md
$ git status
On branch main
Your branch is up to date with 'origin/main'.
Changes to be committed:
(use "git restore --staged <file>..." to unstage)
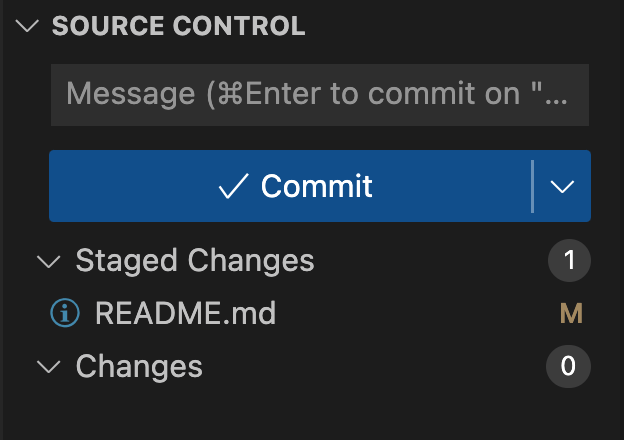
modified: README.mdThe Status command prompts that README.md has not yet been committed (at this time, the file is in the staging area). At this point, in the VSCode sidebar, we can see the README.md file appearing under the Staged Changes category, as shown in the figure below:
Next, we commit to the local repository and check the current status again:
$ git commit -m "update README.md"
$ git status
On branch main
Your branch is ahead of 'origin/main' by 1 commit.
(use "git push" to publish your local commits)
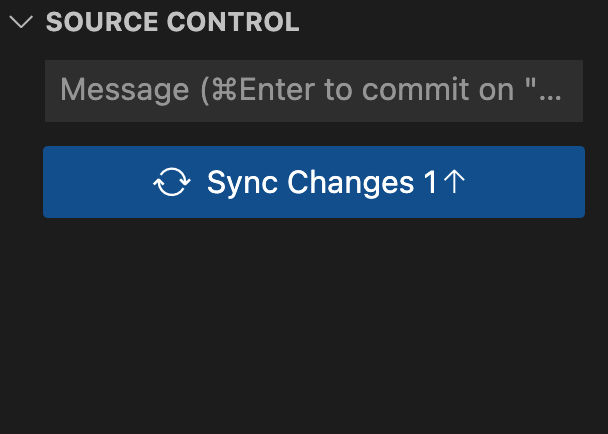
nothing to commit, working tree cleanNow, the status of the three areas is completely consistent (see the last sentence in the output above: nothing to commit, working tree clean). But there is still a prompt: the local branch is one commit ahead of the remote main branch (Your branch is ahead of 'origin/main' by 1 commit), meaning the changes we just committed have not yet been synchronized to the remote server. At this time, the commit we just executed can be found under the COMMITS category.
As shown in the figure below, at this point, the SOURCE CONTROL category in the VSCode sidebar is cleared, and only a sync changes button appears. Once we click this button, the changes we just committed will be published to the remote server.
In this case, we need to use the stash command. We will first introduce some examples of the git stash command-line mode, and then introduce how to use it from the graphical interface:
# 贮藏当前未提交的变更
$ git stash
Saved working directory and index state \
"WIP on master: 049d078 added the index file"
HEAD is now at 049d078 added the index file
(To restore them type "git stash apply")
# 查看所有的贮藏
$ git stash list
stash@{0}: WIP on master: 049d078 added the index file
stash@{1}: WIP on master: c264051 Revert "added file_size"
stash@{2}: WIP on master: 21d80a5 added number to log
# 应用最近的贮藏,但不删除它。
$ git stash apply
On branch master
Changes not staged for commit:
(use "git add <file>..." to update what will be committed)
(use "git checkout -- <file>..." to discard changes in working directory)
modified: index.html
modified: lib/simplegit.rb
no changes added to commit (use "git add" and/or "git commit -a")
# 应用最近的贮藏,并删除它
git stash pop
# 直接删除最近的贮藏
git stash dropWhen we apply a stash, the changes in the stash will be applied to the current working area, which may also cause conflicts that we need to resolve manually. In the above command, we did not specify the name of the stash to operate on, so the target of the operation is the most recent stash. But we can also specify the name of the stash when operating.
In the Git Lens extension in VSCode, we can stash the current changes in the "Changes" panel (as shown in Figure 8-5):
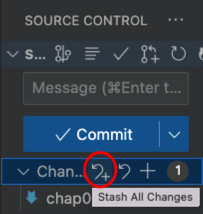
The button in the red box in the above figure is the stash all button. Clicking it will stash the current changes. We can view all stashes in the "Stashes" panel:
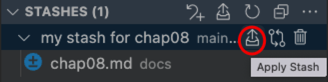
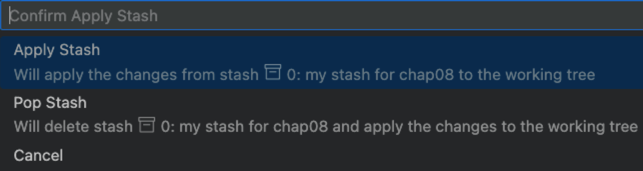
Clicking the "Apply" button brings up a dialog box with two prompts: one is to apply only without deleting the stash; the other is to apply and delete the stash:
Finally, we introduce the .gitignore file. There are some files we do not want Git to track, such as temporary files generated by IDEs, log files, certain files involving passwords (such as .env), etc. We can configure these files in the .gitignore file, and Git will ignore these files.
Each line of the .gitignore file is a string matching pattern conforming to the glob patternglob. Files (or folders) matched by this pattern will not be tracked by Git. We can manually edit this file, but generally, we should use related extensions to assist in managing this file.
2.4. Synchronizing Changes with Others: git push and git pull
The previous operations only recorded changes in the local Git system. To make these changes visible to others, we need to push these changes to the remote repository.
$ git push -u origin mainThe -u parameter is to associate the local main branch with the remote main branch. In subsequent pushes or pulls of branches, the command can be simplified:
# 当我们不指定分支名时,GIT 会使用当前分支
$ git push
# 从远程仓库拉取其它人所做的变更
$ git pullNote that the command to associate the local repository with the server (i.e., git remote add) only needs to be executed once; but every time a new branch is created, you need to execute the git push -u ... command the first time you push changes to that branch, so that the binding between the local branch and the remote branch is completed during the push. Once the binding is completed, the -u parameter can be omitted in subsequent push (or pull) actions.

2.5. Git Tags
As development proceeds, eventually, we will reach some important milestones, such as the completion of a certain version. At this time, we will tag the state of the repository for easy tracing back. This requires a series of git tag commands.
# 列出所有的标签
$ git tag
v0.9
V1.0
# 有筛选地列出标签
git tag --list "v1.0.*"
v1.0
# 创建标签:使用-A 选项指定标签名,-M 指定标签的描述文字
$ git tag -a v1.4 -m "my version 1.4"
$ git tag
v0.9
v1.0
v1.4
$ git tag -a v1.5 -m "my version 1.5"
$ git tag
v0.9
v1.0
v1.4
v1.5
# 查看标签信息
$ git show v1.5
tag v1.5
Tagger: zillionare
Date: Mon Jan 23 15:10:55 2023 +0800
second
commit 57eb735f513c753e49b2fe3005ccfa9b3412762d (HEAD -> main, tag: v1.4, tag: v1.5, origin/main)
Author: zillionare
Date: Mon Jan 23 10:19:28 2023 +0800Here we pause for a moment to explain what tags actually mean. We said earlier that creating a tag is the action of marking a certain state of the repository. In lines 14 and 15 of the above example, we created two different tags consecutively without any new commits. Considering that our repository has a linear commit history, what exactly do these two tags point to? The command output in line 23 subsequently showed that these two tags point to the same commit, i.e., 57eb. These two tags are associated with the state of the repository after commit 57eb. This also shows that tags are not a one-to-one mapping with commits, but a many-to-one mapping.
Since tags point to commits, you might think, can we append a tag to a past state? Your guess is correct; we can indeed do this:
# 假设我们又向仓库做了若干提交之后,发现需要对'57EB'这个提交打上标签
git tag -a v1.6 57eb -m "my version 1.6"info
As mentioned earlier, in Git, the identifier for many objects is a hash string. The identifier for each commit (commit id) is also a 40-byte hash string based on the SHA-1 algorithm.In the command example just now, we used the first 4 bytes of the commit (commit) hash string to replace the entire hash string. In Git, we can only use the first few bytes of the commit hash string to replace the entire hash string, as long as it is unique and includes at least 4 bytes.
You might be curious: if a project is large enough, the probability of commit id hash collisions will increase. How many bytes will we eventually need to use to uniquely determine a hash string? The Linux kernel is a very large Git project. As of February 2019, it had recorded over 875,000 commits. Calculations show that at least 12 characters are needed to ensure uniqueness.
# 一次性地将所有标签推送到远程
$ git push origin --tags
# 仅推送特定标签
$ git push origin v1.6It is also possible that we need to delete tags, which is also a two-stage operation:
# 从本地删除 V1.4 这个标签
$ git tag -d v1.4
# 从远程删除 V1.4 这个标签。这一步可以与上一步独立运行
$ git push origin --delete v1.4After creating a tag, the common operation we use with that tag is to check out the file version pointed to by the tag, such as checking out this version on a CI server to build (build). At this time, we can use the git checkout command:
git checkout v1.4If our purpose for checking out a certain tag is to modify it, note that in this case, we should create a new branch for this checkout. Then we can modify it in this working area and push it to the server. If we do not create a new branch and directly modify the code checked out to the working area, it will cause the repository to be in a "detached HEAD" state. In this state, we can make modifications, but we cannot commit, meaning these modifications will eventually be lost.
At this point, we have basically encountered all the basic operations in Git. We have learned how to create repositories, track changes, commit changes, synchronize with remote servers, and create tags to record important moments in development. Of course, there are some debugging operations we have not introduced, such as viewing logs (git log), which readers can explore on their own. Additionally, after mastering the working principles of Git, we prefer to manage Git repositories through graphical interfaces, so operations like viewing change history should also be viewed through graphical interfaces.
info
Recalling that night many years ago, if we had used version management plus CI/CD back then, it would have been one of countless beautiful nights. In fact, until 2:00 AM, everything was very beautiful. The aged Maotai prepared by the project team for celebration had already been opened; the pale golden liquid and rich sauce aroma are unforgettable.3. Branch Management
Almost all version control systems support branching in some form. Using branches means that parallel development of multiple features (or hotfixes) is possible; in other words, it allows multiple people to develop simultaneously, or one person to follow up on several features at the same time, with the code eventually being merged relatively easily.
Some people call Git’s branching model its "killer feature." Compared with other version management tools, Git’s way of handling branches is incredibly lightweight. Creating a new branch can almost be completed in an instant, and switching between different branches is equally convenient. Unlike many other version control systems, Git encourages frequent use of branches and merges in the workflow, even if done many times a day.
The root cause of Git’s excellent branch management lies in its underlying design. We mentioned earlier that Git, unlike other software, does not save file changes or differences, but a series of file snapshots at different moments. Its characteristic is to trade storage space for time (performance).
Until now, we have not given branches a clear and complete definition. We can understand branches this way: Suppose we are developing a blog website. The development team has 4 people, with features including persistence and caching modules, document object abstraction modules, theme and display modules, comment management modules, etc. If each person is responsible for one feature, the most efficient development mode should be for each person to develop independently on their own branch, complete unit testing for their module, and then merge into a common branch (e.g., called develop) for integration testing. When integration testing is complete, merge into the main branch to complete the version release, and then enter the next feature iteration.
Additionally, we will encounter situations like this: after the website’s 1.0 version is released, new feature development has already begun, but there is an urgent bug that needs to be fixed. At this time, we need to switch to the online branch (i.e., a tag above main), create a hotfix branch, fix the bug, test and release, and finally merge into the main branch and the integration branch (develop).
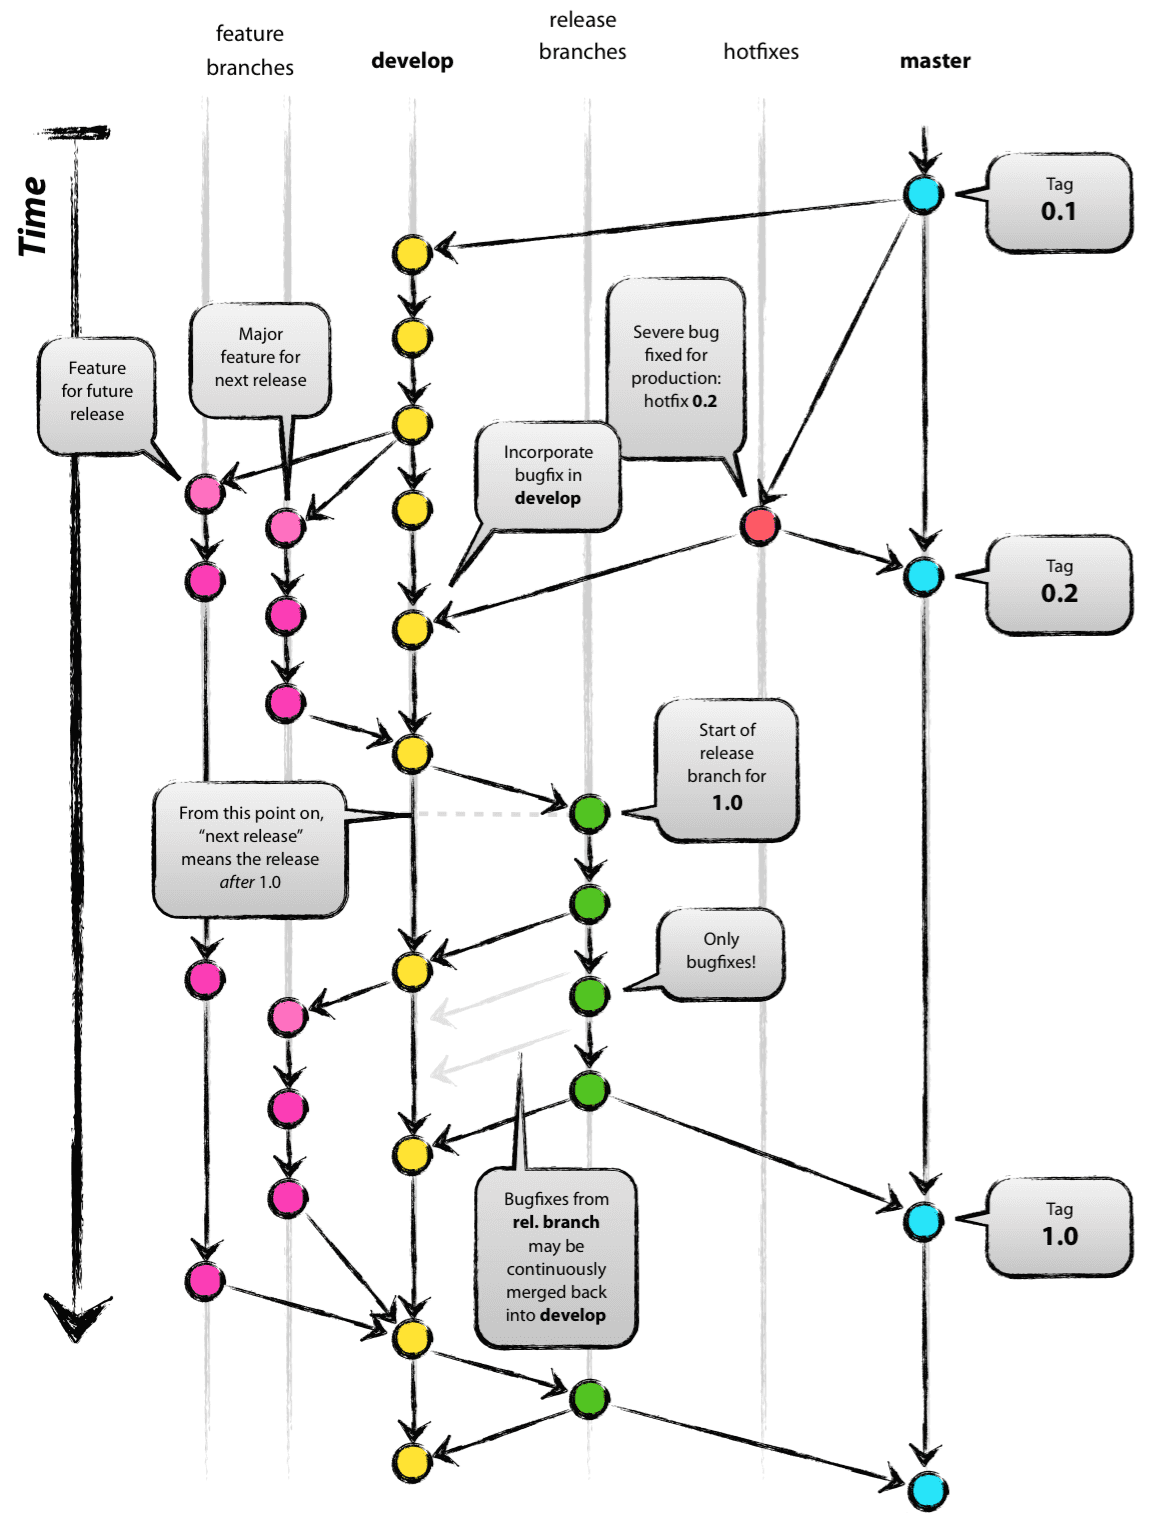
The above development scenario is a relatively typical one. In 2010, Vincent Driessen abstracted it into a workflow model, which has been widely recognized in the following 10+ years. Bitbucket, the Git repository hosting service produced by the famous Atlassian company, also recommends this model in its official documentation. Vincent also developed the Git extension gitflow based on this model to help people better apply this model. So far, this project has gained 26.1k stars on GitHub.
 {width="50%"}
In this model, there are always two branches on the server: the main branch (originally master in the original image) and the develop branch. The head pointer of the main branch should point to the state when the product build was released, meaning we should be able to build a usable product from the main branch at any time. The develop branch can be regarded as an integration branch; its head pointer should reflect the latest development status of the next release. This is also the branch we use to create nightly builds.
When the code on the develop branch reaches a stable state and is ready for release, all these changes should be merged into the main branch, and tagged with a version number. By definition, every time changes are merged into the main branch, a new release version should be generated. Therefore, merging into the main branch should be very strict, using hooks to ensure that the CI process automatically builds software and tests, and completes deployment (or publishes to PyPI).
If the developer is a team, obviously, merging from the develop branch to the main branch should be the work of the develop lead.
Besides main and develop, we will also have a series of auxiliary branches that only exist temporarily and will eventually be removed. These branches are:
- Feature branches
- Release branches
- Hotfix branches
These branches have their own specific goals, so their sources and final merge destinations also follow strict rules.
3.1. Feature Branches
Feature branches are created from the develop branch to develop a new feature. When the feature development is complete, it needs to be merged back into the develop branch. We can name the branch {{feature_name}}/{{developer}}. Here, feature_name is the name of the feature, and developer is the developer in the team responsible for this feature. Of course, if only one person is responsible for the feature development, the developer part can be omitted.
We should create a feature branch like this:
git checkout -b feature_name/developer_name developDuring development, we should submit and push changes to the remote server in a timely manner to avoid code loss and facilitate code review by others. When feature development is complete, we should timely merge changes from the feature branch back into the develop branch and delete the feature branch. The following is an example of operation commands:
$ git checkout develop
Switched to branch 'develop'
$ git merge --no-ff myfeature
Updating ea1b82a..05e9557
(Summary of changes)
$ git branch -d myfeature
Deleted branch myfeature (was 05e9557).
$ git push origin developThe commands here are used to describe the workflow. In practice, we prefer to use the graphical interface of Git Lens to operate. Note the --no-ff option in line 4. The purpose of this option is to allow us to still see a complete history record on the develop branch, including the existence of a feature branch and which commits constitute a feature. The following figure compares the differences with and without using this option:
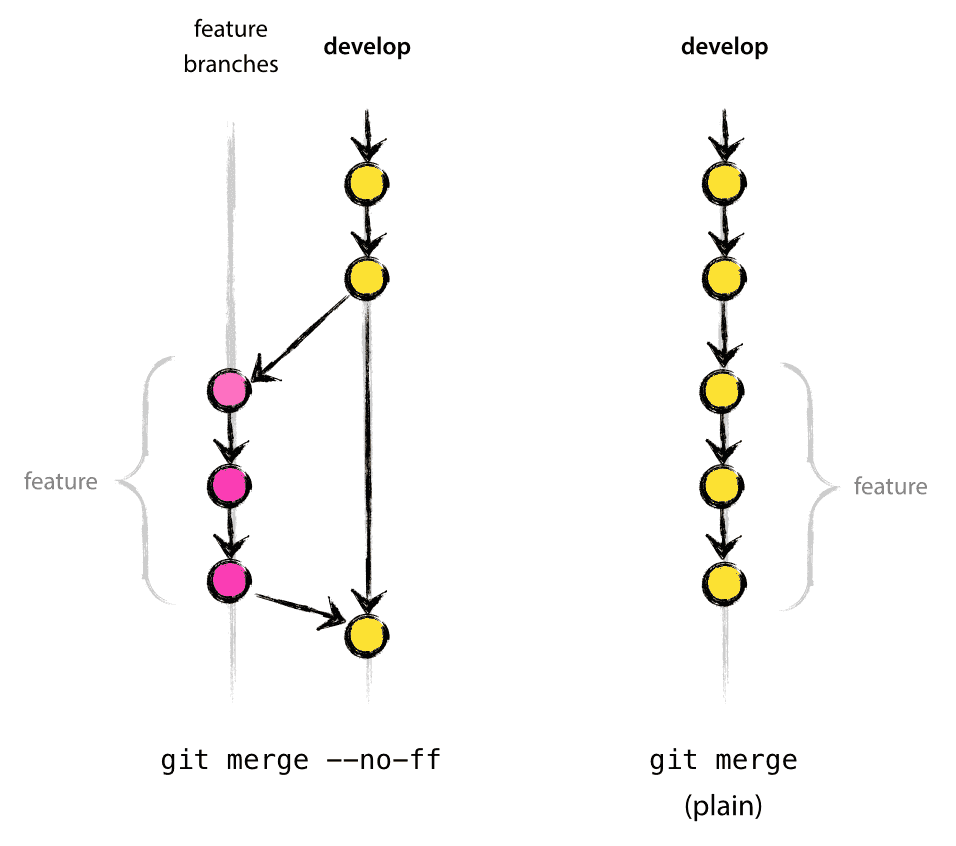
The right part of the above figure shows a normal merge (i.e., without specifying the --no-ff option). Here, it is not obvious which commits constitute a feature (unless checking the log), let alone the existence of the feature branch. Additionally, in the right case, rolling back the entire feature would be a headache.
3.2. Release Branches
Release branches are used to prepare for a new release, completing every detail before the official release. This branch also allows small patches and some meta-data changes (such as version numbers, build dates, etc.). Once the release branch is created, the develop branch can continue to develop features for the next version. When the release is complete, it needs to be merged back into the develop branch and the main branch. Branch names generally use release-*.
Migration from the develop branch to the release branch should occur after all features are merged into develop, and any features not belonging to this release should absolutely not have entered the develop branch before this.
The version number should only be determined when the release branch is created. The command to create a release branch is (assuming the previous version was 1.1.5 and the latest version is set to 1.2):
$ git checkout -b release-1.2 develop
Switched to a new branch "release-1.2"
$ poetry version 1.2
Files modified successfully, version bumped to 1.2.
$ git commit -a -m "Bumped version number to 1.2"
[release-1.2 74d9424] Bumped version number to 1.2
1 files changed, 1 insertions(+), 1 deletions(-)When the release branch is finally stable and ready for release, we should merge the release branch into the main branch and create a tag. The name of this tag should be consistent with the version number (generally starting with V). Finally, merge the release branch into the develop branch, i.e., bring all changes into the next version.
The command to merge the release branch into the main branch is:
$ git checkout main
Switched to branch 'main'
$ git merge --no-ff release-1.2
Merge made by recursive.
(Summary of changes)
$ git tag -a 1.2
$ git checkout develop
Switched to branch 'develop'
$ git merge --no-ff release-1.2
Merge made by recursive.
(Summary of changes)
Finally, given that all changes on the release branch have been merged into main and develop, there is no need to keep it anymore. Now we should delete this branch:
$ git branch -d release-1.2
Deleted branch release-1.2 (was ff452fe).3.3. Hotfix Branches
Hotfix branches are branched from the main branch to fix online bugs. When the fix is complete, it needs to be merged back into the main branch and the develop branch. Branch names generally use hotfix-*.
The main role of hotfix branches is to ensure that developers on the develop branch are not affected, while others can quickly fix online bugs. The specific operation commands are similar to the previous examples, so we will not elaborate here. However, it is worth reminding that we must also assign a version number and create a tag for hotfixes.
If a release branch already exists during a hotfix, should the hotfix be merged back into the develop branch or the release branch? The answer is the release branch. If the hotfix is merged into the develop branch, this hotfix will only be released with the next version, which is unreasonable. Therefore, the hotfix should be merged into the release branch, and eventually, it will be merged into the develop branch as the release branch merges into develop, ensuring it enters subsequent versions.
The following figure demonstrates the flow of changes in hotfixes between branches:
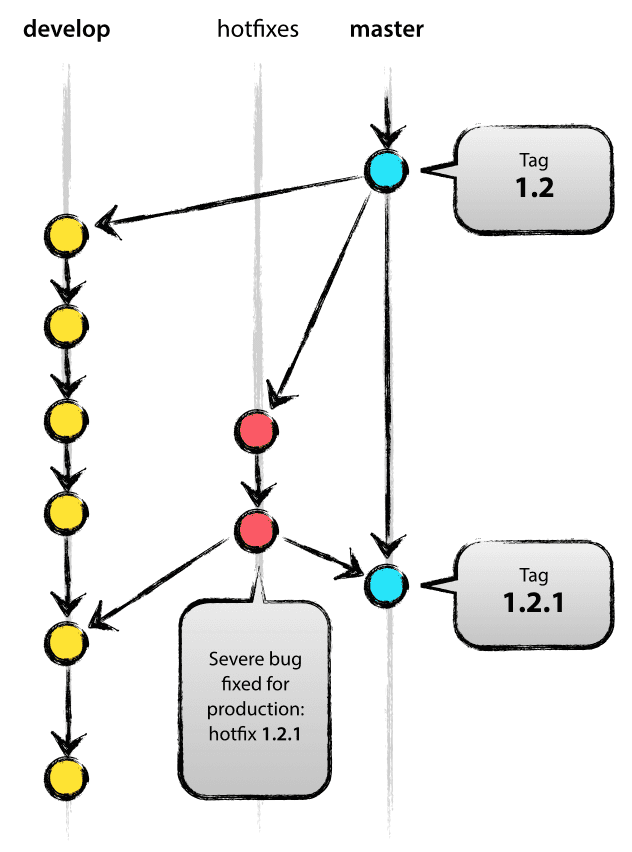 {width="50%"}
When introducing the content of this section, we referred more to Vincent Driessen’s blog article 《A successful Git branching model》. This article is a classic work on Git branching models, and readers are advised to do extended reading. The gitflow tool developed by Vincent Driessen is an extension of Git, used to implement the above workflow, and its installation and use are also recommended.
4. Advanced Operations in Git
4.1. Branch Merging and 3-Way Merge
In the branch management section, we mentioned the concept of merge (branch merging), but we did not specifically discuss how to operate. In this section, we will use the release of a hotfix as an example to introduce branch merging and 3-way merge operations.
Suppose our product has already released version 1.1, and the team is now developing version 1.2. During development, a serious bug was found in the online version (numbered 533 in the tracker system) that needs to be fixed immediately. According to the Gitflow model, we should branch out a hotfix_533 branch from the main branch, fix the bug, and then merge it back into the main branch and the develop branch.
The following figure shows the state diagram of related branches when the hotfix_533 branch is created:
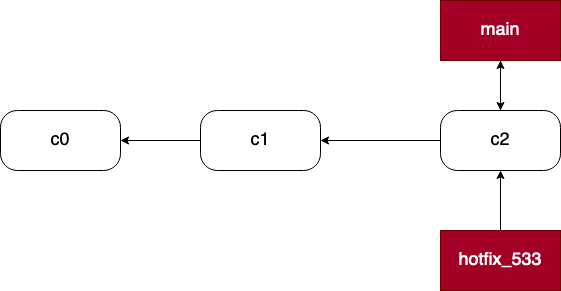
After we fix this bug, a new commit is generated, denoted as c3, with its parent node being c2. This commit occurs on the hotfix_533 branch, so we must also merge it back into the main branch. Suppose that while fixing issue 533, a new bug was found online, denoted as issue 534. This hotfix was completed earlier, generating a commit denoted as c4, which has already been merged into the main branch. At this time, the state diagram of related branches is shown in Figure 8-12:
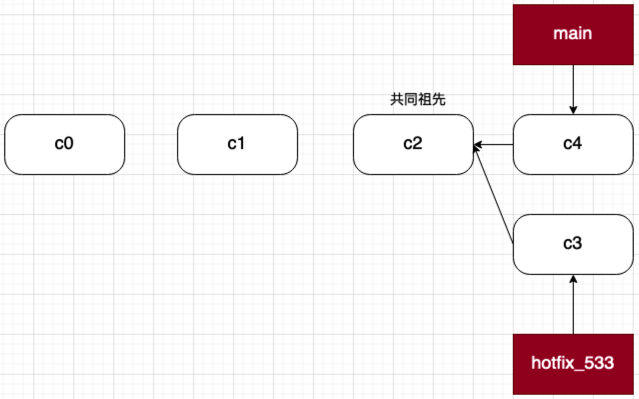
If commits c4 and c3 do not conflict with each other (e.g., modifying different files, or even if modifying the same file, but modifying different lines), Git can generally merge directly. If they conflict, we need to manually resolve the conflicts.
Let’s first look at the case without conflicts. In the previous examples, we demonstrated using Git’s native commands via the command line. But from now on, we may use graphical interfaces more often for examples and mention the Git commands happening behind the scenes.
First, we merge c4 from the hotfix_534 branch back into the main branch. We need to switch to the main branch first, then move the mouse to the hotfix_534 entry in the interface below, and right-click to bring up the context menu, as shown in the figure below:
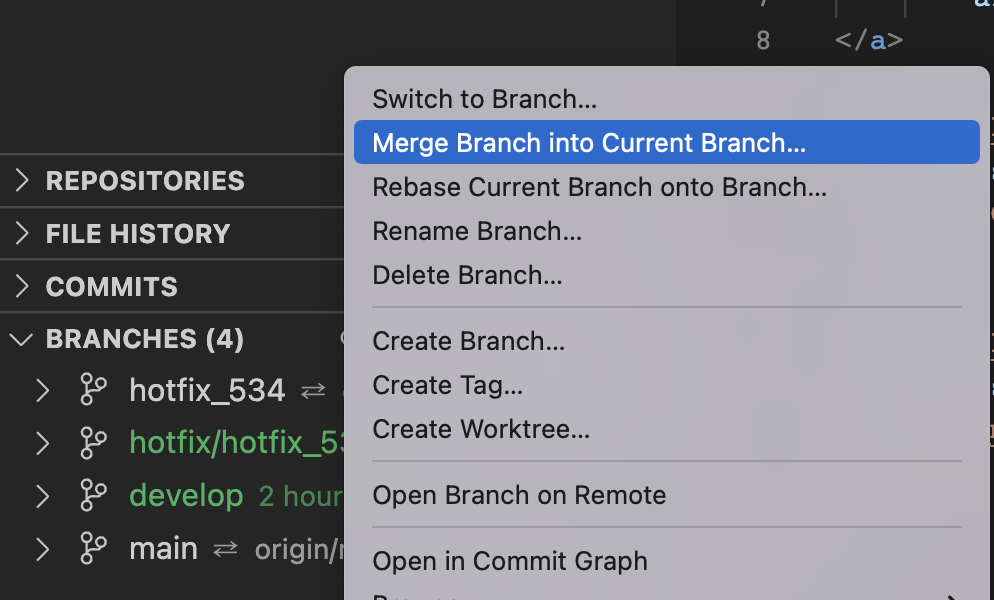
Clicking "Merge into current branch," in the following dialog box, select "Merge" (the corresponding command is git merge), as shown in the figure below:
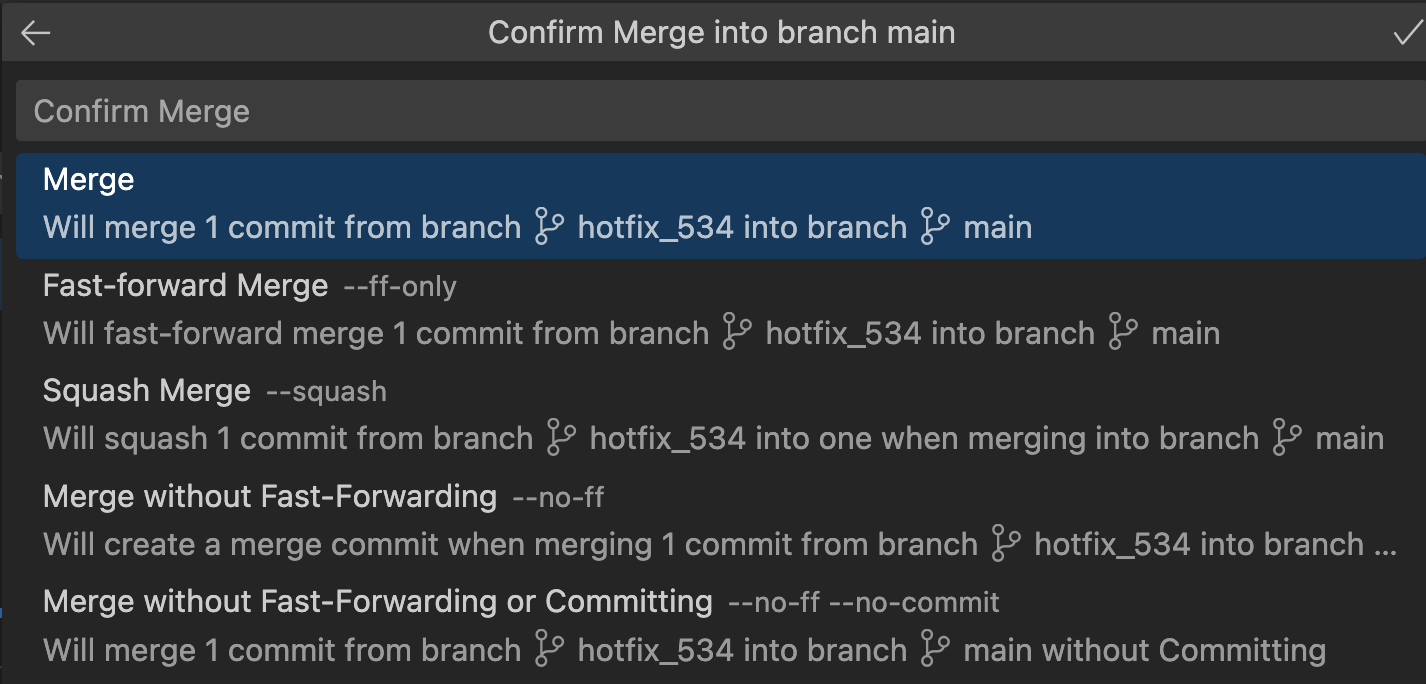
In the previous examples, we generally used git merge --no-ff. In this example, we used git merge. This is because hotfixes belong to short-lived branches. If we are working on the develop branch, we should use git merge --no-ff, so as to preserve the history record of the develop branch. If you want to customize different default behaviors for merge actions for different branches, you can achieve this by modifying the gitconfig file. Interested readers can research this on their own.
What if c4 and c3 conflict with each other? This situation is called a 3-way merge, and we need to manually resolve conflicts. Starting from VSCode 1.69, VSCode provides a 3-way merge editor, greatly facilitating merging and finally filling the biggest gap between it and PyCharm.
We need to turn on the corresponding switch in the VSCode settings:

Executing the merge again at this time, we will see the following interface:
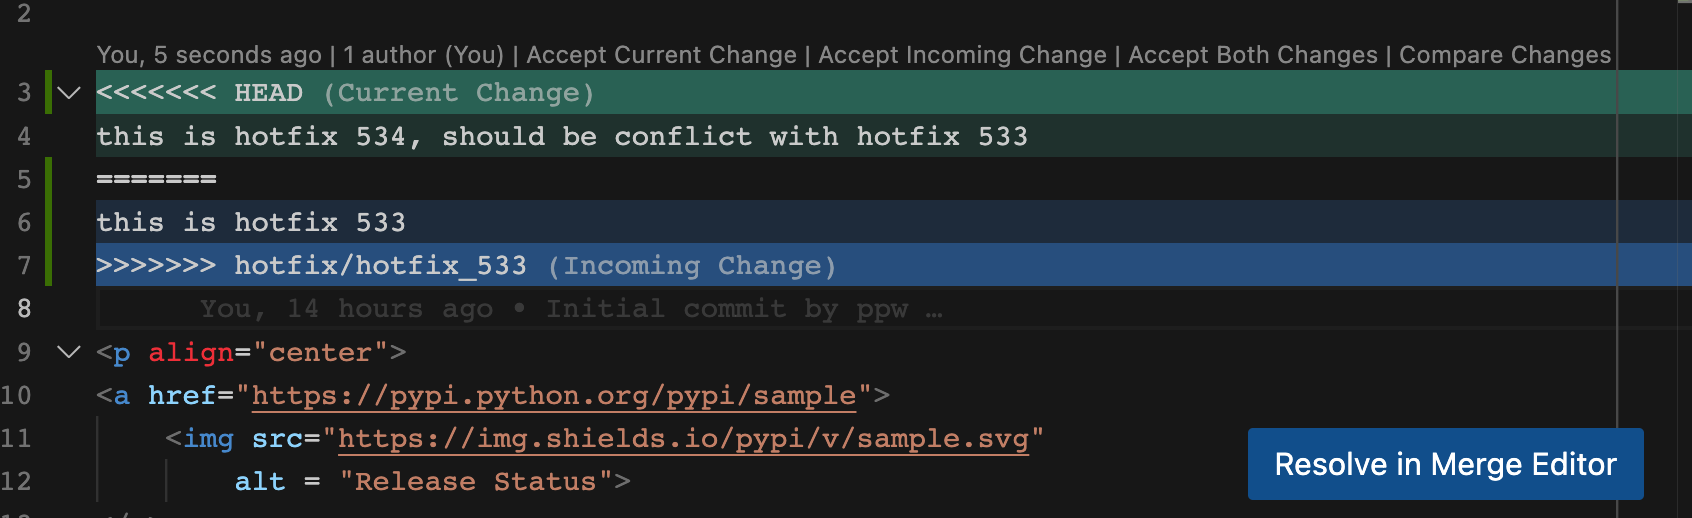
We click the "Resolve in Merge Editor" button:
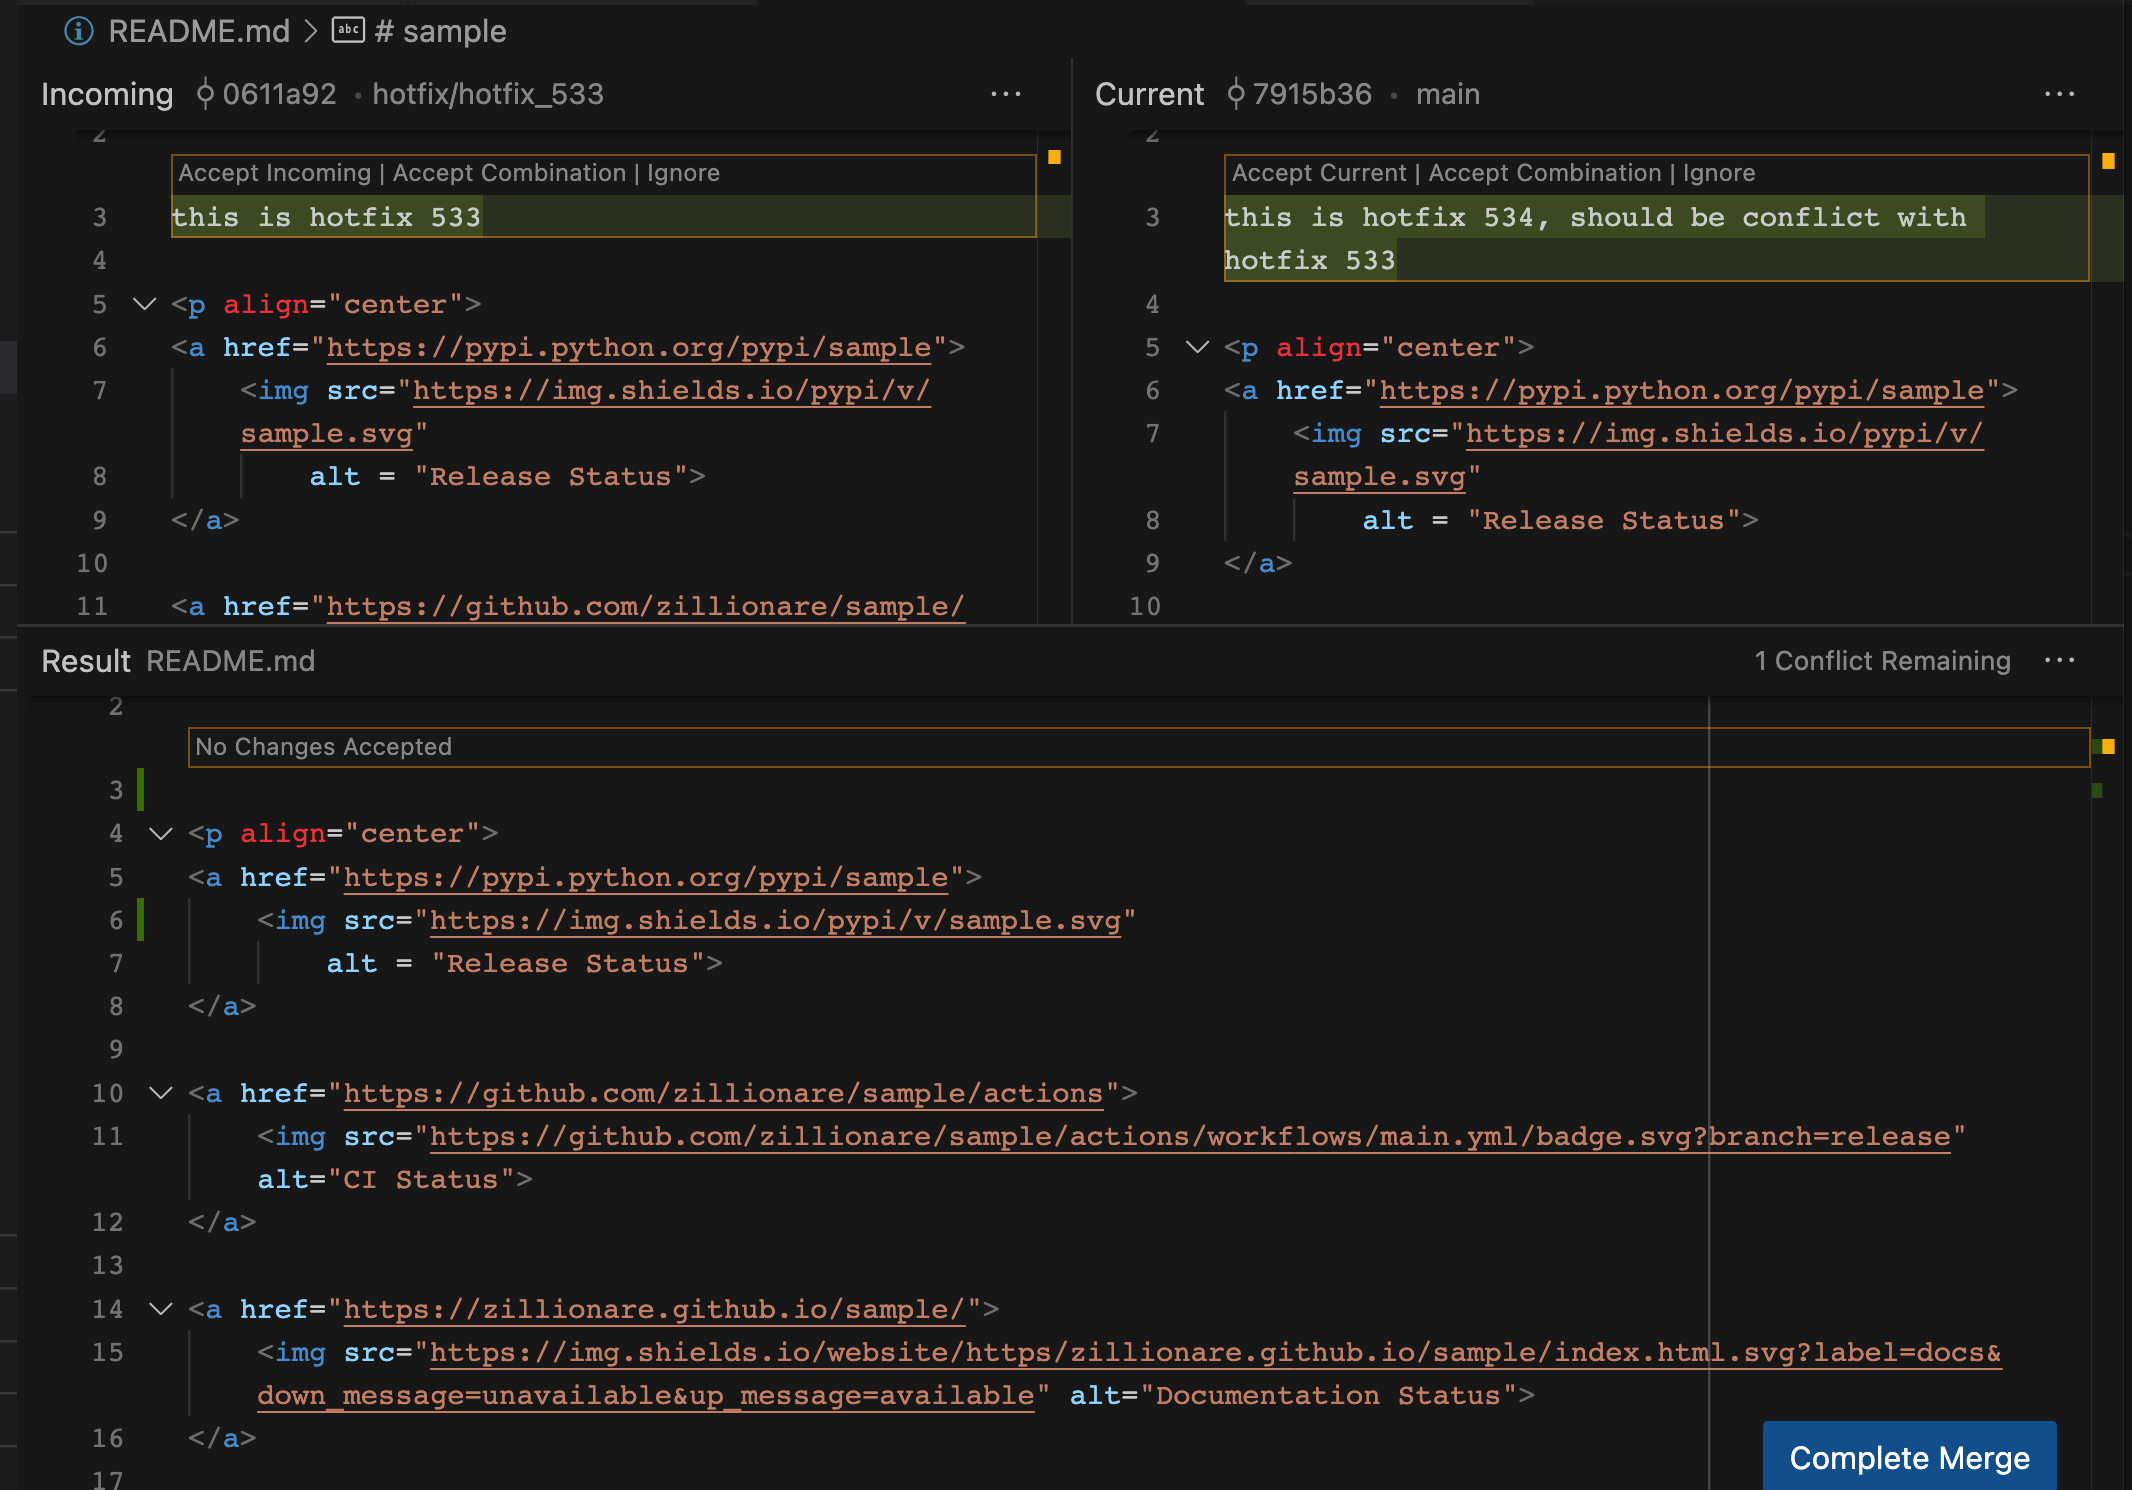
The left side is the hotfix_533 branch, and the right side is the main branch, with two changes conflicting with each other. If we accept hotfix_533, we can click the "Accept Incoming" button at the top. If we accept the main branch, we can click the "Accept Current" button at the bottom. If we want to keep the changes from both branches, we can click the "Accept Combination" button in the middle to keep both modifications simultaneously. We can also reject both modifications entirely, in which case we only need to edit the corresponding line in the result window below (line 3 in the figure).
After all conflicts in a file are resolved, click the "Complete Merge" button to close the editor and complete the merge.
4.2. Rebase
Rebase is another way to merge branches. The purpose of rebase is to move the changes of one branch onto another branch. Suppose we have the following state:
If we use the git merge method to merge, we will get the following figure:
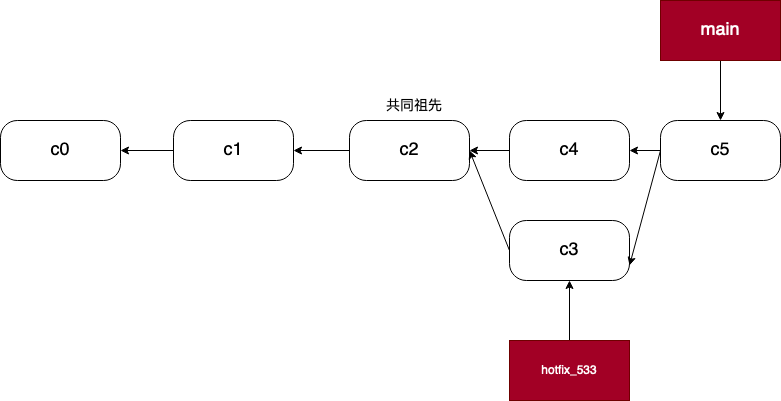
We can also perform a rebase operation on hotfix_533, changing the parent node of c3 from c2 to c4:
$ git checkout hotfix_533
$ git rebase main
First, rewinding head to replay your work on top of it...
Applying: added staged commandRebase is more like an operation replay. It re-executes all commits after c2 (the common ancestor) on the main branch on the hotfix_533 branch, and then applies c3 on this basis. Finally, we merge the hotfix_533 branch back into main. Figure 8-20 reflects the changes on both branches and the final state:
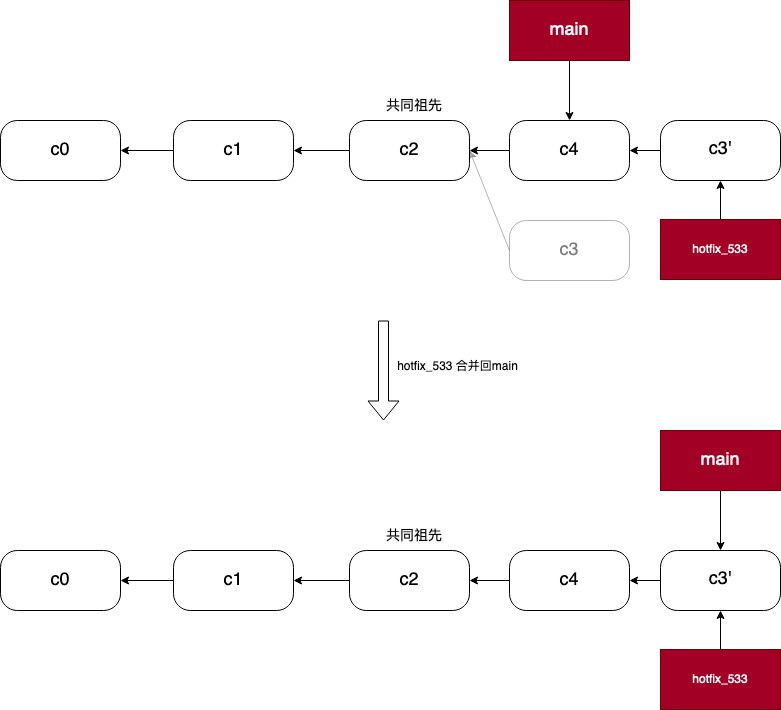
Compared to not using rebase, after performing rebase, the branch history will not fork, making the branch history clearer.
At this point, we have introduced both rebase and merge for code merging. You must be wondering which method is better and when to use each method? In fact, regardless of which method is used, the final state of the code must be consistent; the difference is only in the commit history.
One view holds that the commit history of a repository is a record of what actually happened. It is a document against history, having value in itself, and cannot be changed arbitrarily. From this perspective, changing the commit history is a desecration; you use lies to cover up what actually happened. What if the commit history produced by merging is a mess? Since the fact is so, these traces should be preserved for future generations to consult.
Another view is exactly the opposite. They believe that commit history is what happened during the project process. No one publishes the first draft of a book; software maintenance manuals also need repeated revisions to be convenient to use. People holding this view will use rebase to write stories, writing in whatever way is convenient for later readers.
Now, let’s return to the previous question: is merging or rebasing better? There is no simple answer. Git is a very powerful tool that allows you to do many things to commit history, but the needs of each team and each project are different. Since you have learned the usage of both respectively, I believe you can make wise choices based on actual situations.
However, we must emphasize that rebase is an advanced operation. Under some complex commit combinations (e.g., when multiple people collaborate on development, and someone rolls back a pushed commit), using rebase may lead to unexpected results. Therefore, before you deeply understand the working principles of rebase, you can also just use merge.
4.3. Branch Comparison: git diff
Before performing code merging, we often compare different branches to understand the differences between two branches. It also helps us discover which merge conflicts exist before merging.
Git provides the git diff command to compare the differences between two branches. Moreover, it can also compare the differences between two commits. We will briefly introduce some usage of git diff on the command line, then jump to the graphical interface. After all, graphical interfaces can display more information.
When calling Git diff, obviously we need to provide it with the branch names to be compared. Here there are so-called two-dot syntax and three-dot syntax. The former directly compares two branches; the latter introduces the common ancestor for comparison together.
# 使用两点语法时,显示的是在后一个分支上,而不在前一个分支上的提交
$ git diff branch1..branch2
diff --git a/file-feature b/file-feature
new file mode 100644
index 0000000..add9a1c
--- /dev/null
+++ b/file-feature
@@ -0,0 +1 @@
+this is a feature file
# 使用三点语法,显示的是自共同祖先以来的所有提交的去同子集
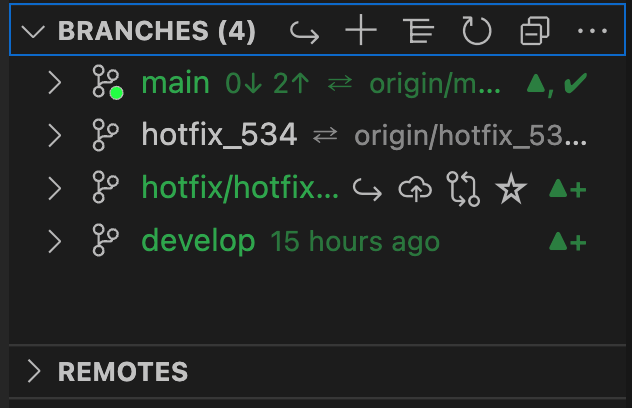
$ git diff branch1...branch2Now, let’s see how to compare two branches in the Git Lens extension. First, we select the two branches to be compared in the menu below (Figure 8-21):
Then we find the comparison results under the "Search & Compare" panel:
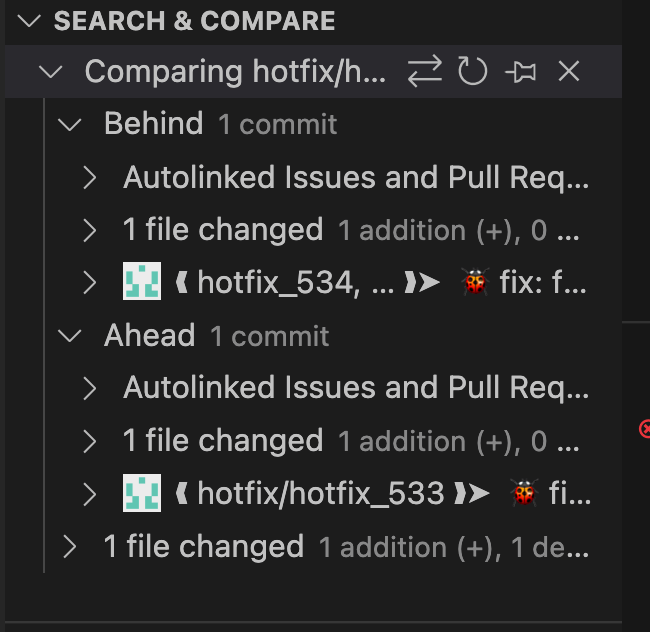
Note that after the "Comparing hotfix/..." string, there is a swap icon. It is used to swap the order of the two branches in the two-dot syntax of git diff. To view changes in file content, you can find the changed file name in the drop-down menu of "1 file changed," and clicking it will allow you to browse the specific changes.
4.4. Reset and Checkout
We have already encountered the checkout command earlier. Here we introduce another similar command, namely reset.
To understand the reset command, we need to review Git’s three-tree model, i.e., the working area, staging area (index), and HEAD. The role of the reset command is to point the current branch to a certain commit, while resetting the staging area and working area to make them consistent with the specified commit.
Suppose we have the following commit history:
$ git log --oneline
59b6711 (HEAD -> main) test reset
4699b9e (origin/main, develop) Initial commit by ppw
$ git status
git status
On branch main
Your branch is ahead of 'origin/main' by 1 commit.
(use "git push" to publish your local commits)
nothing to commit, working tree cleanWe can see that there is currently 1 unpushed commit, i.e., 59b6711. Now, we can also reset this commit:
# 重置到上一个提交。注意,这里的 HEAD~表示上一个提交,我们也可以用提交的 HASH 串
$ git reset --soft HEAD~
$ git status
On branch main
Your branch is up to date with 'origin/main'.
Changes to be committed:
(use "git restore --staged <file>..." to unstage)
modified: README.mdNow, you will see the README.md file appearing under the "Staged Changes" category in the "SOURCE CONTROL" panel of the VSCode sidebar. This is equivalent to canceling the commit operation.
Now let’s commit README.md again, then execute the reset command:
$ git reset --mixed HEAD~This time, we use the mixed parameter. We will see the README.md file appearing under the "Changes" category, equivalent to canceling the commit and add operations.
If we use the --hard parameter to execute reset, then we will also cancel the file changes themselves:
$ git reset --hard HEAD~If we do not bring any parameters, reset will execute a mixed operation.
If we execute reset operations from the graphical interface, it is roughly divided into these steps. First, we find the COMMITS panel, then find the commit to be reset, click it, and select the "undo commit" operation, which is equivalent to executing a "reset --soft HEAD~" operation.
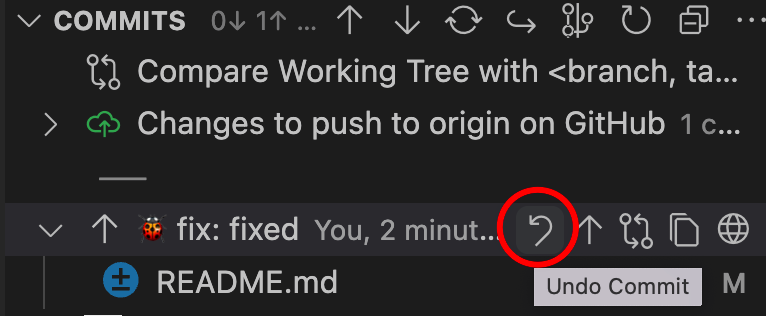
If we also want to cancel the "stage" operation (i.e., undo add), we can find staged changes in the "SOURCE CONTROL" panel, then click the "unstage all changes" button. The same operation can also be applied to files under the "Changes" category, so we will not elaborate here.
4.5. Gutter Change
When we introduced stash operations earlier, we stashed entire files as units. However, sometimes we might need to add a certain file in several different batches. This command is called interactive staging in Git. Executing it via the command line is cumbersome. Here we introduce the gutter change function in Git Lens, as shown in the figure below:

Gutter change refers to the line indicator on the right side of the line number indicator in the editing area, as shown in the figure above. When you click this line, a window will pop up, displaying the change history of the current area, and allowing you to roll back or commit only these lines of changes.
5. Who Introduced the Error: How to Trace Code Changes (Case Study)
Suppose a group of people are jointly developing a feature, and one person submits incorrect code. This incorrect code is merged into the main branch, causing an online fault. After an emergency fix version is released, the problem is fixed. After a period of time, the team decides to hold a post-mortem meeting, hoping to know how the error was introduced and how to draw inferences from one instance to avoid similar errors in the future.
Usually, if the incorrect code is still in the current code, obviously we just need to use git blame to know who submitted it. If Git Lens is installed, you only need to move the mouse to the end of that line of code, and Git Lens will display the commit history of that line of code, as shown in the figure below:
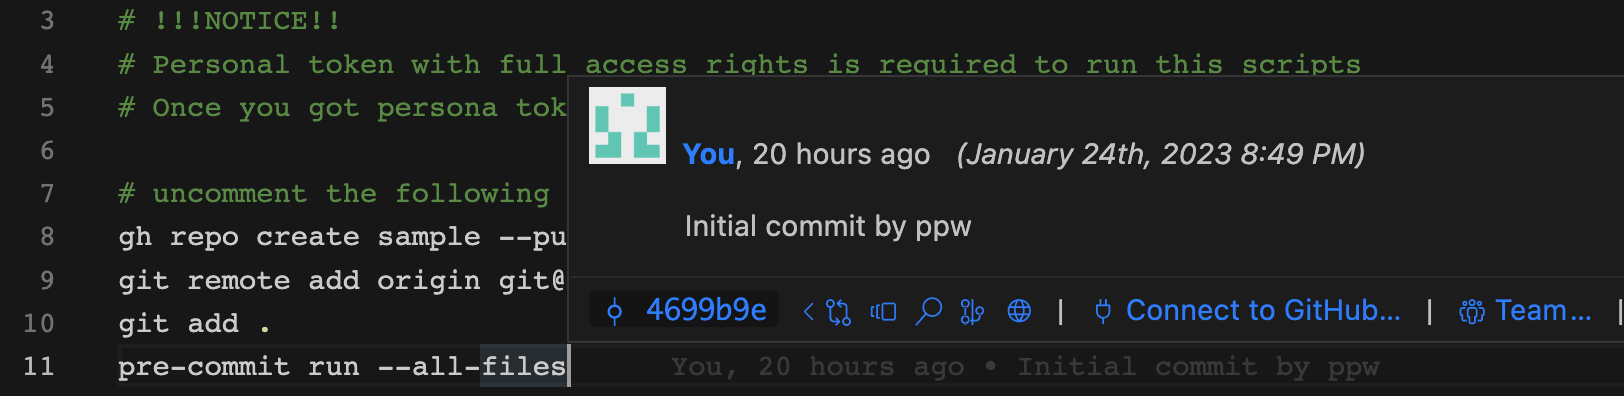
However, since we have already fixed that incorrect code and some time has passed, that segment of code has been deleted from the code. Now, the only clue is that we only know that a certain incorrect string caused this bug. So, how do we search via this string?
The answer is the git log command + git blame command.
$ git log -S "hotfix 533" -p --all
commit 8e24fd76282a9e876fe3ceed4e95908d4d4300fd (HEAD -> main)
Author: aaron yang <aaron_yang@jieyu.ai>
Date: Wed Jan 25 20:18:30 2023 +0800
test
diff --git a/README.md b/README.md
index 8a5ccfb..909d4f6 100644
--- a/README.md
+++ b/README.md
@@ -1,5 +1,6 @@
# SAMPLE
+this is hotfix 533
<p align="center">
<a href="https://pypi.python.org/pypi/sample">
commit e5cb519e57d131f23acea92fe46f39a21319a570 (origin/hotfix_534, hotfix_534)
Author: aaron yang <aaron_yang@jieyu.ai>
Date: Tue Jan 24 20:58:02 2023 +0800
🐞 fix: fix
diff --git a/README.md b/README.md
index 8a5ccfb..2539c76 100644
--- a/README.md
+++ b/README.md
@@ -1,5 +1,6 @@
# SAMPLE
+this is hotfix 534, should be conflict with hotfix 533
There are two commits containing the string "hotfix 533." We are more concerned about who introduced the changes in commit 8e24. So we use the git blame command to view the change history of that commit:
$ git blame
8e24fd76 (aaron yang 2023-01-25 20:18:30 +0800 3) this is hotfix 533The parentheses show the commit author and commit time of that line of code. Next, we will go ask him what his considerations were when introducing that line of code at that time.
6. GitHub and GitHub CLI
GitHub is an online software source code hosting service platform, using Git as its version control software, written by developers Chris Wanstrath, P. J. Hyett, and Tom Preston-Werner using Ruby on Rails. GitHub started on October 1, 2007, and officially went online in April 2008. In 2018, GitHub was acquired by Microsoft.
Besides allowing individuals and organizations to perform version management, GitHub also provides certain social features, including allowing tracking (follow) of other users, organizations, and software library dynamics, and commenting on software code changes and bugs. GitHub also provides charting features to display how developers work on code repositories and the development activity of software.
info
According to statistics, over 95% of GitHub users are male, so GitHub is often jokingly referred to by netizens as "Gayhub," the world's largest same-sex social networking site.Besides serving as a Git hosting service platform, GitHub also provides GitHub Pages web hosting services (can host static web pages, including blogs, project documentation, and even entire books); Codespaces online development environments and GitHub Actions CI services.
The web version features of GitHub are left for readers to explore themselves. Here we mainly explain the functions and usage of GitHub CLI.
Besides the web interface, GitHub also provides some REST-style APIs for everyone to use. The currently available API version is called V3. Through these APIs, we can manage repositories, access users, build and trigger CI, manage issues, etc.
These APIs allow us to complete the above functions via curl. GitHub also developed a command-line tool, GitHub CLI, abbreviated as gh, based on these APIs.
6.1. Installation
To install gh on Mac, you can use brew:
$ brew install ghTo install on Linux and BSD, if it is Debian, Ubuntu Linux, Raspberry Pi OS, or other systems based on apt, you can use apt:
type -p curl >/dev/null || sudo apt install curl -y
curl -fsSL https://cli.github.com/packages/githubcli-archive-keyring.gpg | sudo dd of=/usr/share/keyrings/githubcli-archive-keyring.gpg \
&& sudo chmod go+r /usr/share/keyrings/githubcli-archive-keyring.gpg \
&& echo "deb [arch=$(dpkg --print-architecture) signed-by=/usr/share/keyrings/githubcli-archive-keyring.gpg] https://cli.github.com/packages stable main" | sudo tee /etc/apt/sources.list.d/github-cli.list > /dev/null \
&& sudo apt update \
&& sudo apt install gh -yIf it is Fedora, CentOS, Red Hat Enterprise Linux, or these operating systems, you can use dnf:
$ sudo dnf install 'dnf-command(config-manager)'
$ sudo dnf config-manager --add-repo https://cli.github.com/packages/rpm/gh-cli.repo
$ sudo dnf install ghIf your operating system is not in this list, you can refer to the article installing gh on Linux and BSD.
If it is Windows, you can install via package management tools like winget, scoop, Chocolatey, or directly download the installation package to install.
Finally, if you have installed conda on all operating systems, you can also install via conda:
$ conda install -c conda-forge gh6.2. Main Commands of GitHub CLI
The main commands of GitHub CLI are:
auth: 完成 gh 和 git 在 github 上的鉴权
codespace: 连接并管理 codespace
gist: 管理 gists,主要是增删改查的一些动作
issue: 管理 issue,包括查看、编辑、评论、关闭和重新打开、移交等 16 个子命令
pr: 管理 pull request,包括 checkout, close, diff, edit 等 16 个子命令
release: 管理版本发布,包括增删改查等 8 个子命令
repo: 管理存储库,包括克隆、创建、删除、同步等 15 个子命令
run: 查看、列出、监控最近执行的 Github actions
workflow: 列出、查看、启用和停止定义中的 workflow。与 run 相比,相当于程序与进程的关系。
alias: 管理命令别名,或者说是命令的快捷方式
config: gh 的设置命令
extension: 管理 gh 的扩展
label: 管理仓库中跟 issue 相关的标签。
search: 搜索仓库,issue 和 pr。用法举例:搜索 python 主题下点赞数最多的仓库。
secret: 管理跟仓库关联的一些机密信息
ssh-key: 管理 ssh 秘钥
status: 显示本账号关联的 issue,pr 状态和最近的活动In addition to the above commands, we also need to specifically introduce the api command. It can be used to initiate a GitHub API request. Since gh is already authenticated, this request can be made without authentication. The commands supported by gh are limited. Through the api command, we can extend gh. For example, to get the GitHub user list:
$ gh api users
[
{
"login": "mojombo",
"id": 1,
"node_id": "MDQ6VXNlcjE=",
"avatar_url": "https://avatars.githubusercontent.com/u/1?v=4",
"gravatar_id": "",
"url": "https://api.github.com/users/mojombo",
"html_url": "https://github.com/mojombo",
"followers_url": "https://api.github.com/users/mojombo/followers",
"following_url": "https://api.github.com/users/mojombo/following{/other_user}",
"gists_url": "https://api.github.com/users/mojombo/gists{/gist_id}",
"starred_url": "https://api.github.com/users/mojombo/starred{/owner}{/repo}",
"subscriptions_url": "https://api.github.com/users/mojombo/subscriptions",
"organizations_url": "https://api.github.com/users/mojombo/orgs",
"repos_url": "https://api.github.com/users/mojombo/repos",
"events_url": "https://api.github.com/users/mojombo/events{/privacy}",
"received_events_url": "https://api.github.com/users/mojombo/received_events",
"type": "User",
"site_admin": false
},
{
"login": "defunkt",
"id": 2,
"node_id": "MDQ6VXNlcjI=",
"avatar_url": "https://avatars.githubusercontent.com/u/2?v=4",
"gravatar_id": "",
"url": "https://api.github.com/users/defunkt",
"html_url": "https://github.com/defunkt",
"followers_url": "https://api.github.com/users/defunkt/followers",
"following_url": "https://api.github.com/users/defunkt/following{/other_user}",
"gists_url": "https://api.github.com/users/defunkt/gists{/gist_id}",
"starred_url": "https://api.github.com/users/defunkt/starred{/owner}{/repo}",
"subscriptions_url": "https://api.github.com/users/defunkt/subscriptions",
"organizations_url": "https://api.github.com/users/defunkt/orgs",
"repos_url": "https://api.github.com/users/defunkt/repos",
"events_url": "https://api.github.com/users/defunkt/events{/privacy}",
"received_events_url": "https://api.github.com/users/defunkt/received_events",
"type": "User",
"site_admin": false
},
...
]6.3. GitHub CLI Application Examples
GitHub CLI can conveniently perform some automated operations on accounts and repositories. In the project created by ppw, there is a script named repo.sh, which uses GitHub CLI.
After ppw generates the framework code, we need to submit it to GitHub. Since this repository does not yet exist on GitHub, we must wait for the user to create it manually, so this submission cannot be automated. When we use GitHub CLI, this problem is solved:
# 调用 GH 命令创建仓库
$ gh repo create sample --public
# 由于仓库是 GH 创建的,因此脚本就知道远程服务器 URL
$ git remote add origin git@github.com:zillionare/sample.git
$ git remote add origin git@github.com:zillionare/sample.gitAdditionally, setting some secret information for repositories via GitHub’s web interface is cumbersome and time-consuming. Suppose you manage more than 10 repositories and need to regularly change these secret information; it is even more so. We can solve this problem via the gh secret command. The following code is excerpted from repo.sh:
gh secret set PERSONAL_TOKEN --body $GH_TOKEN
gh secret set PYPI_API_TOKEN --body $PYPI_API_TOKEN
gh secret set TEST_PYPI_API_TOKEN --body $TEST_PYPI_API_TOKEN
gh secret set BUILD_NOTIFY_MAIL_SERVER --body $BUILD_NOTIFY_MAIL_SERVER
gh secret set BUILD_NOTIFY_MAIL_PORT --body $BUILD_NOTIFY_MAIL_PORT
gh secret set BUILD_NOTIFY_MAIL_FROM --body $BUILD_NOTIFY_MAIL_FROM
gh secret set BUILD_NOTIFY_MAIL_PASSWORD --body $BUILD_NOTIFY_MAIL_PASSWORD
gh secret set BUILD_NOTIFY_MAIL_RCPT --body $BUILD_NOTIFY_MAIL_RCPTIn projects generated by ppw, when CI runs, it needs API keys for PyPI and Test.PyPI, API keys for GitHub when publishing documentation, and when CI completes, it needs to send email notifications, requiring configuration of relevant server information, sender, recipient information, and other sensitive information.
Through the above script, we import environment variables from the current host into the repository’s secret information, so that they can be directly used in GitHub Actions. In this process, we ensure both convenience and the security of secret information.