
Connecting Home Servers from Starbucks Over IPv6
Our course environment runs on a cluster with 256GB of RAM and 192 CPU cores, which students access through a browser. Renting equivalent capacity from a major cloud provider isn't cheap. So we kept the servers in the office, and in our early startup days we only had residential broadband with no public IP — so we rented a small cloud VM just for port forwarding.
With that port forwarding in place, we also set up a VPN so we could dial back into the office from home or on the road. But recently the VPN broke for no apparent reason.
Just as national policy started pushing IPv6 this year, I decided to give it a try. IPv6's biggest advantage is effectively unlimited addresses — every device can get its own public IPv6 address.
After about four hours, I had both IPv4 and IPv6 working, plus free DDNS — enough to work comfortably from Starbucks.
An unexpected bonus: my previous cloud VM only had 5 Mbps of bandwidth. With a direct IPv6 connection, performance is fantastic — our teaching site now loads instantly.
info
If your router supports IPv6 bridge mode (usually under Network or WAN settings), you may just need to enable it along with IPv6 on your optical modem and you're done. Skip straight to Section 3 to check whether you got an IPv6 address.IPv6 addresses come in public and private varieties. Public addresses start with 2, private ones start with F. If your device has an F-prefix IPv6 address, it's still not reachable from the internet.
Most newly installed residential broadband already has IPv6 enabled by default. What we actually need to do is unblock IPv6 between the ONT (fiber modem) and your own router.
This usually comes down to:
- Your router is too old and doesn't support IPv6
- IPv6 simply isn't enabled in your router settings
First, change the ONT's connection mode from PPPoE to Bridge. Once that's done, the ONT no longer acts as a router — your own router will handle the dial-up connection.
info
This step requires the super-admin password. Ask the broadband technician for your area — if you can show you know networking, they'll usually give it to you.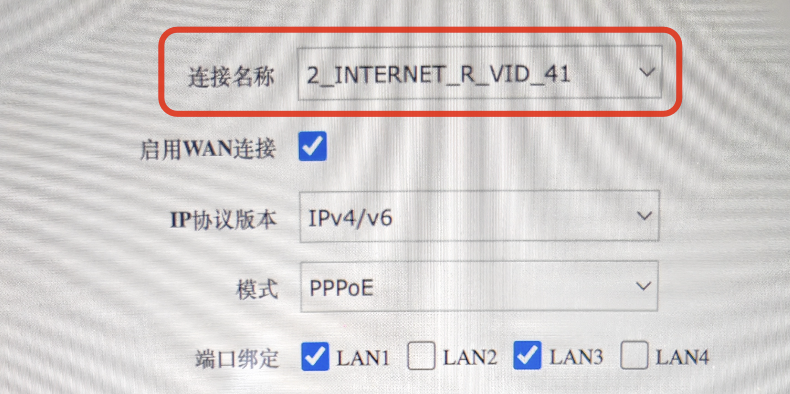
It's the connection highlighted in red that we want to modify, not the others. It's currently set to PPPoE — bridge mode is usually in that same dropdown. Also, for IP protocol version, be sure to select IPv4/IPv6.
The same dialog also shows your PPPoE username. Be sure to write down both the username and password. After switching to bridge mode, your router will establish the connection, so it will need those credentials.
The password is masked. If you don't know it, open Developer Tools in Chrome, find the password field, and remove type="password" — the password will then be revealed.
Here's my updated configuration:
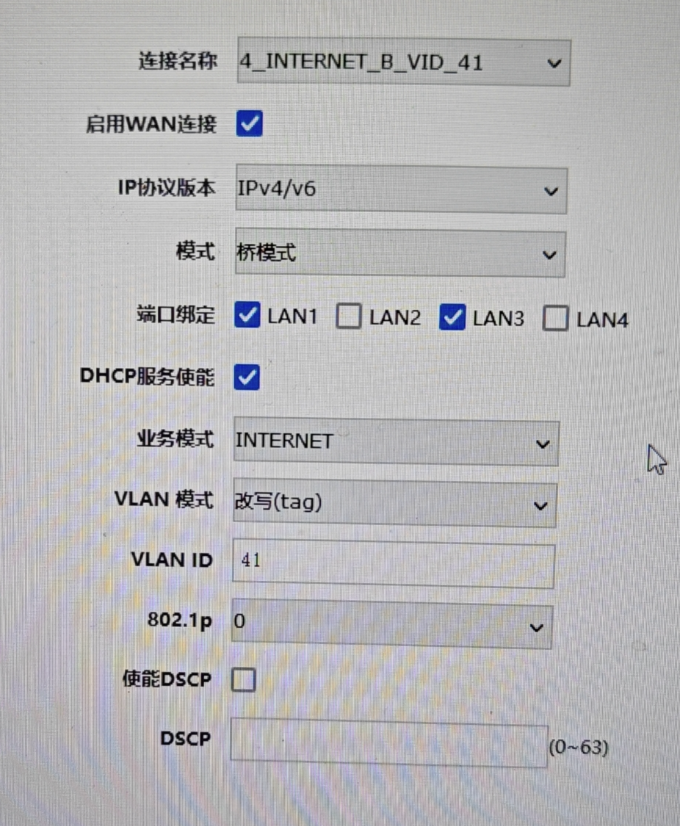
The key points are the IP protocol version and the mode — leave everything else unchanged.
Configure Your Router
notice
Note the physical connection between router and ONT. Connect the router's WAN port to the ONT's LAN port with a cable — not LAN to LAN. With LAN-to-LAN, your router won't be able to dial.In WAN settings, change the connection type to PPPoE and enter the IP address, username, and password from the ONT. If it offers separate IPv4 and IPv6 options, enable IPv6 and set it to reuse the IPv4 dial-up session. Leave everything else at defaults.
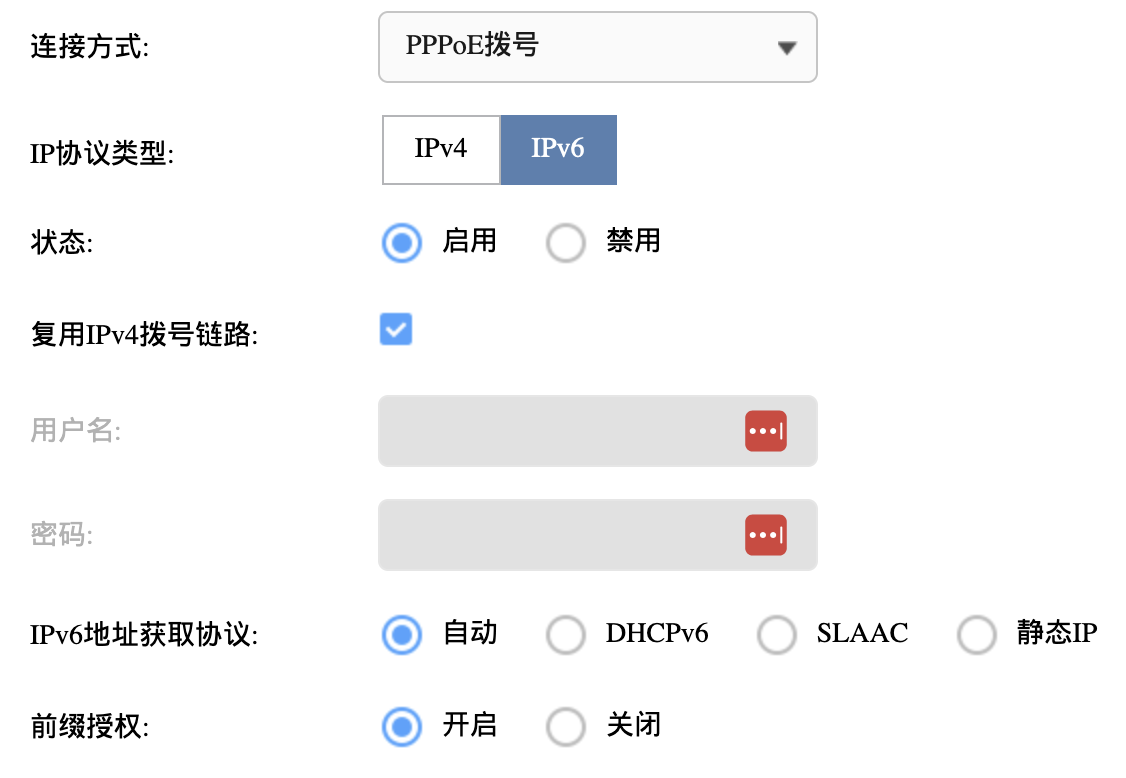
Then go to LAN settings, where we need to configure IPv6.
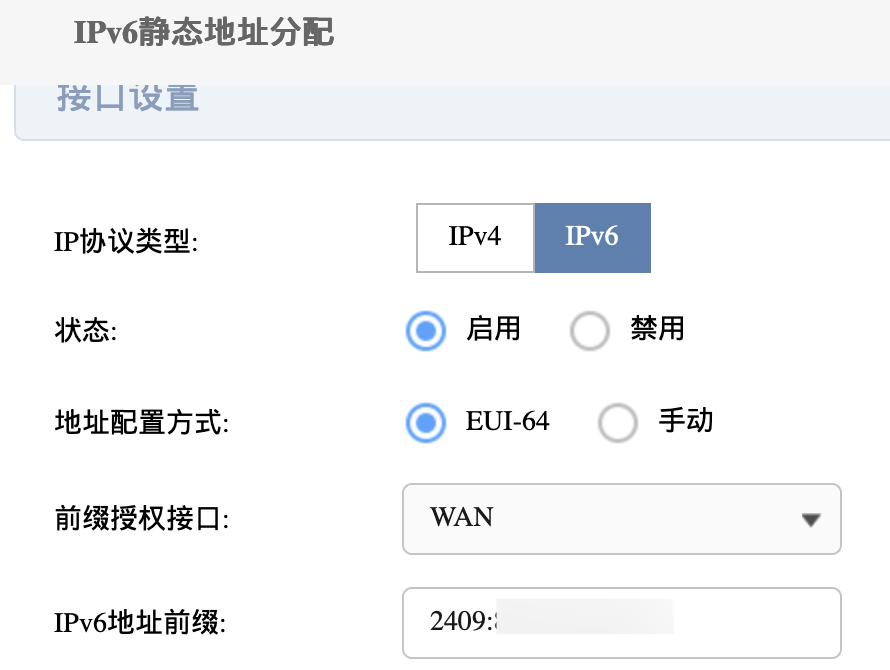
We also need to enable the DHCPv6 service and set the IPv6 address pool, and — most importantly — configure DNS:
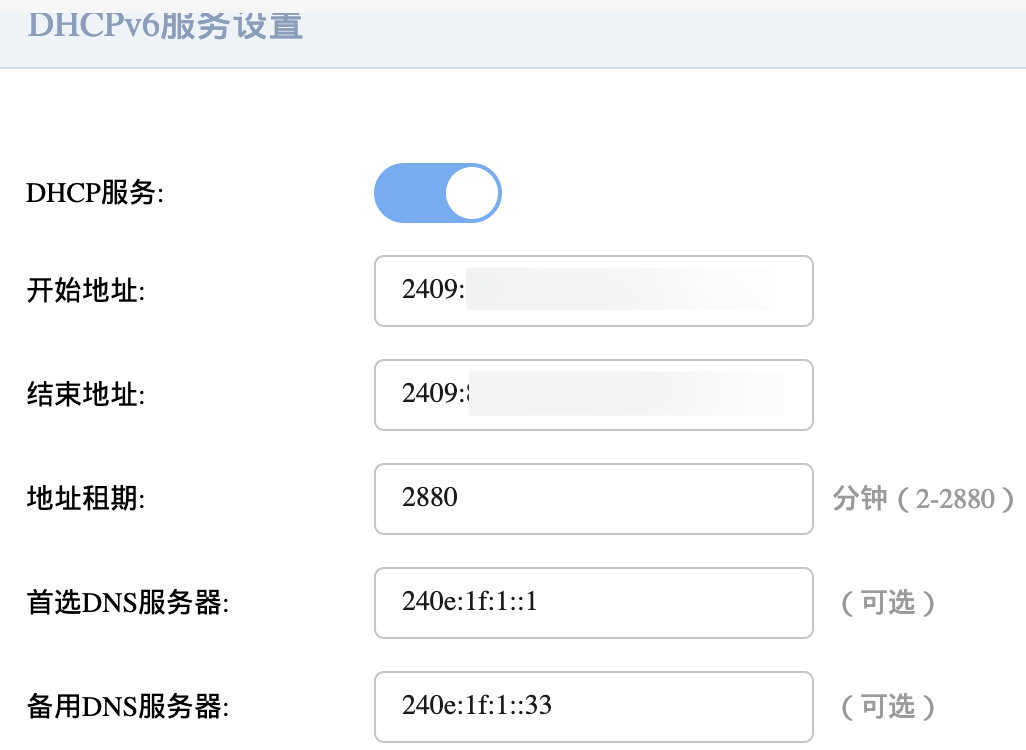
Testing for a Public IPv6 Address
The ipw.cn site offers a test service. If you prefer the command line, use:
curl 6.ipw.cnIf your machine has an IPv6 address, it will return it. If it starts with 2, it's a public IP. If it starts with F, you're still on a private address.
Check that IPv4 still works with:
curl 4.ipw.cnThis will return your IPv4 address.
If you don't like the command line, just visit the ipw.cn website in your browser. It will show your current IP address. If you're on IPv6, it will say IPv6 preferred — otherwise your setup didn't work.
Set Up DDNS
Even though public IPv6 addresses are plentiful, your ISP may still change yours from time to time. That's why we need DDNS to keep the record updated — day to day, you just use the domain name.
The easiest DDNS setup uses Cloudflare. First, you need a domain already hosted on Cloudflare. Then request an API token from the dashboard.
For DDNS, the ddns-go container works well. Install it on every device that needs to be reachable independently from the internet.
sudo docker run -d --name ddns-go --restart=always --net=host -v /opt/ddns-go:/root jeessy/ddns-goThen open http://ip:9876 to update the configuration. Since you're using an API token, you don't need to pre-create the subdomain on Cloudflare — just type the subdomain in this UI and ddns-go will create it for you.
Once configured, just check the logs to confirm.
Caveats
Don't expose plain HTTP services via your domain — your ISP may block them. Using HTTPS and ports above 40000 is said to reduce the risk.